Anyone ready for fall once the calendar turns to September? I know I’m ready to get a bit cooler temps and to enjoy being outside. That goes for my crafting, too. With the release of Stampin’ Up!’s brand-new September-December 2023 Mini Catalog, I’m loving digging into the great new products for fall, Halloween, winter, and Christmas crafting.
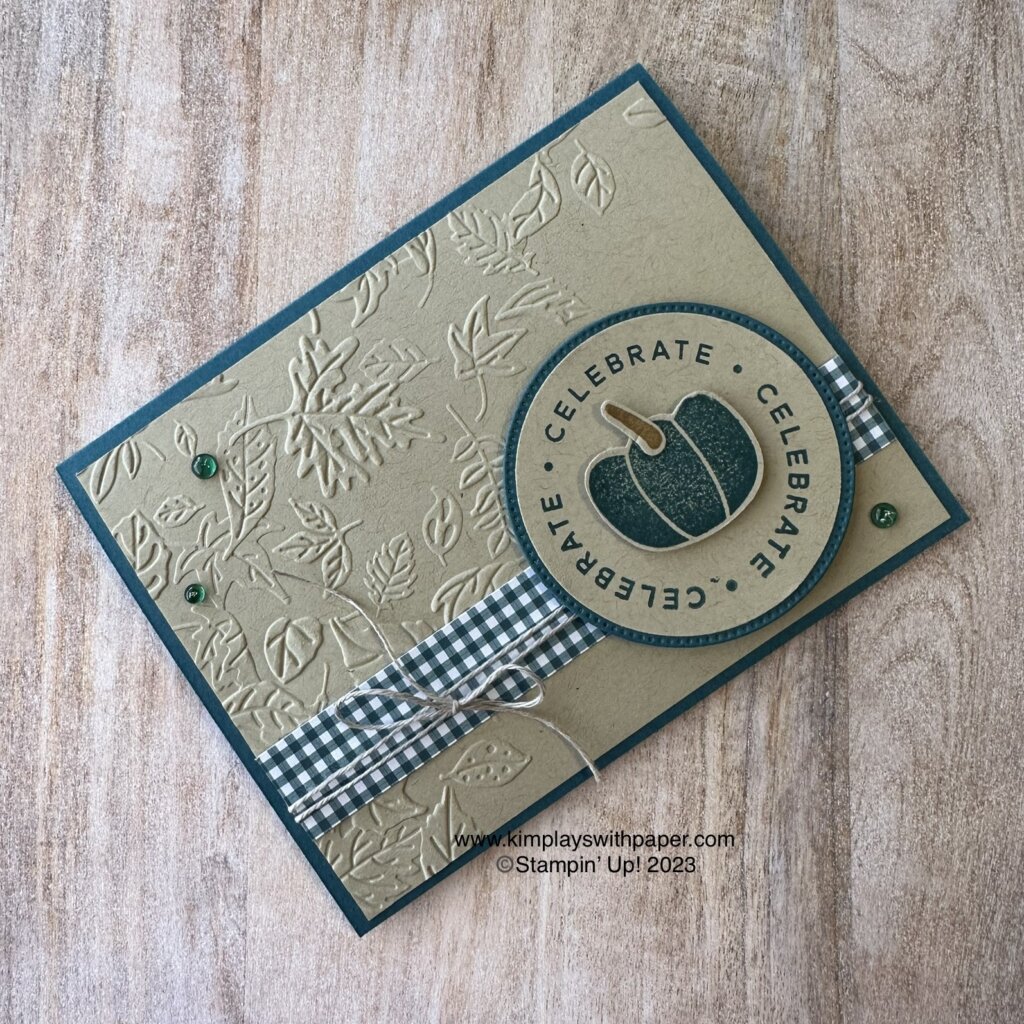
Today, I offer a free card-making tutorial created with the new Pick of the Patch Bundle. Buy the Pick of the Patch stamp set and coordinating Pick of the Patch Builder Punch as a bundle and save 10 percent. Find it on page 51 of the mini catalog.
PAPER – Pretty Peacock Cardstock (150880), Crumb Cake Cardstock (120953), Glorious Gingham 6 x 6 Designer Series Paper (DSP) (163170)
INK – Pretty Peacock (150083), Pecan Pie (161665)
OTHER –Leaf Fall 3D Embossing Folder (159847), Stylish Shapes Dies (159183), Linen Thread (104199), Tinsel Gems Four-Pack (161623), Stampin’ Seal (152813), Mini Glue Dots (103683), Multipurpose Liquid Glue (110755), Stampin’ Cut & Emboss Machine (149653)
Cutting & Scoring:
Pretty Peacock Cardstock – 8 ½” x 5 ½”, scored and folded at 4 ¼”, 3” x 3”
Crumb Cake Cardstock – 5 ¼” x 4”, 3” x 3”, and scraps
DSP (Pretty Peacock design) – 5 ¼” x ¾”
Linen Thread – 20”
Instructions:
Emboss the 5 ¼” x 4” Crumb Cake Cardstock with the Leaf Fall 3D Embossing Folder, leaving a blank space in the bottom right-hand corner.
Add the DSP to the card front, about one-quarter of the way up.
Wrap the Linen Thread around this layer and tie a bow. Add this layer to the Pretty Peacock card base.
Stamp the Celebrate circle sentiment on the 3” x 3” Crumb Cake Cardstock with Pecan Pie ink. Punch with the 2 3/8” Circle Punch. Die cut a circle from the Stylish Shapes Dies with the 3” x 3” Pretty Peacock Cardstock. Layer these two pieces.
Stamp the smaller pumpkin in Pretty Peacock ink on the Crumb Cake scrap and punch. Stamp the stem with Pecan Pie ink on a Crumb Cake scrap and punch. Add the stem to the pumpkin. Use Stampin’ Dimensionals to pop up the pumpkin in the middle of the circle.
Add Stampin’ Dimensionals to the back of the circle and add to card front in the lower right-hand corner, as shown above.
Place three Pretty Peacock gems on the card front.
Thanks so much for visiting my blog today. I hope you enjoyed this free card-making tutorial. Visit this blog post to see a fun bendy fold card using this same bundle.
Get more tutorials and paper crafting inspiration by subscribing to my free, email newsletter. Click here. Then watch your InBox for a confirmation email from AWeber. They want to be sure you wish to receive my messages.
Kim
Click on any of the pictures below to purchase the products to make this card at home.
Are you looking for a versatile stamp set and punch bundle? Stampin’ Up!’s Circle Sayings Bundle (page 17 of Stampin’ Up!’s Annual Catalog) offers a great variety of images and sentiments to cover the most common occasions. And, pair it with other images in your stash, and the possibilities are endless.
In today’s post, I continue my Christmas in July series using the Circle Sayings Bundle which includes the Circle Sayings stamp set and teh 2 3/8″ Circle Punch. (Buy them as a bundle and save 10 percent.) The first card includes a sentiment from the Brightest Glow stamp set. And, believe it or not, the sentiments are not heat embossed with gold. They are stamped with Stampin’ Up!’s new In Color, Wild Wheat. I love how Wild Wheat looks like gold; it’s a must-have color for fall and winter crafting.
Circle Sayings Christmas Cards
All the Christmas card samples featured in this post use the same basic ingredients. I changed the image/sentiment within the circle with current products.
Very Vanilla Thick Card Stock base measures 8 1/2 x 5 1/4 scored and folded at 4 1/4
Very Vanilla Card Stock layer measures 5 1/4 x 4 and embossed with the Merry Melody 3D Embossing Folder
Gold Foil strip measures 4 x 3/4
Circle from Stylish Shapes Dies cut in Gold Foil
Gold and Vanilla 3/8″ Satin Edged Ribbon
Jewels: either Adhesive-Backed Sparkle Gems or Festive Pearls
The card above uses a star die cut with Gold Foil from the Beautiful Balloons Dies.
The cards above and below use the snowflake from the Season of Chic stamp set and Chic Dies.
Circle Sayings Class to Go
I’ve started offering classes to go that contain a zoon/video option. The August class features the Circle Sayings Bundle. Click here to read a post that contains all of the information about this fun class. I hope you can join me!
How-To Video
Thanks so much for visiting my blog today. Are you inspired to to start creating your homemade holiday cards?
Kim
Click on any of the pictures below to shop directly from my online store to get the products to create this card at home.
Welcome to Team Stamp It’s June Blog Hop. We’re so glad you joined us! This month, we feature projects related to summer and patriotic themes. Be sure to visit all of the blogs on the hop. Leave a comment for a chance to win a Confetti Birthday Card Kit. Use the hashtag #stampitcontest.
Circle Sayings Fourth of July
When you’re a card maker, you don’t need a reason to get into your craft room and make a card. But when there’s a holiday, any holiday, us creators get into gear. And we even send cards to celebrate the Fourth of July. I found it fun to try to make an Independence Day card with the supplies I have on hand.
For this patriotic card, I grabbed a variety of current Stampin’ Up! products, including:
Night of Navy Base: 7 1/2″ x 5 1/2″, scored at 3 1/2″
Night of Navy Cardstock (front): 3″ x 5 1/4″ and (inside) 5 1/4″ x 1/2″
Sweet Sorbet Designer Series Paper (6 x 6 Paper Pack): 2 3/4″ x 5″ (front) and 1″ x 5 1/4″ (inside)
Basic White Cardstock: 5 1/4″ x 4″
See other summer- and patriotic-themed cards by following the list at the end of this post. Remember to visit all of the blogs and leave a comment to have a chance to win a Confetti Birthday Card Kit.
I appreciate you visiting today. Need more inspiration? Sign up to receive my free, email newsletter. I send two to three newsletters each month that include a free, card-making tutorial, a paper crafting video, and updates on Stampin’ Up! news and specials. Click here. Then watch check your InBox for a message from AWeber. They want to be sure you wish to receive my emails.
Kim
Click on any of the pictures below to shop directly for the products used to create this card from my online store.
Yay! Stampin’ Up!’s 2023-2024 is now live! See a PDF of it by clicking here. As demonstrators, we got to order early from a selection of products. Today, I share a handful of cards created with the Circle Sayings Bundle. Find this bundle on page 17 of the new catalog. Purchase the stamp set and 2 3/8″ circle punch as a bundle and save 10 percent.
This bundle s perfect for creating quick and easy cards. And it includes a variety of sentiments that work well for all occasions: thank you, birthday, hello, smile, thinking of you, and celebrate. Mix and match the images and sentiments with different papers and ink to create the perfect card.
Because You’re Awesome Card
Here are the measurements for the card featured at the top of this post. This is also a fun fold. (Be sure to watch the video to see step-by-step instructions for creating this card and to see the fun fold.)
Boho Blue Cardstock: 5 1/4 x 4 (scored at 3 1/8 and 2 1/2)
Night of Navy Cardstock: 4 x 2 3/4, 4 x 2 1/4, 4 x 1, 5 1/4 x 4
Countryside Inn 12 x 12 Designer Series Paper: 3 3/4 x 2 1/2, 3 3/4 x 2, 3 3/4 x 3/4
Basic White: 5 x 3 3/4
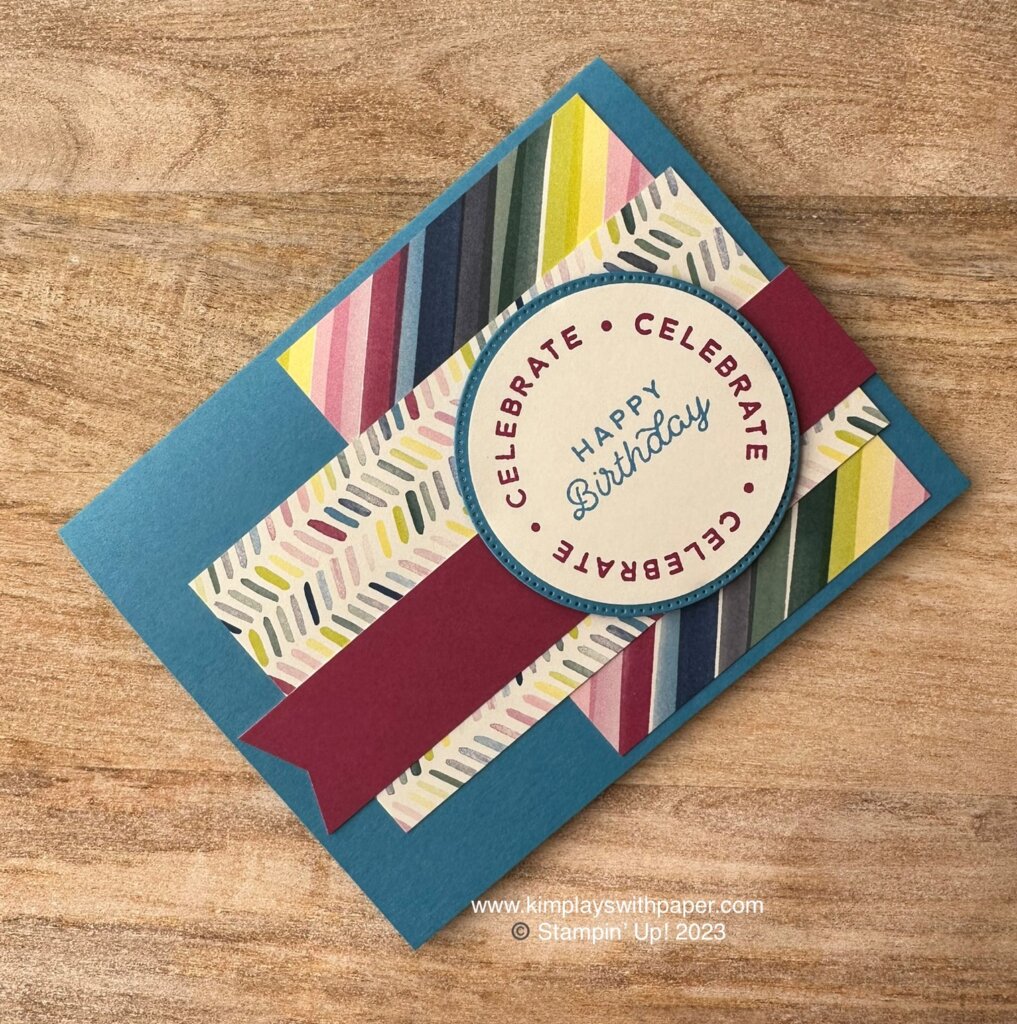
Here’s another sample created with the Circle Sayings Bundle. This birthday card uses a strip of 6 x 6 Brights (Granny Apple Green) Designer Series Paper and Berry Burst Card Stock embossed with the dot pattern from the Basics 3D Embossing Folder (an Online Exclusive). I love how the 2 3/8-inch circle punch fits perfectly in the second largest circle die from the Stylish Shapes Dies.
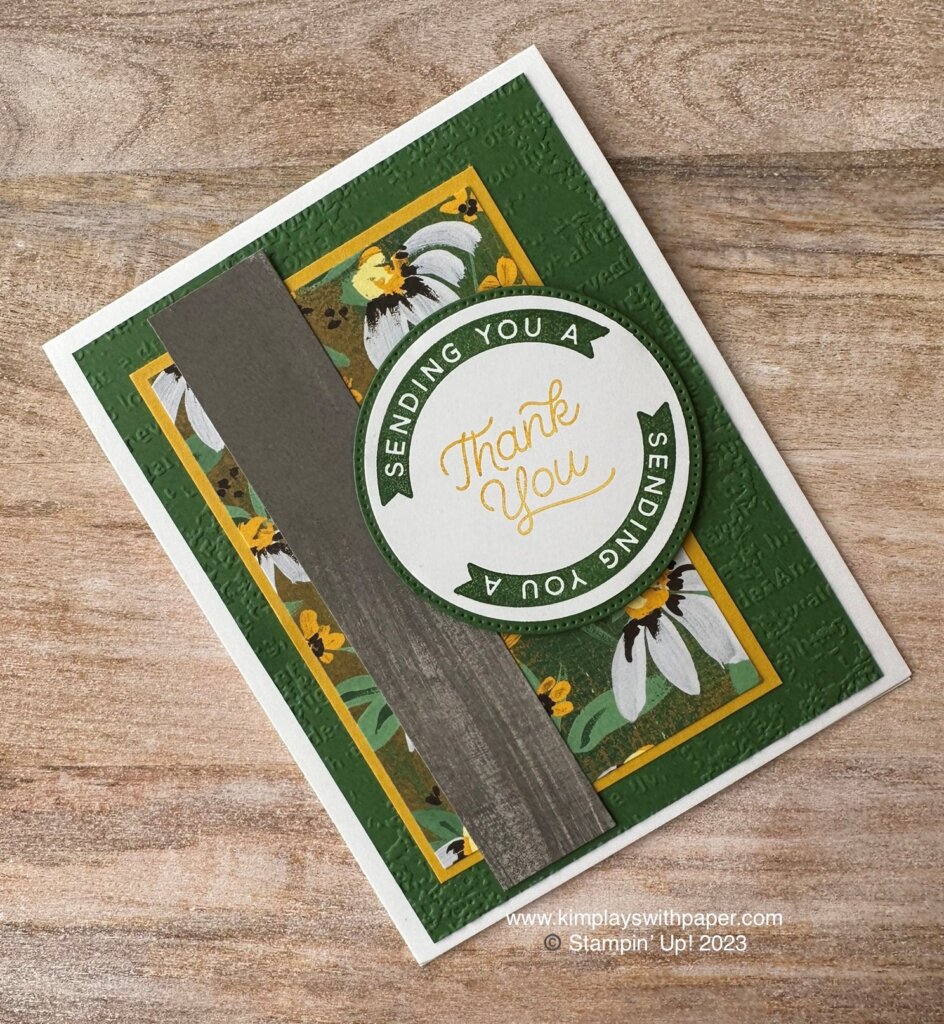
This bundle enables you to create a variety of cards and is compatible with different papers and colors. Here, it’s the Fresh as a Daisy 12 x 12 Designer Series Paper with the Timeworn Type 3D Embossing Folder.
And, one more. I love this flexible layout and used the brand-new Bright & Beautiful 6 x 6 Designer Series Paper.
Circle Sayings Card Samples Video
I hope you’ve enjoyed these card samples. Stay tuned for lots more as I play with this set and others from Stampin’ Up!’s brand-new 2023-2024 Annual Catalog.
Kim
Click on any of the photo graphics below to shop directly from my online store for the paper crafting products to create this card.
If you’re looking for a fun and versatile flower stamp set with a coordinating punch, Stampin’ Up!’s Petal Park Bundle meets and exceeds that expectation. Find it beginning on page 30 of the Stampin’ Up! January-April 2023 Mini Catalog. I’ve been playing with it for a couple of weeks, and I enjoy pairing it with the coordinating Regency Park 6 x 6 Designer Series Paper, as well as additional stamp set sentiments and images.
Click on the links below to see other posts using this bundle:
In this post, I include the finished product of what I’ve been creating in my craft room in Mesa, Arizona, as a Stampin’ Up! demonstrator. The ideas start to flow when I get to playing. I hope you enjoy these and are inspired.
The card featured at the beginning of this post uses a fun fold. The how-to video at the end of this post gives the measurements and provides step-by-step instructions, showing you how I put this handmade greeting card together. This birthday card also uses a sentiment from Stampin’ Up!’s Go To Greetings, the “sprinkles” from the Beautifully Happy stamp set, and Enamel Dot Essentials Embellishments.
Here’s a look at the inside of the card.
I’ve created so many cards with the Regency Park 6 x 6 paper, I have some small pieces (strips left). They’re perfect for use with the card below. I pulled the sentiment from the Fragrant Flowers stamp set.
The flowers in the set work well with Stampin’ Up!’s Picture This Dies. Aren’t they fun in this card below? The Regency Park 6 x 6 Designer Series Paper includes flower images that can be punched with the coordinating Petal Park Builder Punch. I grabbed the sentiment form the Something Fancy stamp set.
Petal Park Card Samples Video
Thanks so much for visiting my blog today. I hope you’ve enjoyed a few samples of this fun, bright, and easy-to-use bundle.
Need more inspiration? Sign up to receive my free, email newsletter. I send two to three newsletters each month that include a free card-making tutorial, a paper crafting video, updates on Stampin’ Up! news and specials, and special “subscriber only” offers. Click here to subscribe. Then watch your email for a message from AWeber. They want to be sure you really want to receive my newsletters.
Kim
Click on any of the graphics below to shop online for these paper crafting products.
Sign up for my newsletter and get a free tutorial!
Get Updates!
Join our mailing list to receive the latest updates from Kim!
You have Successfully Subscribed!
Current Catalogs
Follow Me
Categories
Disclaimer
The content in this blog is the sole responsibility of Kim Quade as a Stampin’ Up!® Independent Demonstrator. The use of and content of classes, services or products offered is not endorsed by Stampin’ Up!