Anyone ready for fall once the calendar turns to September? I know I’m ready to get a bit cooler temps and to enjoy being outside. That goes for my crafting, too. With the release of Stampin’ Up!’s brand-new September-December 2023 Mini Catalog, I’m loving digging into the great new products for fall, Halloween, winter, and Christmas crafting.
Today, I offer a free card-making tutorial created with the new Pick of the Patch Bundle. Buy the Pick of the Patch stamp set and coordinating Pick of the Patch Builder Punch as a bundle and save 10 percent. Find it on page 51 of the mini catalog.
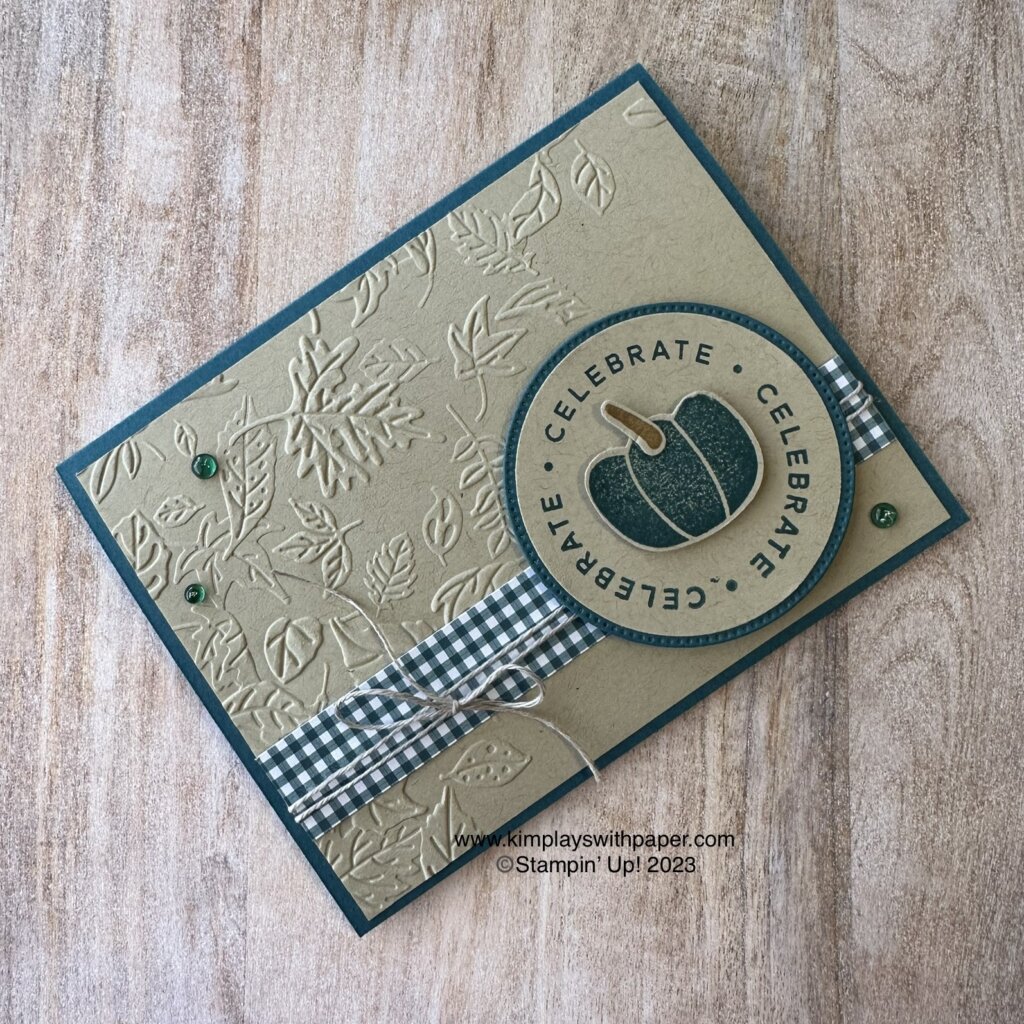
PAPER – Pretty Peacock Cardstock (150880), Crumb Cake Cardstock (120953), Glorious Gingham 6 x 6 Designer Series Paper (DSP) (163170)
INK – Pretty Peacock (150083), Pecan Pie (161665)
OTHER –Leaf Fall 3D Embossing Folder (159847), Stylish Shapes Dies (159183), Linen Thread (104199), Tinsel Gems Four-Pack (161623), Stampin’ Seal (152813), Mini Glue Dots (103683), Multipurpose Liquid Glue (110755), Stampin’ Cut & Emboss Machine (149653)
Cutting & Scoring:
Pretty Peacock Cardstock – 8 ½” x 5 ½”, scored and folded at 4 ¼”, 3” x 3”
Crumb Cake Cardstock – 5 ¼” x 4”, 3” x 3”, and scraps
DSP (Pretty Peacock design) – 5 ¼” x ¾”
Linen Thread – 20”
Instructions:
Emboss the 5 ¼” x 4” Crumb Cake Cardstock with the Leaf Fall 3D Embossing Folder, leaving a blank space in the bottom right-hand corner.
Add the DSP to the card front, about one-quarter of the way up.
Wrap the Linen Thread around this layer and tie a bow. Add this layer to the Pretty Peacock card base.
Stamp the Celebrate circle sentiment on the 3” x 3” Crumb Cake Cardstock with Pecan Pie ink. Punch with the 2 3/8” Circle Punch. Die cut a circle from the Stylish Shapes Dies with the 3” x 3” Pretty Peacock Cardstock. Layer these two pieces.
Stamp the smaller pumpkin in Pretty Peacock ink on the Crumb Cake scrap and punch. Stamp the stem with Pecan Pie ink on a Crumb Cake scrap and punch. Add the stem to the pumpkin. Use Stampin’ Dimensionals to pop up the pumpkin in the middle of the circle.
Add Stampin’ Dimensionals to the back of the circle and add to card front in the lower right-hand corner, as shown above.
Place three Pretty Peacock gems on the card front.
Thanks so much for visiting my blog today. I hope you enjoyed this free card-making tutorial. Visit this blog post to see a fun bendy fold card using this same bundle.
Get more tutorials and paper crafting inspiration by subscribing to my free, email newsletter. Click here. Then watch your InBox for a confirmation email from AWeber. They want to be sure you wish to receive my messages.
Kim
Click on any of the pictures below to purchase the products to make this card at home.
When we think about creating fall-themed cards, it’s a good time to pull out the baby wipe technique. Although it can be used for other themes, this technique lends itself really well for fall.
What is the baby wipe technique? (Be sure to watch the video below to see step-by-step visual instructions for making this technique come to life.) But here’s the crux of it:
Layer a couple of baby wipes on a Silicone Craft Sheet
Drip a few drops of reinker of desired colors on the baby wipe. For this card, I used Crumb Cake, Old Olive, Crushed Curry, and Cherry Cobbler. Make sure to cover the area the size of the stamp.
Use the baby wipe as your ink pad. Press the stamp onto the wipe and then stamp on your card stock.
Gorgeously Made Baby Wipe Technique
For today’s card, I used the large leaf stamp from Stampin’ Up!’s Gorgeously Made stamp set. Here are some other details that may help you create this card at home:
Thick Very Vanilla Card Stock Base measuring 8 1/2 x 5 1/2, scored at 4 1/4
Very Vanilla Card Stock layer die cut with Deckled Rectangle Dies and run through the Leaf Fall 3D Embossing Folder (an Online Exclusive)
Cherry Cobbler Card Stock layer cut with Deckled Rectangle Dies
Very Vanilla Card Stock layer stamped used the baby wipe technique and die cut with Deckled Rectangle
Sentiment from Something Fancy
Festive Pearls
Simply Elegant Gold Trim
How to Video
Thanks so much for visiting my blog today! I hope you’re inspired to try this fun baby wipe technique at home. Get more inspiration by subscribing to my free, email newsletter. I send two to three newsletters each month that include a free card making tutorial, paper crafting video, and updates on Stampin’ Up! news and specials. Click here. Then check your email for a message from Aweber asking you to confirm your subscription. They want to be sure you really wish to receive my messages. Thanks!
Kim
Click on any of the images below to shop from my online store to get the products used to create this card.
Are you ready for fall? The really hot summer has me dreaming about the cooler temps fall brings. I’m channeling that with my card making in my Mesa, Arizona, craft room. (It didn’t help bring on winter with Christmas in July, so I’m not sure this will actually work!)
But I am excited to work with the fall color palette. I tap into these fall offerings using Stampin’ Up!’s Gorgeously Made Bundle.
See this post for another card created recently with this bundle. The stamp set and dies were still out on my craft room table, and that inspired me to try the big leaf image for an autumn card.
Gorgeously Made Fall Leaves
Here are a few details about this card:
Thick Very Vanilla Card Stock: 8 1/2 x 5 1/2, scored at 4 1/4
Ink colors: Cherry Cobber, Old Olive, Crushed Curry, and Crumb Cake
Exposed Brick 3D Embossing Folder
Gold Foil
Simply Elegant Trim
Festive Pearls
I feel these cards are great to have on hand during September, October, and November. You can add any sentiment for the occasions you need.
Be sure to watch the video to see step-by-step instructions for creating this card. You’ll learn about the “stamping off” or second-generation stamping technique as well as how to add a little sponging with the Small Blending Brushes.
Gorgeously Made Fall Leaves Video
Thanks so much for visiting my blog today. Gain more creative inspiration by subscribing to my free, email newsletter. I send two to three newsletters each month that include a free card-making tutorial, a paper crafting video, and updates on Stampin’ Up! news and specials. Click here. Then watch your email for a confirmation from Aweber. They want to be sure you really wish to receive my communications.
Kim
Click on any of the photos below to shop directly for the products used to create this card:
Welcome to Team Stamp its August Blog Hop! We’re so glad you joined us. This month, we feature projects suitable for fall. I can’t believe it’s that time already! Be sure to visit all of the blogs. Leave a comment for a chance to win a Confetti Birthday Card Kit. Look for a list of hoppers at the end of this post.
Inked Botanicals for Fall
For today’s card, I used a handful of different Stampin’ Up! products. Here’s a list to help you get started.
Calypso Coral base measuring 8 1/2 x 4 1/2, scored at 4 1/4
Leaves from Season of Chic stamp set (Annual Catalog) stamped in the coordinating colors of Crushed Curry, Calypso Coral, and Lost Lagoon and die cut with Chic Dies.
Sentiment stamped from Pick of the Patch Bundle (available beginning September 6, 2023, from Stampini’ Up!’s September-December 2023 Mini Catalog) stamped in Lost Lagoon on Very Vanilla card stock.
Calypso Coral 3/16″ Braided Linen Trim (available beginning September 6, 2023, from Stampini’ Up!’s September-December 2023 Mini Catalog) .
Lost Lagoon Gems from Tinsel Gems Three-Pack (Annual Catalog).
I love all of the designs in the Inked Botanicals 6 x 6 Designer Series Paper. But I saved this design to use specifically on fall-themed cards. The leaves and colors lend themselves well for this. I hope you agree!
Thanks so much for stopping by today. Be sure to leave a comment. You could win a Confetti Birthday Card Kit.
Congrats to last month’s winner: Karen Halterman
Click on any of the links below to see what other crafters have created:
PAPER – Very Vanilla Thick Cardstock (144237), Very Vanilla Cardstock (101650), Gold Foil (132622)
INK – Soft Suede (147115)
OTHER – Leaf Fall 3D Embossing Folder (159847), Stampin’ Seal (152813), Gold Shimmer Ribbon (152156), Champagne Rhinestone Basic Jewels (151193), Mini Glue Dots (103683), Multipurpose Liquid Glue (110755), Stampin’ Cut & Emboss Machine (149653)
Cutting & Scoring:
Thick Very Vanilla – 8 ½” x 5 ½”, scored at 4 ¼” and folded in half
Vanilla Cardstock – 5 x 3 ¾”
Gold Foil – 5 ¼” x 4”
Ribbon – 16”
Instructions:
Dry emboss the 5” x 3 ¾” Very Vanilla Cardstock with the Leaf Fall 3D Embossing Folder. Position the paper in the folder so the bottom, right-hand corner isn’t embossed.
Stamp the “Let’s Celebrate” sentiment in the lower right-hand corner of the embossed piece with Soft Suede ink.
Attach the embossed piece to the 5 ¼” x 4” Gold Foil sheet.
Wrap the ribbon around this piece and tie a bow.
Attach this to the Thick Very Vanilla Cardstock base.
Add three Champagne Rhinestone Basic Jewels to the card front.
Love this card? See this blog post (with a how-to video included) for three other ideas using this embossing folder.
Thanks so much for visiting my blog today. I’d love to help you in your paper crafting journey.
Kim Quade, Stampin’ Up! demonstrator, Mesa, Arizona
Click on any of the graphics below to shop directly from my online store to purchase the products needed to create this card.
Sign up for my newsletter and get a free tutorial!
Get Updates!
Join our mailing list to receive the latest updates from Kim!
You have Successfully Subscribed!
Current Catalogs
Follow Me
Categories
Disclaimer
The content in this blog is the sole responsibility of Kim Quade as a Stampin’ Up!® Independent Demonstrator. The use of and content of classes, services or products offered is not endorsed by Stampin’ Up!