I pulled together two stamp sets from Stampin’ Up!’s 2021-2022 Annual Catalog to create this Thanksgiving card — Beauty of Friendship and Banner Year. The card goes together easily and quickly. Enjoy the free tutorial below.
INK – Cajun Craze (147085), Early Espresso (147114)
OTHER – Stitched Rectangle Dies (151820), Gold 3/8” Fine Art Ribbon (154561), Champagne Rhinestone Basic Jewels (151193), Mini Glue Dots (103683), Stampin’ Seal (152813), Stampin’ Dimensionals (104430), Paper Snips Scissors (103579), Stampin’ Cut & Emboss Machine (149653)
Cutting & Scoring:
Basic White – 8 ½” x 5 ½” scored at 4 ¼”, 5 ¼” x 4”, 3 ¾” x 2 ½”
Gold Foil – ¼” x 5 ¼” (2)
DSP – 5 ¼” x 1 ½”
Ribbon – 4”
Instructions:
Die cut the 3 ¾” x 2 ½” Basic White Card Stock with the Stitched Rectangle Die that measures approximately 2 ¼’ x 3 ½”
Stamp the tree trunk/branches image with Early Espresso ink onto the die cut rectangle.
With Cajun Caze ink, stamp the large, more solid-looking foliage stamp on top of the trunk, creating a tree image. Set aside.
Choose the “Happy Thanksgiving” sentiment from the Banner Year stamp set and stamp with Cajun Craze ink in the bottom, right-hand corner of the 5 ¼” x 4” piece of Basic White card stock.
Tape the DSP piece (pattern shown above) to the 5 ¼” x 4” Basic White card stock, with the top edge about 1 ½” down from the top. Add each Gold Foil strip, one on top of the DSP and one on the bottom. These are nudged close to the DSP, but do not overlap.
Fold the 8 ½” x 5 ½” Basic White card stock in half. Adhere the 5 ¼” x 4” stamped and decorated piece on top of this.
Add Stampin’ Dimensionals to the back of the tree piece and place on the card front, on the left-hand side.
Tie a knot in the ribbon and place on the tree image with a Glue Dot. Trim ribbon as necessary.
Add three Champagne Rhinestone Basic Jewels to the card front.
Thanks so much for stopping by today.
Get More Inspiration
Looking for more inspiration? Subscribe to my free email newsletter by clicking here. (Then be sure to check your email for an email from Aweber confirming you really want to receive my emails!) I send two to three emails each month that include a free tutorial, video, updates on Stampin’ Up! news and products, and special offers to newsletter subscribers.
Kim
Click on any of the graphics below to shop directly from my online store.
This week, I’ve focused on using products from Stampin’ Up!’s current Sale-A-Bration sale.This sale allows you to earn FREE items with minimum purchases of $50 and $100 before tax and shipping. Choose from 10 different items.
I love the Penguin Playmates Designer Series Paper, especially the side of the paper without the penguins. Weird, right? But, the colors lend themselves to so many projects.
See this post for cards created with the Delicate Dahlias stamp set and the Penguin Playmates DSP.
Please enjoy this free Penguin Playmates Christmas Card Tutorial.
PAPER –Penguin Playmates (DSP) (158420), Fresh Freesia (155613), Soft Sea Foam (146988), Basic White (159276)
INK – Gorgeous Grape (147099)
OTHER – Fresh Freesia 3/8” Open Weave Ribbon (155615), Layering Circles Dies (151770), Wonderful Snowflakes (156340), Beautiful Trees Dies (155840), Mini Glue Dots (103683), Stampin’ Seal (152813), Stampin’ Dimensionals (104430), Mini Stampin’ Dimensionals (144108), Mini Stampin’ Cut & Emboss Machine (151003)
Cutting & Scoring:
Fresh Freesia – 8 ½” x 5 ½” scored at 4 ¼”, 3 ½” x 3 ½”
Soft Sea Foam – 3 ½” x 3 ½”
Basic White, 5 ¼” x 4”, scrap
DSP – 2 ½” x 5”, 1 ¼” x 5”
Ribbon – 6“, 3”
Instructions:
With Gorgeous Grape ink, stamp the Merry Christmas sentiment from the Peaceful Deer stamp set onto a Basic White scrap. Die cut with the rectangle label from the Beautiful Trees Dies.
Die cut the 3 ½” x 3 ½” Fresh Freesia card stock with the largest circle from the Layering Circle Dies and the largest scallop on the 3 ½” x 3 ½” Soft Sea Foam card stock. Adhere these together.
With adhesive of choice, place the two DSP pieces onto the 5 ¼” x 4” Basic White card stock, as shown above, with the 1 ¼” piece on the left and the 2 ½” piece placed right next to it, leaving a small white border around.
Place a Glue Dot on each end of the 6” piece of ribbon. Wrap the ribbon around the above layer and affix Glue Dots in the back.
With adhesive of choice, attach this piece to the front of Fresh Freesia 8 ½” x 5 ½” card stock that’s been folded in half to create a base.
Place one Glue Dot in the center of the snowflake. (Note: there is a shiny side and a matte side to the snowflake. I like the shiny side to face up.) Center the snowflake on the circle.
Pop up the snowflake circle on the front of the card with Stampin’ Dimensionals.
Put two or three Mini Stampin’ Dimensionals on the sentiment and place on top of the snowflake, near the bottom.
Tuck the 3” piece of ribbon underneath the ribbon on the card and tie a knot, as shown above.
Free Newsletter?
Would you like to receive tutorials just like this in your email? Click here to subscribe to my free, email newsletter. I send emails two to three times a month and include a tutorial, video, and updates on Stampin’ Up! news and notes.
Thanks so much for stopping by today.
Kim
Click on any of the images below to shop directly from my online store.
I just love the excitement of a brand-new catalog. Stampin’ Up!’s 2021-2022 Annual Catalog officially debuts today. Click here to view a PDF copy. (Please contact me to receive your own hard copy of this beautiful catalog.)
Look for new stamp sets, die cuts, bundles, punches, patterned paper, ribbons, and more! Today, I’m sharing a free card tutorial using the Beauty of Friendship stamp set. (It’s offered in a bundle with the Beautiful Trees Dies for a 10 percent discount.)
This card features #simplestamping and goes together quickly.
Beauty of Friendship Card Tutorial
Stampin’ Up! Supplies:
STAMPS – Beauty of Friendship (154983)
PAPER – Bumblebee (153077), Mossy Meadow (133676), Basic White (159276), Beauty of the Earth Designer Series Paper (DSP) (155841)
INK – Early Espresso (147114), Old Olive (147090), Mossy Meadow (147111)
OTHER –Mini Glue Dots (103683), Stampin’ Seal (152813), Paper Snips (103579), Baker’s Twine Essential Pack (155475)
Cutting & Scoring:
Bumblebee – 8 ½” x 5 ½” scored at 4 ¼”, 5” x ¼”
Basic White – 5” x 3 ¾”
Mossy Meadow – 5 ¼” x 4”
DSP – 5” x 1”
Baker’s Twine – 5”
Instructions:
Fold the 8 ½” x 5 ½” Bumblebee cardstock in half.
Ink the tree trunk from the Beauty of Friendship stamp set with Early Espresso ink and stamp on the front of the white cardstock, closer to the right side, as shown in the card above.
Stamp one of the smaller foliage images with Mossy Meadow ink on the tree branches. Stamp the other image with Mossy Meadow directly on top of the first. This is called two-step stamping.
Ink the shadow/ground stamp with Old Olive and stamp at the bottom of the tree trunk.
Choose a sentiment and stamp it at the bottom of the card with Mossy Meadow ink.
Afix the DSP piece to the front of the white piece, aligning it directly with the left edge.
Place the Bumblebee strip next to the DSP.
With Stampin’ Seal or your choice of adhesive, place the white cardstock onto the Mossy Meadow panel.
Afix this whole piece to the Bumblebee base.
Tie a bow with the Baker’s Twine and place on the front of the tree with a Glue Dot.
Thanks for stopping by today. Be sure to check back often to see samples from this great catalog.
Kim
Click on any of the graphic below to shop directly from my online store 24/7.
Please enjoy this Butterfly Brilliance free tutorial.
While the Butterfly Brilliance stamp set and coordinating Brilliant Wings Dies will be available in Stampin’ Up!’s brand-new catalog, the sneak peek is available now. Purchase the stamp set and dies as a bundle and receive a 10 percent discount. The coordinating 6 x 6 Butterfly Bijou Designer Series Paper and the Natural Touch Specialty Paper are available while supplies last. Be sure to watch the video (a Facebook Live replay) to see all of the pieces in action. I’m especially loving the Rainbow Glimmer Paper from Stampin’ Up!’s 2020-2021 Annual Catalog.
Butterfly Brilliance Free Tutorial
Stampin’ Up! Supplies:
STAMPS – Butterfly Brilliance (155092), Art Gallery (154421)
PAPER – Bermuda Bay (131197), Vellum Cardstock (101856), Rainbow Glimmer (153056)
OTHER –Stitched Shapes Dies (152323), Brilliant Wings Dies (155523), Classic Label Punch (141941), Pearl Basic Jewels (144219), Blackberry Bliss Stampin’ Blends Combo Pack (154877), Mini Glue Dots (103683), Stampin’ Seal (152813), Paper Snips (103579), Stampin’ Cut & Emboss Machine (149653)
Cutting & Scoring:
Bermuda Bay – 8 ½” 5 ½”, scored at 4 ¼”, 5 ¼” 4”, scrap
Vellum – 3 ½” x 3 ½”
Rainbow Glimmer – select pieces in desired color patterns
Instructions:
Fold the 8 ½” x 5 ½” Bermuda Bay cardstock in half.
Ink the Butterfly Brilliance stamp with Versamark and stamp on the 5 ¼” x 4” Bermuda Bay cardstock. Adhere to the card base.
Die cut the Vellum Cardstock with the largest circle from the Stitched Shapes Dies. Adhere to the card front with a few Glue Dots placed strategically so they can’t be seen when the butterfly is in place.
Die cut three of the butterflies from the Rainbow Glimmer Paper, including the largest one and two of the smaller ones.
Using the tip of the Paper Snips to put Glue Dots on the back side of the butterflies.
Place the largest butterfly on the Vellum circle. Arrange the other butterflies on the card.
Stamp the thank you sentiment with Blackberry Bliss ink onto the Bermuda scrap. Punch with Classic Label Punch.
Adhere the punched sentiment to the front of the card as shown above.
Color two small Pearl Basic Jewels with the Dark Blackberry Bliss Stampin’ Blend.
Place one each of the colored pearls on each side of the sentiment.
Thanks so much for stopping by today! Please let me know if you have questions about this project or any other. I’d love to help you in your papercrafting journey.
Did you know I send an email newsletter with free tutorials and videos two or three times a month? Click here to subscribe.
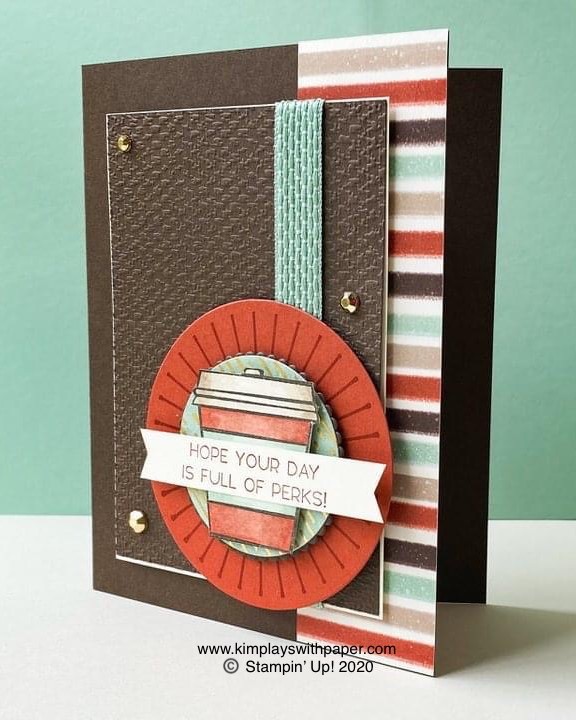
OTHER – Layering Circles Dies (151770), Tasteful Textures 3D Embossing Folder (152718), Banners Pick a Punch (153608); Basket Weave & Metallic Ribbon Combo Pack (153553); Gilded Gems (152478; Stampin Cut & Emboss Machine (149653), Paper Trimmer (152392), Paper Snips (103579), Stampin’ Dimensionals (104430), Stampin’ Seal + (149699); Stampin’ Seal (152813)
Cutting & Scoring:
Early Espresso: 8 ½” x 5 ½”
score @ 4 ¼” and fold
Very Vanilla: 3 5¤16” x 4 9¤16”
Early Espresso: 3 ¼” x 4 ½”
Cajun Craze: 3 ¼” x 3 ¼”
Gilded Autumn (strip) DSP: 1 ½” x 5 ½”
Gilded Autumn (metallic strip) DSP: 2” x 2”
Early Espresso: 2” x 2”
Very Vanilla: 2 ¼”x 2”
Very Vanilla: 3 x ½”
Mint Macaron Basket Weave Ribbon: 6”
Instructions:
Attach striped DSP to card base with Seal.
Emboss (3 ¼” x 4 ½”) Early Espresso panel with Tasteful Textures folder and attach to Very Vanilla panel with Seal. Wrap ribbon around panel and attach with Seal+ on back of panel. Attach to card base with Dimensionals.
Die cut the Cajun Craze panel with the largest smooth circle from the Layering Circles Dies. Stamp the “ray’s stamp” in Cajun Craze Ink 2 times on the Cajun Craze circle die. Attach to card base with Dimensionals.
Die cut the 2” x 2” Early Espresso with the 5th largest scallop circle die. Die cut the 2” x 2” Gilded Autumn DSP with the 4th largest smooth circle die. Attach both dies together with Seal. Attach to Cajun Craze circle die with Dimensionals.
Stamp coffee cup in Early Espresso Ink on 2 ¼” x 2 Very Vanilla Cardstock and color with Stampin’ Blends (top = Crumb Cake; cup = Cajun Craze; center = Mint Macaron). Attach to DSP circle with Dimensionals.
Stamp greeting on ½” x 3 Very Vanilla Cardstock in Cajun Craze Ink, and punch both ends with the Banners Pick a Punch. Attach to coffee cup with Seal.
Attach three Gilded Gems to the card base.
Click on any of the graphics below to shop directly from my online store.
Sign up for my newsletter and get a free tutorial!
Get Updates!
Join our mailing list to receive the latest updates from Kim!
You have Successfully Subscribed!
Current Catalogs
Follow Me
Categories
Disclaimer
The content in this blog is the sole responsibility of Kim Quade as a Stampin’ Up!® Independent Demonstrator. The use of and content of classes, services or products offered is not endorsed by Stampin’ Up!