Welcome to our monthly Maui Achievers Blog Hop. We’re a group of Stampin’ Up! demonstrators from around the world who have achieved the Stampin’ Up! bonus of the Maui incentive trip. We celebrate this achievement by organizing a monthly hop which helps us continue to inspire you creatively.
You may be starting here or have come from someone else’s blog – either way there’s a list at the end of this post to help you move around all the different blogs and get many amazing ideas. We all have our country listed – so if you’re looking for a demonstrator, these are top demonstrators in their country and would love to help you with your Stampin’ Up! shopping or if you’d like to join our Stampin’ Up! teams. Visit all of the blogs and leave a comment. We love to hear from you.
Daisy Lane 2021 Calendar
These 2021 desktop calendars make great gifts. Easy to make, they can be adorned and embellished with any number of stamps, papers, dies, and/or punches.
These calendars make use of the Daisy Lane stamp found in Stampin’ Up!’s 2020-2021 Annual Catalog. I l love that this set also coordinates with the Daisy Punch and the Medium Daisy Punch. Also, the calendar on the right uses the Playful Alphabet Dies.
Both feature the Flower & Field 12 x 12 Designer Series Paper which is a free item you can earn from Stampin’ Up!’s upcoming Sale-A-Bration promotion. Beginning January 5, this package of 12 sheets (2 each of 6 double-sided) designs is available free with a $50 purchase. Look for a host of other stamp sets and papers available free with minimum $50 and $100 purchases before tax and shipping.
Measurements
Black base measures 11 x 4 1/2 inches, scored at 5 1/2 and 8 1/4
Flower and Field DSP measures 5 1/4 x 4
Bumblebee is cut at 5 1/4 x 4 for both the top and bottom pieces
Black mat for the Post It Note measures 3 1/2 x 3 1/2
Desktop Calendar Video
Thanks for stopping by today. Please leave a comment below and click to receive updates when I add a new post.
Be sure to visit all of the blog on the hop for a host of paper crafting inspiration.
Kim
List of Blog Hoppers
List of Products Used for Daisy Lane 2021 Calendar
Click on any of the graphics below to go directly to my online store to shop 24/7.
The holiday countdown begins! Just 10 days until Christmas Day of 2020. You may still be purchasing and wrapping gifts. Or, maybe you’re finished. You might be baking, and you might be creating and sending holiday cards.
And, you might receive a last-minute invitation. Or need a last-minute quick gift. Wine, liqueurs, and sparkling water make great host or spur-of-the-moment gifts. A quick and easy wine bottle tag spruces up the gift. Stampin’ Up!’s coordinating products make this quick, fun, and festive.
Basic card stock color of your choosing: 8 inches x 3 1/4 inches, scored at 2 1/4 inches on the horizontal side.
A piece of coordinating Designer Series paper cut at 5 x 3 inches. I used Heartwarming Hugs for the tag on the left and Brightly Gleaming Specialty Designer Series Paper for the tag on the right.
1 /2 inch circle punch to create the hole for hanging.
Detailed Trio punch for rounding the edges.
Perfectly Plaid stamp set and coordinating Pine Tree Punch (left) and Christmas Gleaming and Gleaming Ornaments Punch Pack (right).
Please note: Many of the products in the August-December 2020 Mini Catalog retire. Stampin’ Up! announced a Year-End Closeout Sale last week. Check the list which includes some products up to 50 percent off. But supplies are limited, so some availability may be limited.
Check out the video for visual instructions.
Thanks for stopping by today! I appreciate you!
Kim
Click on any of the graphics below to shop my online store 24/7.
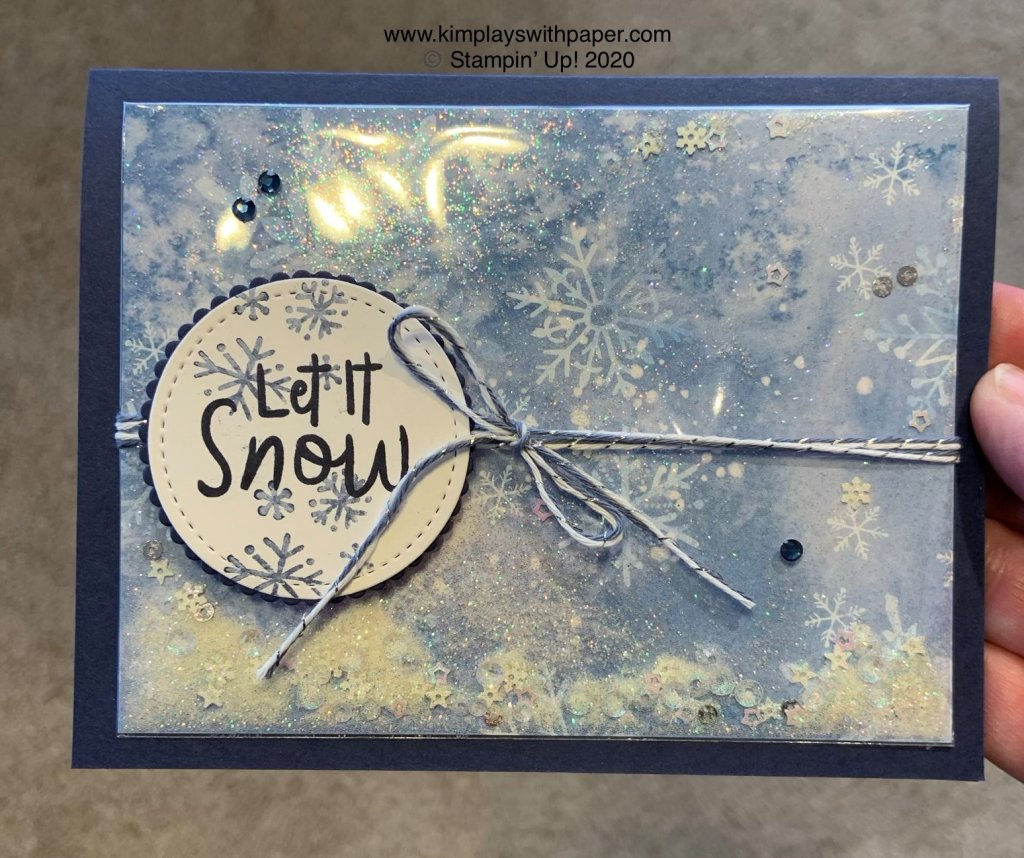
I’m showing you how to make a Snowflake Splendor Shaker Card. See the directions and video below.
Let it snow! Today’s shaker card makes that happen. Sometimes, shaker cards seem difficult to make. But this new technique is easy. It uses one of Stampin’ Up!’s Clear Envelopes. (I grabbed this idea from one of the presenters at our demonstrator gathering and made it my own.)
Used Snowflake Sequins and retired Dazzling Diamond for the snow. (I saw another demonstrator use course sea salt as snow.)
20 inches of the Misty Moonlight/Silver Bakers Twine from the Flowers for Every Season Ribbon Combo Pack.
Coordinating bling from the Holiday Rhinestone Basic Jewels.
Be sure to watch the video for a step-by-step presentation of how this card goes together.
Extended through Wednesday, November 25, Stampin’ Up! is holding its Online Extravaganza. Almost everything in the 2020-2021 Annual Catalog is 10 percent off. Some exclusions (seventy-four items) apply, but that leaves a whole of card stock, ink, stamp sets, bundles, embossing folders, and more on sale. Click here to shop online.
Please let me know if you have questions about this card or any other paper crafting projects. If you’re not currently working with a Stampin’ Up! demonstrator, I’d love to help you in your crafting journey.
Kim
List of Products Used to Make the Snowflake Splendor Shaker Card
Click on any of the graphics below to go directly to my online store to shop 24/7.
Keep reading to learn some handmade holiday helping ideas!
Do you wish there was an easy way to create handmade holiday greetings cards and gift tags?
Do you feel you aren’t creative and/or don’t have the energy to make your own cards?
Is there a creative child or adult on your Christmas shopping list?
Would you like to spend some quality time crafting with your loved ones?
Stampin’ Up!’s kits can check off all of the boxes above! Read below to see all of the options.
Christmas Countdown Advent Calendar
Imagine your kiddos (or grand-kiddos) peeking in the little boxes each day, while you witness the joy on their faces when they discover what’s inside.
Get ready for Christmas with this hand-crafted advent decor, the Christmas Countdown Kit. Decorate the boxes and then fill with small treats. The kit includes enough supplies to decorate 25 mini boxes, plus it comes with a sturdy outer box to hold them all. Size is approximately 11 x 11.
When the holidays are over, decorate the reverse side of the mini boxes with any designer paper and you’ve created a unique and pretty storage solution.
This kit is just $30 + tax and shipping. (Think about adding a Stampin’ Seal + and Stampin’ Dimensionals if you don’t have these at home.)
Watch this quick video below to get a peek at what this kit offers.
Joy of Sharing All-Inclusive Card Kit
Do you want to send handmade Christmas cards but don’t have the time to design and make your own? Let the Joy of Sharing All-Inclusive Kit come to your rescue!
This kit includes a stamp set, mini ink pad, acrylic block, envelopes and the ingredients to create 15 handmade cards — traditional or photo.
The cost for this kit is $35 + tax and shipping.
https://youtu.be/0yZouBlt09g
Tag Buffet Project Kit
Create your own cute handmade gift tags with the fun Tag Buffet Project Kit. It costs $30 (+ tax and shipping) and makes 30 gorgeous tags.
You’ll also need a stamp set. Stampin’ Up! recommends the coordinating Tag Buffet set ($18) as well as Stampin’ Dimensionals and Garden Green, Real Red, and Shaded Spruce Stampin’ Pads.
Grab some kits for you and your friends and have a fun gathering. (Buy four kits from me, and I’ll send you the stamp set! Contact me for additional details.)
Watch this video (a Facebook Live replay) to see the details of this great card kit.
Simply Citrus All-Inclusive Card Kit
Are you looking for a fun and creative gift for a craft lover in your life? Stampin’ Up!’s Simply Citrus All-Inclusive Card Kit contains the ingredients to make 15 handmade greeting cards. This bright and cheery kit includes a photopolymer stamp set, mini ink pad, stamping block, envelopes, and embellishments.
The sentiments include: Just a Note, Way to Go, Hello Sunshine, and Thanks for Being You.
This kit is just $32 + tax and shipping.
Looking Up All-Inclusive Card Kit
Check another gift off of your list with Stampin’ Up!’s Looking Up All-Inclusive Card Kit. It has the ingredients to create 15 handmade greeting cards. The kit includes a photopolymer stamp set, mini ink pad, stamping block, embellishments, and envelopes.
The sentiments include: Happy Birthday, I Hear a Congratulations Are in Order, Feel Better Soon, I am So Very Thankful for You, Thanks So Much.
This kit is just $29 + tax and shipping.
Paper Pumpkin Monthly Crafting Kit
Stampin’ Up!’s Paper Pumpkin offers a one-stop box for creative success! Each monthly kit comes with the ingredients to make a special project — from greeting cards, to treat packets, to gift card holders, and more.
Kits are designed for anyone who wants to quickly and easily achieve beautiful, handcrafted projects — anytime and anywhere! You (or the receiver) will get a new project every month.
There are two ways to subscribe:
1. An ongoing month-to-month subscription. This option costs just $22 + tax per month (shipping is included). I’ll provide you a card to give to the recipient.
Click here to begin the subscription process. Subscribe by December 10 to receive the first kit in December: Beary Comforting.
2. A 1-, 3-, 6-, or 12-month subscription. Costs vary. For example, a 6-month subscription is $114 + tax and shipping. Purchase a prepaid code, and the recipient just needs to activate their account to begin getting the fun kits in the mail. Visit the online store to learn more. I’ll provide a gift card to go with it!
Or contact me. I’ll help you choose the right option. It’s a gift that keeps on giving!
Gift Certificate/Wish List
Let your favorite crafter choose their own products by giving them a gift certificate. I can provide certificates in any amount. Contact me to get started. The certificates are redeemable directly through me, and not Stampin’ Up!
Or, create your wish list, send it to me, and I’ll let your family know which products would make a great gift for you. Here are some easy directions for you.
Go to: kimquade.stampinup.net
In the upper left corner, make sure it says: Shopping with Kim Quade
If you don’t have an online shopping profile with me, you may need to create one.
Select an item from the store.
Click the “heart” Add to List.
Click “Create a New List.”
Name your list: Wishlist for Kids, Wishlist for Hubby, etc.
When you’ve added the desired items to your list, click the heart at the top of the page.
Your list and the selected items should appear.
Click “Share List.”
Copy provided link.
Send that link in an email to the person purchasing the gift.
When that person receives the email, they click on the link to view your wish list on my store.
They can then select and pay for the items they wish to purchase.
Join me for today’s video. I’m creating a Thanksgiving card using the Stamparatus reflection technique.
Do you send Thanksgiving cards? It’s almost time to get those in the mail. I decided to feature fall trees for one of my card designs. The Stamparatus comes in handy for this.
Stampin’ Up!’s stamp positioning tool lends itself to a variety of fun techniques. Today’s card and video feature the reflection technique. (Other fun uses include hinge-step stamping. See a related video here.)
Card Details
Basic Black card stock base — 11 inches x 4 1/4 inches, scored at 5 1/2 inches
Whisper White – 2 pieces cut at 5 1/4 x 4 inches (one is for the inside of the card)
Ink colors of Memento, Crushed Curry, Merry Merlot, and Pumpkin Pie
Sponge Daubers and Sponge Brayer
Holiday Rhinestone Assortment
Stamparatus Reflection Technique Video
This video, a Facebook Live replay provides a step-by-step demonstration of how the card comes together.
Thanks for stopping by today. Please let me know if you have questions about how this card was created. If you’re not currently working with a Stampin’ Up! demonstrator, I’d love to help you in your paper crafting journey.
Kim
Products Used to Make this Card
Click on any of the links to go directly to my online store.
Sign up for my newsletter and get a free tutorial!
Get Updates!
Join our mailing list to receive the latest updates from Kim!
You have Successfully Subscribed!
Current Catalogs
Follow Me
Categories
Disclaimer
The content in this blog is the sole responsibility of Kim Quade as a Stampin’ Up!® Independent Demonstrator. The use of and content of classes, services or products offered is not endorsed by Stampin’ Up!