Today, I’m sharing a Halloween boo card sample as part of Team Stamp It’s monthly blog hop.
Welcome to the blog hop. Thanks for joining us today. This talents group of stampers is featuring a host of cards and projects for Halloween and/or fall. Be sure to visit all of the participating blogs for awesome inspiration. Leave a comment with the hashtag #stampitcontest. You could win a Boho Indigo Product Medley. (Winner announced at the time of the next hop.)
Halloween Boo Card Sample
October 1 is around the corner. Are you ready for the the spookiest fall holiday? Stampin’ Up! offers a host of fun supplies and products to create cards and treats. Look for the a variety of these rubber stamps, ink, paper, and embellishments in the August-December 2020 Mini Catalog.
I just love the Pumpkin Pie, Gorgeous Grape, and Basic Black color combination for Halloween. I also used the following Stampin’ Up! products:
Want to use your Boho Indigo Scraps (or any scraps) with a fun embossing technique? Keep reading.
I love Stampin’ Up!’s Boho Indigo Product Medley. Find it on page 9 of Stampin’ Up!’s 2020-2021 Annual Catalog. The Night of Navy and Midnight Muse colors call to me! I’ve used the medley in a ton of card projects. Click on the links below to look at past posts, samples, and projects.
After all of that creating, I have a lot of scraps and small pieces. The technique I show today isn’t new. I resurrected it for this beautiful designer series paper and its scraps!
Using Stampin’ Up!’s 1 1/2-inch circle punch, punch a variety of different designs from both sides of the patterned paper
Arrange the circles onto a a piece of Very Vanilla card stock or Midnight Muse card stock.
Glue the circles down with multipurpose glue.It’s OK if some of them go off the edge of the base.
Let it dry.
Run the whole piece through the Stampin’ Cut & Emboss machine with your choice of embossing folders. I used Stampin’ Up!’s Tin Tile and Dainty Diamonds.
Trim the edges if any of the circles overlap.
Layer onto a coordinating card stock and then a card base.
Add a sentiment of your choice.
You could dress up with ribbon or other embellishments.
Boho Indigo Scraps and Embossing Video
Be sure to watch the video below to see me work through this card. I hope you love this technique. Changing the embossing folders gives your cards a different look. Think of all of the possibilities with all of Stampin’ Up!’s different designer series papers. I’m sure you have a pile of scraps that would worth for this.
Thank for stopping by today. Click on the graphics below to shop directly from my online store.
Welcome to the Stampin’ Friends September 2020 Blog Hop! I’m featuring a Halloween card and a project using Stampin’ Up!’s Little Treats.
Thanks for joining us. This month, the participating stampers focus on Halloween, fall, and outdoor greeting cards and projects. Visit all of the blogs and leave a comment. Look for a list of participating stampers after the information about the card and project.
I love this set’s versatility. It contains sentiments and images for Halloween, fall, Thanksgiving, Christmas, general treat giving, and even weddings/engagements/anniversaries.
The Little Treats Box Dies uses a 6 x 6 sheets of card stock. Run it through the Stampin’ Cut & Emboss Machine just once. It comes out in one piece, all ready to put together.
In addition to the Little Treats stamp set and dies, I used the following products:
A fun combination of Gorgeous Grape and Pumpkin Pie.
The sparkly Black Glimmer Paper and Glittered Organdy Ribbon.
Cobwebs 3D Embossing Folder.
Stitched Shapes and Layering Circles Dies.
Pearl colored with Black Stampin’ Blends.
Thanks for stopping by. Please let me know if you have questions about these projects or any other stamping question.
Remember, visit all of the blogs to get a host of great papercrafting ideas.
A Christmas card using Stampin’ Up!’s Banner Year stamp set.
I chose Stampin’ Up!’s Banner Year photopolymer stamp set as one of my first purchases. Look for it on page 65 of the August-December Mini Catalog. I purchased it because it includes both sentiments for a host of holidays. It works for Halloween, fall, Thanksgiving, Christmas, and Valentine’s Day. It’s worth the $17 investment. Purchase it in a bundle with the Banners Pick a Punch and receive a 10 percent discount on the pair.
This card also features a fun fold. Be sure to watch the video below showing how I created this card.
I also used these additional products to make it:
Heartwarming Hug Designer Series Paper
Real Red 3/8″ Sheer Ribbon
Layering Circles Dies
Stitched Shapes Dies
Real Red Card Stoick
Old Olive and Real Red Classic Stampin’ Pads
Banner Year Christmas Card Video
Stampin’ Up!’s Get & Go Promotion
Do you have a long wish list of Stampin’ Up! products? (Who doesn’t with the two awesome catalogs?) Would you like to receive a discount on your future purchases?
In September, Stampin’ Up! is offering a great promotion. Purchase the Starter Kit for $99 + tax. Choose $125 worth of product from either catalog (and the clearance rack). It’s all shipped free.
In addition, receive free:
Queen Anne’s Lace stamp set;
So Much Love stamp set;
A package of Rhinestone Basic Jewels:
16 pre-cut papers packs to make 16 cards; and
A code to redeem for a free Paper Pumpkin kit.
When you purchase the Starter Kit, not only do you get future discounts on quality products, but you join an awesome group of crafty people who create awesome cards and projects. Don’t miss out on the fun!
Click here to begin the process. Or contact me ([email protected]), and I can help you get started.
Thanks for stopping by today! If you’re not currently working with a Stampin’ Up! demonstrator, I’d love to help you with your papercrafting hobby.
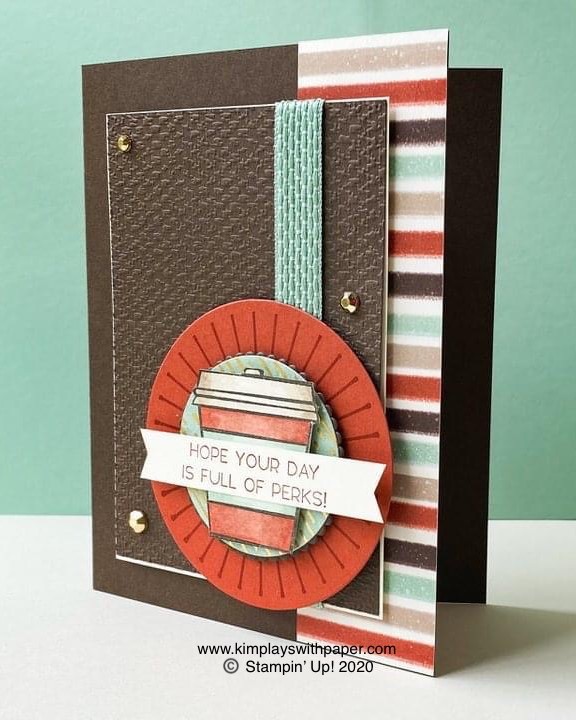
OTHER – Layering Circles Dies (151770), Tasteful Textures 3D Embossing Folder (152718), Banners Pick a Punch (153608); Basket Weave & Metallic Ribbon Combo Pack (153553); Gilded Gems (152478; Stampin Cut & Emboss Machine (149653), Paper Trimmer (152392), Paper Snips (103579), Stampin’ Dimensionals (104430), Stampin’ Seal + (149699); Stampin’ Seal (152813)
Cutting & Scoring:
Early Espresso: 8 ½” x 5 ½”
score @ 4 ¼” and fold
Very Vanilla: 3 5¤16” x 4 9¤16”
Early Espresso: 3 ¼” x 4 ½”
Cajun Craze: 3 ¼” x 3 ¼”
Gilded Autumn (strip) DSP: 1 ½” x 5 ½”
Gilded Autumn (metallic strip) DSP: 2” x 2”
Early Espresso: 2” x 2”
Very Vanilla: 2 ¼”x 2”
Very Vanilla: 3 x ½”
Mint Macaron Basket Weave Ribbon: 6”
Instructions:
Attach striped DSP to card base with Seal.
Emboss (3 ¼” x 4 ½”) Early Espresso panel with Tasteful Textures folder and attach to Very Vanilla panel with Seal. Wrap ribbon around panel and attach with Seal+ on back of panel. Attach to card base with Dimensionals.
Die cut the Cajun Craze panel with the largest smooth circle from the Layering Circles Dies. Stamp the “ray’s stamp” in Cajun Craze Ink 2 times on the Cajun Craze circle die. Attach to card base with Dimensionals.
Die cut the 2” x 2” Early Espresso with the 5th largest scallop circle die. Die cut the 2” x 2” Gilded Autumn DSP with the 4th largest smooth circle die. Attach both dies together with Seal. Attach to Cajun Craze circle die with Dimensionals.
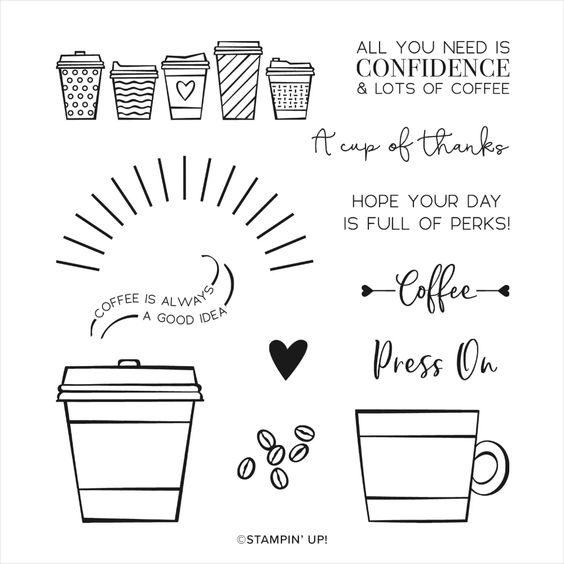
Stamp coffee cup in Early Espresso Ink on 2 ¼” x 2 Very Vanilla Cardstock and color with Stampin’ Blends (top = Crumb Cake; cup = Cajun Craze; center = Mint Macaron). Attach to DSP circle with Dimensionals.
Stamp greeting on ½” x 3 Very Vanilla Cardstock in Cajun Craze Ink, and punch both ends with the Banners Pick a Punch. Attach to coffee cup with Seal.
Attach three Gilded Gems to the card base.
Click on any of the graphics below to shop directly from my online store.
Sign up for my newsletter and get a free tutorial!
Get Updates!
Join our mailing list to receive the latest updates from Kim!
You have Successfully Subscribed!
Current Catalogs
Follow Me
Categories
Disclaimer
The content in this blog is the sole responsibility of Kim Quade as a Stampin’ Up!® Independent Demonstrator. The use of and content of classes, services or products offered is not endorsed by Stampin’ Up!