For those who love Halloween, Stampin’ Up!’s Bewitching Bundle offers a fun combination of stamp set and Witch Hat Builder Punch. Find the combo in Stampin’ Up!’s July-December 2022 Mini Catalog. In this post, I offer a free tutorial for making a cute Halloween greeting card as well as a video where I create the card and a treat packet. Be sure to read to the end to see all of it!
Bewitching Bundle Free Tutorial
Please enjoy this free card-making tutorial.
Stampin’ Up! Supplies:
STAMPS – Bewitching Bundle (159857), Best Witches (159860),
PAPER – Basic Black (121045), Vellum Cardstock (101856), Basic White Cardstock (159276)
INK – Pumpkin Pie (147086), Memento (132708)
OTHER – Stylish Shapes Dies (159183), Chic Dies (158815), Black & White ¼” Gingham Ribbon (156485), Classic Matte Dots (158146), Blending Brush (153611), Pumpkin Pie Stampin’ Blends Combo Pack (154897), Stampin’ Seal (152813), Stampin’ Dimensionals (104430), Mini Glue Dots (103683), Multipurpose Liquid Glue (110755), Stampin’ Cut & Emboss Machine (149653)
Cutting & Scoring:
Basic Black – 8 ½” x 5 ½”, scored at 4 ¼” and folded in half, 4” x 3”
Vellum Cardstock – 3” x 3”
Basic White Cardstock – 5 ¼” x 4” (2), 3” x 3”
Ribbon – 16”
Instructions:
With the Blending Brush, apply a layer of Pumpkin Pie ink to the left-hand side of one of the Basic White cardstock pieces measuring 5 ¼” x 4”. Stamp the Best Witches sentiment with Memento ink in the bottom right corner.
Die cut the Basic Black 4” x 3” card stock with the crosshatch image from the Chic Dies. Glue to the card front on the left-hand side, on top of the blended ink.
Die cut the Vellum Cardstock with the 2 ½’ circle from the Stylish Shapes Dies.
Stamp the witch’s hat on the 3” x 3” Basic White cardstock with Black Memento Ink. Color image with Pumpkin Pie Blends. Punch with coordinating punch.
Put Stampin’ Dimensionals on the back of the hat and center on the vellum circle.
Turn the circle over and place Stampin’ Dimensionals on the back of this piece and add to card front on top of the black, Chic Dies piece.
Glue this whole piece to the Basic Black card base.
Wrap the ribbon around the card front and tie a bow.
Add black Classic Matte Dots to card front.
Adhere remaining Basic White piece to the middle of the card.
Bewitching Bundle Peekaboo Treat
Click here to see another idea using Stampin’ Up!’ Peekaboo Treat Bags. Look for the Peekaboo Treat Bags in Stampin’ Up!’s Annual Catalog. You get 10 bags – five white and five craft — for $6.
Thanks so much for visiting my blog today. I hope you’re inspired to start your Halloween crafting.
Need more inspiration? Click here to sign up to receive my free, email newsletter. I send two to three newsletters each month that include a free tutorial, video, and Stampin Up! news and updates.
Kim
Click on any of the links below to shop directly from my online store to purchase the paper crafting products I used to create the card and treat bag.
Stampin’ Up!’s Dots & Spots Die is one of the newest additions to the free SaleABration offerings. Place a $100 Stampin’ Up! order before tax and shipping and choose this free through August 31, 2022.
You might be stumped on how to use this dotted background die. In this post, I include a free tutorial for creating one card using this fun die.
Need more ideas? Click here to see a Halloween card using the Dots & Spots Die.
Dots & Spots Free Tutorial
Please enjoy these step-by-step instructions for making the featured card.
PAPER – Parakeet Party (159259), Pacific Point (111350), Daffodil Delight (119683), 2022-2024 In Color 6 x 6 Designer Series Paper (159253), Basic White Cardstock (159276)
INK – Parakeet Party (159208), Pacific Point (147098)
OTHER – Stylish Shapes Dies (159183), Layering Circles Dies (151770), Dots & Spots Die (159164), Paper Snips Scissors (103579), Stampin’ Seal (152813), Stampin’ Dimensionals (104430), Mini Glue Dots (103683), Stampin’ Cut & Emboss Machine (149653)
Cutting & Scoring:
Parakeet Party – 8 ½” x 5 ½”, scored at 4 ¼” and folded in half
Daffodil Delight – 4 ½” x 3 ¼”, 2 ½” x 2 ½”
Pacific Point – 3” x 2 ¾”
Basic White Card Stock – 5 ¼” x 4”, 3” x 1 ½”, 2 ½” x 2 ½”, scrap
2022-2024 In Color 6 x 6 DSP – 3” x 1” (dot pattern)
Instructions:
Stamp the Rays of Light stamp on the front of the Parakeet Party card front with Parakeet Party ink.
Stamp one of the swimsuits from Sunny Splash on the Basic White card stock scrap with Pacific Point ink. Hand cut with Paper Snips Scissors.
Pop this up on a circle cut with the Stylish Shapes Dies using the 2 ½” x 2 ½” inch white card stock. Layer this on a scallop circle cut with the Layering Circles Dies from the 2 ½” x 2 ½” Daffodil Delight card stock.
Die cut the Pacific Point 3” x 2 ¾” card stock with the Dots & Spots Die and adhere to the top portion of the 4 ½” x 3 ¼” Daffodil Delight card stock, leaving a quarter-inch border around the top and sides.
Stamp the “Hello Sunshine” sentiment with Pacific Point ink on the white card stock measuring 3” x 1 ½” (make sure to stamp near the bottom) and attach to the Daffodil Delight card stock, just below the Pacific Points Dots & Spots piece.
Add the DSP on top, covering the seam, as shown above.
Attach this whole piece to the card front.
Use Stampin’ Dimensionals to pop up the circle on the card front.
Stamp the swimsuit with Pacific Point ink in the lower right corner of the 5 1/4 “ x 4” card stock and adhere to the center of the card.
Thanks for visiting my blog. I hope you enjoyed the project.
Need more inspiration? Click here to sign up to receive my free email newsletter. I send two to three newsletters each month that include a free tutorial, video, and Stampin’ Up! news and notes. (Then, watch your inbox for a message from AWeber. They’re confirming you want to receive my emails.)
Kim
Shopping List
Click on any of the graphics below to shop directly from my online store for the paper crafting products to create the above card.
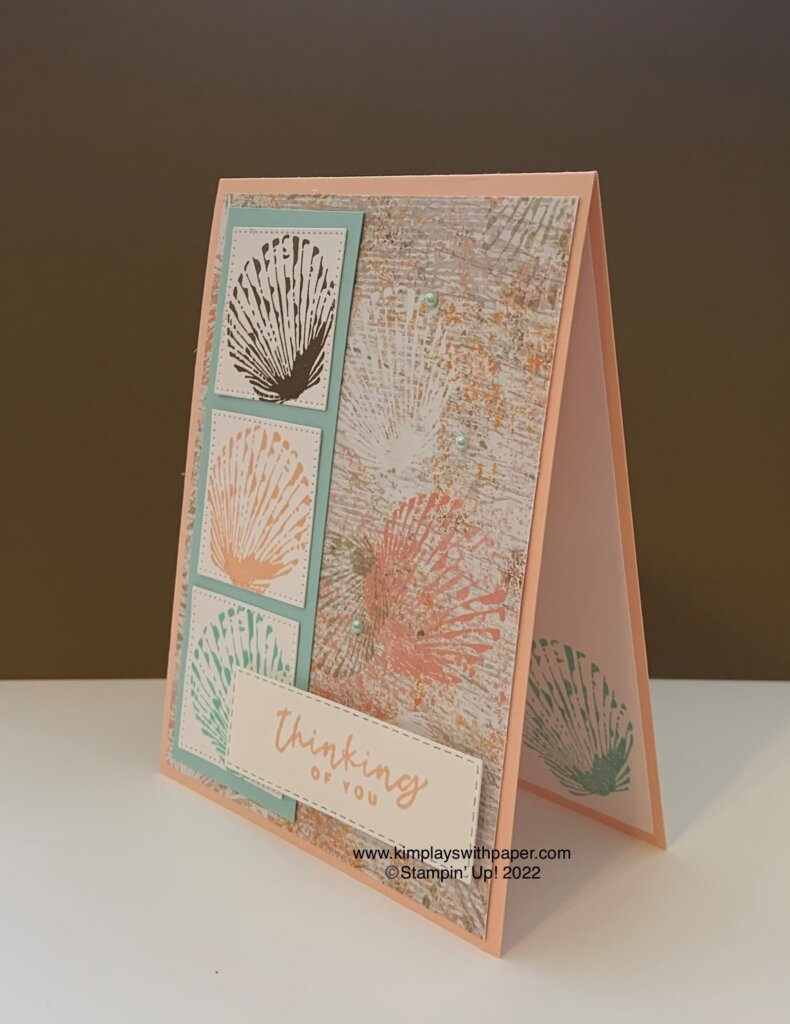
Card-making inspiration comes from many places. For today’s card and free tutorial, I spotted a sketch on Pinterest and adapted it to fit the Season of Chic stamp set. Find it on page 99 of Stampin’ Up!’s Annual Catalog.
Click here to see another blog post with additional cards using this sketch.
PAPER – Petal Pink (146985), Pool Party (159259), Texture Chic 12 x12 Designer Series Paper (158808), Basic White Cardstock (159276)
INK – Pool Party (147107), Petal Pink (147101), Soft Suede (147115)
OTHER – Stylish Shapes Dies (159183), Stitched Rectangle Dies 151820) Pool Party Stampin’ Blends (154894), Pearl Basic Jewels (144219), Stampin’ Seal (152813), Stampin’ Dimensionals (104430), Mini Glue Dots (103683), Stampin’ Cut & Emboss Machine (149653)
Cutting & Scoring:
Petal Pink – 11” x 4 ¼”, scored at 5 ½” and folded in half
Pool Party – 1 ¾” x 5”
Basic White Card Stock – 2” x 5”, 3 ½” x 1”, 5 ¼” x 4”
Texture Chic DSP – 5 ¼” x 4” (seashell pattern)
Instructions:
With the 1 ½” square from the Stylish Shapes Dies, die cut three squares from the 2” x 5” Basic White Card Stock.
Die cut a Stitched Rectangle 3” x 3/4” from the 3 ½” x 1” Basic White Card Stock.
Stamp the seashell on each square: one with Pool Party, one with Soft Suede, and one with Petal Pink.
Ink the sentiment with Pool Party and stamp on the rectangle.
Add the DSP to the Petal Pink card front.
Adhere squares on the Pool Party Card Stock. With adhesive of choice, glue this piece to the DSP on the lefthand side, as shown above.
Place Stampin’ Dimensionals on the back of the sentiment and place on the card front.
Color three pearls with the Pool Party Stampin’ Blends.
Add pearls to card front.
Stamp a seashell on the remaining Basic White Card Stock and adhere to center of card.
Thanks so much for visiting my blog today. Get more ideas by signing up to receive my free email newsletter. Click here. I send two to three newsletters each month that include a free tutorial, video, and updates on Stampin’ Up! news.
Kim
Click on any of the graphics below to shop directly from my online store.
Lots of sweet projects with Stampin’ Up!’s Sweetest Cherries stamp set and coordinating Cherry Builder Punch. Find them on page 19 of Stampin’ Up!’s 2022-2023 Annual Catalog. Buy them as a bundle and save 10 percent.
Please enjoy this free tutorial for the Sweetest Cherries Thank You card
PAPER – Sweet Sorbet (159268), Parakeet Party (159259), Early Espresso (119686), 2022-2024 In Color 6 x 6 Designer Series Paper Assortments (159253), Vellum Cardstock (101856), Basic White Cardstock (159276)
OTHER – Painted Texture 3D Embossing Folder (154317), Stylish Shapes Dies (159183), Neutrals Stampin’ Write Markers (147158), Red Rhinestone Basic Jewels (146924), Stampin’ Seal (152813), Stampin’ Dimensionals (104430), Mini Glue Dots (103683), Stampin’ Cut & Emboss Machine (149653)
Cutting & Scoring:
Sweet Sorbet – 8 ½” x 5 ½” scored at 4 ¼” and folded in half, scrap
Basic White Card Stock – 5 ¼” x 4” (2), 1 ¾” x ¾”
Parakeet Party – 4” x 1 5/8”, scrap
Vellum – 2 ½” x 2 ½”
Early Espresso – scrap
2022-2024 In Color DSP – 4 ½” x 1 ¼” (red dot pattern)
Instructions:
Emboss one piece of the Basic White cardstock with the Painted Texture 3D Embossing Folder. Attach to Sweet Sorbet card base with Stampin’ Seal.
Add the Parakeet Party cardstock to the base as shown above. Layer the DSP on top of this.
Die cut a circle with the Stylish Shapes Dies from the Vellum cardstock.
Punch the cherry, stem, and leaf from cardstock scraps. Use Mini Glue Dots to assemble the cherry. Pop up on the Vellum circle with Stampin’ Dimensionals.
Attach Stampin’ Dimensionals to the back of the Vellum circle
Use an Early Espresso Stampin’ Write marker to color just the “thank you” sentiment. Stamp on the small white piece.
Place the sentiment on the card front with Stampin’ Dimensionals.
Add Red Rhinestone Basic Jewels.
Adhere remaining Basic White cardstock to card center.
Click here to see a post with other Sweetest Cherries samples and a video.
Thanks for stopping by my blog today. I hope I provided some paper crafting inspiration.
Need more ideas? Sign up to receive my free, email newsletter by clicking here. I send two to three newsletters a month that include a free tutorial, a video, class to go offers, and updates on Stampin’ Up! news. (Then be sure to check your email for a confirmation from AWeber. They want to be sure you really want to receive my emails!)
Sweetest Cherries Thank You Card Supply List
Click on any of the product pictures below to shop directly from my online store.
PAPER – Basic White Card Stock (159276), Thick Basic White Card Stock (159229)
INK – Evening Evergreen (155576), Calypso Coral (147101), Garden Green (147089), Pale Papaya (155670)
OTHER – Champagne Rhinestone Jewels (151193)
Cutting & Scoring:
Thick Basic White Card Stock — 11 x 5 1/2″, scored at 4 1/4″, fold in half
Basic White Card Stock — 5 1/4″ x 4″
Instructions:
Using Evening Evergreen ink, stamp off first to lighten ink tone, then stamp fern leaves in bottom right corner of the 5 1/4″ x 4″ white card base.
With Garden Green ink, stamp the large leaf at full strength.
Using Calypso Coral ink, stamp off first to lighten ink tone, then stamp smaller leaves behind larger leaf from step above.
With Pale Papaya ink, stamp off first to lighten ink tone, then stamp newstype works in open white space in upper left and lower right images of stamped leaves.
Using Evening Evergreen ink, stamp sentiment in upper left white space of card front.
Attach stamped sheet to Thick Basic White Card Stock Base.
Embellish with Champagne Rhinestone Jewels.
The card above features the heat embossing technique to create a handmade thank you card.
I used the Vellum 12 x 12 Layering Designs, some of the Tropical Layers Dies, and a tag from Stylish Shapes (a brand-new die cut set coming soon) to create the birthday card above.
These treat packets also use supplies from the versatile suite.
Thank you for visiting my blog. I hope you enjoyed these projects. Please let me know if I can help you in any way.
Need more inspiration? Sign up to receive my free email newsletter. I send two to three newsletters each month that include a free tutorial, video, and Stampin’ Up! news, notes, and specials. Click here and then watch your inbox for a confirmation email from Aweber. They want to be sure you really want to receive my messages!
Kim
Click on any of the links below to shop directly from my online store. Thank you for choosing me as your Stampin’ Up! demonstrator.
Sign up for my newsletter and get a free tutorial!
Get Updates!
Join our mailing list to receive the latest updates from Kim!
You have Successfully Subscribed!
Current Catalogs
Follow Me
Categories
Disclaimer
The content in this blog is the sole responsibility of Kim Quade as a Stampin’ Up!® Independent Demonstrator. The use of and content of classes, services or products offered is not endorsed by Stampin’ Up!