Feb 19, 2022 | 2021-2022 Annual Catalog, Annual Catalog, Gallery, January-June 2022 Mini Catalog, Kim's Creations, Punches, Tutorial |
Since moving to Arizona more than two years ago, I’ve gained a newfound love for everything cactus. In my head, I imagined that deserts and cactus were dry and dull. This is far from true. The majestic saguaros are absolutely amazing. And in the spring, the cactus come alive with blooms of many and various colors.
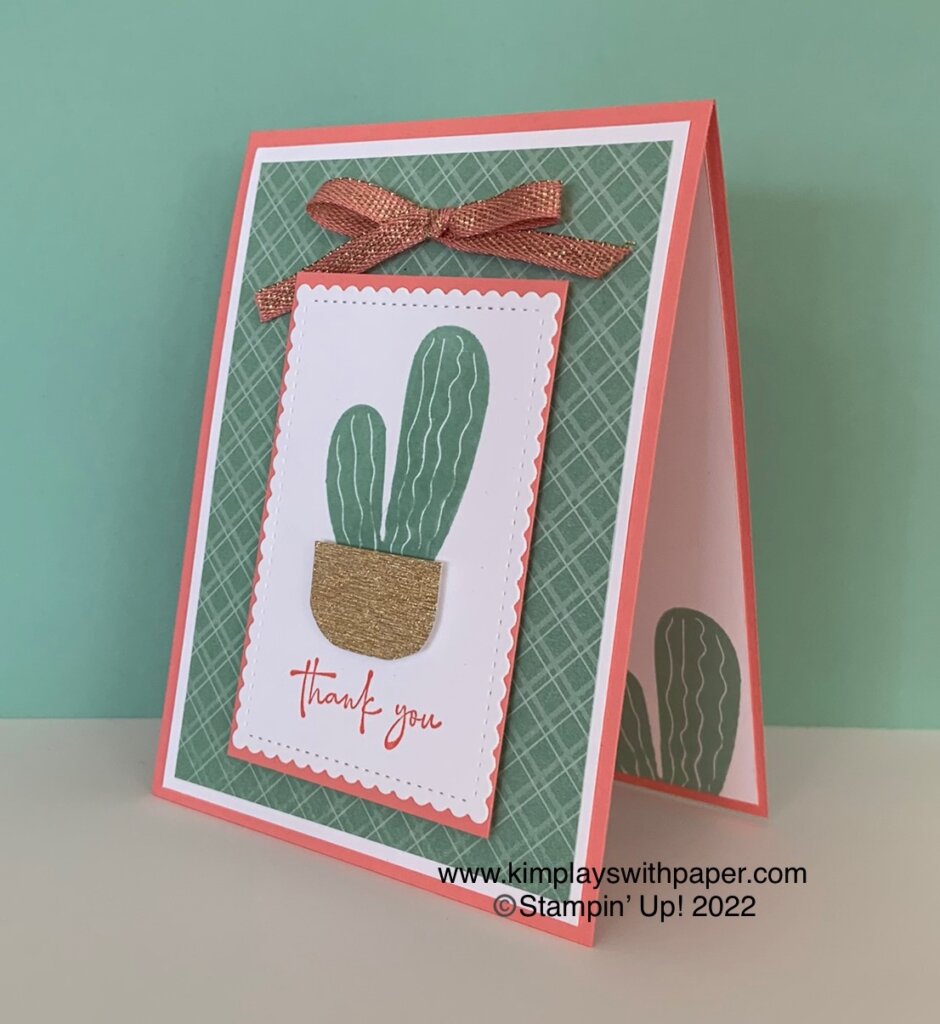
When Stampin’ Up! releases a new cactus stamp set, I’m sure to place it in my collection. I love the Cactus Cuties Bundle that includes the Cactus Cuties Stamp Set and Cactus Builder Punch. Buy them as a bundle and save 10 percent. Find it on pages 66 and 67 of Stampin’ Up!’s January-June 2022 Mini Catalog.
Thanks to Brayce Campagna for giving me the inspiration for the card above.

Cactus Cuties Thank You Card Tutorial
Please enjoy this free card tutorial.
Stampin’ Up! Supplies:
- STAMPS – Cactus Cuties Bundle (158058), Happy & Heartfelt (158005)
- PAPER – Flirty Flamingo Card Stock (141416), Basic White Card Stock (159276), 6 x 6 Subtles Designer Series Paper Assortments (DSP) (155229), Gold 6 x 6 Metallic Specialty Paper (156844)
- INK – Flirty Flamingo (147052), Mint Macaron (147106)
- OTHER – Stitched So Sweetly Dies (151690), Flirty Flamingo ¼” Gold Metallic Ribbon (155610), Stampin’ Seal (152813), Stampin’ Dimensionals (104430), Mini Glue Dots (103683), Stampin’ Cut & Emboss Machine (149653)
Cutting & Scoring:
- Flirty Flamingo – 11” x 4 ¼” scored at 5 ½” and folded in half, 3 ¾” x 2 ½”
- Basic White Card Stock — 5 ¼” x 4” (2), 4” x 3”
- Mint Macaron DSP – 5” x 3 ¾”
- Gold Metallic Specialty Paper — scrap
- Ribbon – 8”
Instructions:
- Die cut the 4” x 3” Basic White card stock with the scallop rectangle from the Stitched So Sweetly Dies that measures 3 ½” x 2 ½”.
- Stamp the cactus with Mint Macaron ink and the sentiment with Flirty Flamingo ink on the white die cut.
- Punch the pot with the Gold Metallic Specialty Paper. Pop it up with dimensionsals.
- Adhere the stamped piece to the 3 ¾” x 2 ½” Flirty Flamingo piece.
- Attach large Basic White card stock to the card front.
- Add the Mint Macaron DSP.
- Use dimensionals to pop up the cactus layer.
- Tie a bow with the ribbon and add it to the card front with a Glue Dot.
- Stamp the cactus on the remaining white piece and glue it to the inside of the card.
Thanks so much for stopping by today. I hope you enjoyed this free card making tutorial. Want more inspiration? Sign up here to receive my free email newsletter. I send two to three newsletters a month that include a free tutorial, video, and Stampin’ Up! updates.
Kim
Click on any of the photos below to shop directly from my online store.
Jan 15, 2022 | 2021-2022 Annual Catalog, Annual Catalog, Birthday, Gallery, January-June 2022 Mini Catalog, Kim's Creations, Tutorial |

My January calendar shows a ton of birthdays. I need to make a stack of cards and get them in the mail. I pulled out Stampin’ Up’s Blessings of Home stamp set, now available in the January-June 2022 Mini Catalog.
Below, I offer a free tutorial and include 14 additional card samples using this stamp set and coordinating Flowers of Home Dies. (Purchase the Blessings of Home stamp set and Flowers of Home Dies as a bundle and receive a 10 percent discount.) See this post for another card and video using products from the Blessings of Home Bundle.
Blessings of Home Birthday
Stampin’ Up! Supplies:
- STAMPS – Blessings of Home (157390)
- PAPER – Very Vanilla Card Stock (101650), Night of Navy Card Stock (100867
- INK – Night of Navy (147110)
- OTHER – Tasteful Textile 3D Embossing Folder (152718), Stitched So Sweetly Dies (151690), Pearl Basic Jewels (144219), Night of Navy Stampin’ Bends Combo Pack (154891), Stampin’ Seal (152813), Mini Stampin’ Dimensionals (144108), Stampin’ Cut & Emboss Machine (149653)
Cutting & Scoring:
- Night of Navy – 8 ½” x 5 ½” scored at 4 ¼”, 4 ¼” x 3”
- Very Vanilla – 5 ¼” x 4” (2), 4 ½” x 3 ¼”, 3 ¾” x ½”
Instructions:
- Die cut the 4 ½” x 3 ¼” piece of Very Vanilla Card Stock with the scallop rectangle from the Stitched So Sweetly Dies that measures 4” x 3”.
- Stamp the smaller flower bouquet from the Blessings of Home stamp set onto the above die cut piece with Night of Navy ink.
- Use Stampin’ Seal to adhere this piece to the 4 ¼” x 3” piece of Night of Navy Card Stock.
- Emboss one of the 5 ¼” x 4” piece of Very Vanilla Card Stock with the Tasteful Textile 3D Embossing Folder.
- Fold the Night of Navy base in half and adhere the embossed piece to the front of the card.
- Add the stamped and layered image to the top of the card.
- Stamp the birthday sentiment with Night of Navy ink on the 3 ¾” x ½” Very Vanilla Card Stock.
- Use Mini Stampin’ Dimensionals to pop this up on the card front near the bottom of the card as shown above.
- Color three of the Pear Basic Jewels with the Night of Navy Dark Stampin’ Blends. Add them to the front of the card.
- Stamp a portion of the flower image with Night of Navy ink onto the remaining Very Vanilla Card Stock. Adhere to the center of the card.
Blessings of Home Card Samples
Please enjoy this other card samples created by members of my team, Kim’s Paper Krafers, for a recent swap during Stampin’ Up!’s virtual gathering. I hope you find some papercrafting inspiration!
Thanks so much for stopping by my blog today. I’d love to help you with your paper crafting journey. Contact me for catalogs and for schedules of local area classes in Mesa, Arizona.
Please subscribe to my free email newsletter by clicking here. I send to to three emails each month that include a free tutorial, a video, and Stampin’ Up! updates and special.
Kim
Click on any of the graphics below to shop directly from my online store:
Jan 1, 2022 | 2021-2022 Annual Catalog, Annual Catalog, Gallery, January-June 2022 Mini Catalog, Kim's Creations, Tutorial, Valentine's Day |

Now that Christmas has passed, my attention turns to Valentine’s Day! As a Stampin’ Up! demonstrator, I have the opportunity to preorder products from upcoming catalogs. One of my first choices was the Sweet Talk Suite. It’s available beginning Tuesday, January 4, in Stampin’ Up!’s January-June 2022 Mini Catalog. See this post for a host of other card samples.
The suite (#157629–$86.25) includes:
- Sweet Conversations Bundle: Sweet Conversations stamp set and coordinating Sweet Heart Dies.
- Sweet Talk 12 x 12 Designer Series Paper
- Gingham Embossing Folder
- Sweet Little Boxes
- Iridescent Rhinestone Basic Jewels
- Real Real 3/8″ Faux Linen Ribbon
Sweet Talk Suite Free Tutorial
Stampin’ Up! Supplies:
- STAMPS – Sweet Conversations (157618)
- PAPER –Basic White Card Stock (159276), Real Red Card Stock (102482), Sweet Talk 12 x 12 Designer Series Paper (157616)
- INK – Real Red (147084), Highland Heather (147103), Pool Party (147107)
- OTHER – Sweet Hearts Dies (157623), Layering Circles Dies (151770), Mini Glue Dots (103683), Stampin’ Seal (152813), Stampin’ Dimensionals (104430), Stampin’ Cut & Emboss Machine (149653)
Cutting & Scoring:
- Real Red – 11” x 4 ¼” scored at 5 ½”, 2 ½” x 2 ½”, 3” x 3”
- Basic White –5 ¼” x 4” and scraps
- DSP – 5 ¼” x 1 ¼” (3) pattern shown above, 2 ½” x 2 ½” and scrap Petal Pink design
Instructions:
- Fold the Real Red card stock in half.
- Adhere the three DSP pieces equal distance apart on the front of the card.
- Die cut a scallop circle from the 2 ½” x 2 ½” Real Red card stock. Die cut a nesting circle from the Petal Pink design DSP. Adhere these together and use Stampin’ Dimensionals to pop up on the front of the card.
- Die cut the mini envelope from the Sweet Hearts Dies from the 3” x 3” Real Red card stock piece. Fold on the score lines to make an envelope. Use adhesive to place on the top of the circle.
- Stamp one each of the solid, middle-size heart with Pool Party and Highland Heather ink on the Basic White scraps. Die cut.
- Stamp the Luv U sentiment with Real Red ink on the Petal Pink DSP scrap. Die cut.
- Use Glue Dots to place the Pool Party and Highland Heather in the mini envelope.
- Attach the Luv U heart to the front of the envelope.
- Stamp the three-heart, solid stamp with Real Red ink on the 5 ¼” x 4” Basic White card stock. Adhere to the card middle.
Thanks so much for stopping by today. If you’re not currently working with a Stampin’ Up! demonstrator, I’d love to help you with your paper crafting needs. In addition to my blog, I offer a free, email newsletter. I send two to three emails a month that include a free tutorial, video, and updates on Stampin’ Up! news, notes, sales, and products. Subscribe by clicking here. Then, be sure to check your email for a confirmation from AWeber. They just want to be sure you want my emails!
Kim
Jul 6, 2021 | 2021-2022 Annual Catalog, Annual Catalog, Gallery, Kim's Creations, Tutorial |

Beginning July 1, select packages of Stampin’ Up!’s beautiful Designer Series Paper are 15 percent off. What a great opportunity to stock up on your favorite papers! Check out the free tutorial at the end of this email. It features the
Hand-Penned Designer Series Paper that’s discounted in July.
- Beauty of the Earth
- Bloom Where You are Planted
- Hand-Penned
- In Good Taste
- In the Wild
- Pansy Petals
- Sweet Symmetry
- Tidings of Christmas
- You’re a Peach
Offer ends at 11:59 pm Mountain Time August 2. Begin shopping
here or contact me to help you place your order.
Hand Penned Designer Series Paper Free Tutorial
Stampin’ Up! Supplies:
- STAMPS – Colors & Contour (154994) – Bundle and Save 10% with Scalloped Contours Dies (158356)
- PAPER – Mint Macron (138337), Misty Moonlight (153081), Basic White (159276), Hand-Penned Designer Series Paper (154297)
- INK – Memento Tuxedo Black (132708) Pale Papaya (155670)
- OTHER – Genial Gems (155500), Paper Trimmer (152392), Stampin’ Cut and Emboss Machine (149653), Multipurpose Liquid Glue (110755), Dimensionals (104430)
Cutting & Scoring:
- Mint Macaron CS – 8 1/2″ x 5 1/2”, score and fold at 4 1/4”
- Misty Moonlight — CS – 7/8” x 4 3/8”, 2” x 4 3/8”, 3 1/8” x 2 1/8”
- Basic White CS – 3 “x 2”
- DSP – 3/4” x 4 1/4″, 1 7/8” x 4 1/4″
Instructions:
- Adhere DSP to Misty Moonlight layers and glue to card front as shown.
- Stamp large flower image onto upper left side of Basic White CS and stamp sentiment in lower right. Use glue to attach stamped layer to Misty Moonlight layer.
- Attach stamped layer with dimensionals and add three Genial Gems.
Here’s another version of this card using the Tidings of Christmas Designer Series Paper. (Please note the cutting directions for the white image and layering piece: White — 3/14 x 2 1/4 and Cherry Cobbler — 3 1/2 x 2 1/2)

Thanks so much for stopping by today. As a Stampin’ Up! demonstrator in Mesa, Arizona, I offer in-person classes and give live stamping presentations on my business Facebook page.
I’d love to have you join my free email list. I send two to three emails a month that include a free tutorial and updates on Stampiin’ Up! news and specials. Click here to subscribe. Check your email for an email verifying you want to receive my newsletters.
Thanks,
Kim
Click on any of the graphics below to purchase the products used to create this card.
Dec 26, 2020 | Birthday, Gallery, January-June 2021 Mini Catalog, Kim's Creations, Tutorial |

New catalogs and new products arrive Tuesday, January 5. Stampin’ Up!’s January-June 2021 Mini Catalog debuts. Sale-A-Bration begins. Sale-A-Bration is Stampin’ Up!’s most exciting sale. It’s your chance to earn free products. Throughout January and February, receive your choice of a stamp set or Designer Series Paper for purchases of $50 and $100 (before tax and shipping).
New Mini Catalog
This brand-new 92-page catalog features a host of new paper crafting products. Look for hearts, Valentines, dragonflies, flowers, Easter, and more.
I have many favorites in this upcoming catalog, including the Flowering Cactus Product Medley. Since moving to Arizona from Nebraska, I have a new-found appreciation for cactus. This medley includes a stamp set, coordinating dies, fun Designer Series Paper, linen thread, and felt flowers.
Look for more samples in the coming week.
Enjoy this free Flowering Cactus Medley tutorial.
Flowering Cactus Medley Tutorial
Stampin’ Up! Supplies:
- STAMPS – Flowering Cactus Product Medley (154559)
- PAPER – Whisper White (100730), Calypso Coral (122925), Mossy Meadow (133676)
- INK – Mossy Meadow (147111)
- OTHER –Stitched Shapes Dies (152323), Layering Circles (151770), Mini Glue Dots (103683), Stampin’ Seal (152813), Stampin’ Dimensionals (104430), Multipurpose Liquid Glue (110755)
Cutting & Scoring:
- Calypso Coral – 8 ½” 5 ½”, scored at 4 ¼” and 3 ¼” x 3 1/4”
- Whisper White – 5 ¼” x 4” (two pieces) and 3” x 3”
- Designer Series Paper (DSP) – cactus design from package – 1 ¾” x 5 ¼”, 1” x 5 ¼”
- Mossy Meadow – 2” x 5 ¼”
Instructions:
- Fold the Calypso Coral card stock in half on the score line.
- Stamp the birthday sentiment in Mossy Meadow ink in the bottom, right-hand corner of one of the Whisper White 5 ¼” x 4 pieces of card stock.
- Adhere the stamped piece to the front of the Calypso Coral card stock base and the blank piece on the inside of the card.
- On the inside white piece, align and adhere the 1” x 5 ¼” DSP piece on the right-hand side of the Whisper White card stock.
- Using Stampin’ Seal, adhere the 1 ¾” x 5 ¼” DSP to the Mossy Meadow 2” x 5 ¼” piece. Place this on the front of the card, about 1” from the left-hand side.
- Stamp the cactus image shown above on the Whisper White 3” x 3” piece. Die cut with Stitched Circle shape.
- Die cut the 3 ¼’ x 3 ¼” Calypso Coral with Layering Circles Dies.
- With your choice of adhesive, secure the Whisper White circle onto the Calypso Coral Stitched Circle.
- Place Stampin’ Dimensionals on the back of this circle and attach to the front of the card as shown above.
- Add two small drops of Multipurpose Liquid Glue on the cactus image. Place a die cut Calypso Coral felt flower on each drop of glue. Hold with finger for a count of 30 seconds to make sure the flowers stick to the card stock.
While you wait to order from the new upcoming catalogs, be sure to check Stampin’ Up’s Year-End Closeout Sale and the Clearance Rack.
Thanks for stopping by today! Catalogs are in the mail. A PDF link will be available January 5.
Kim


