Jun 11, 2022 | 2022-2023 Annual Catalog, Annual Catalog, Gallery, Kim's Creations, Thank You Cards, Tutorial |

Lots of sweet projects with Stampin’ Up!’s Sweetest Cherries stamp set and coordinating Cherry Builder Punch. Find them on page 19 of Stampin’ Up!’s 2022-2023 Annual Catalog. Buy them as a bundle and save 10 percent.

Please enjoy this free tutorial for the Sweetest Cherries Thank You card
Stampin’ Up! Supplies:
- STAMPS – Sweetest Cherries Bundle (158717)
- PAPER – Sweet Sorbet (159268), Parakeet Party (159259), Early Espresso (119686), 2022-2024 In Color 6 x 6 Designer Series Paper Assortments (159253), Vellum Cardstock (101856), Basic White Cardstock (159276)
- OTHER – Painted Texture 3D Embossing Folder (154317), Stylish Shapes Dies (159183), Neutrals Stampin’ Write Markers (147158), Red Rhinestone Basic Jewels (146924), Stampin’ Seal (152813), Stampin’ Dimensionals (104430), Mini Glue Dots (103683), Stampin’ Cut & Emboss Machine (149653)
Cutting & Scoring:
- Sweet Sorbet – 8 ½” x 5 ½” scored at 4 ¼” and folded in half, scrap
- Basic White Card Stock – 5 ¼” x 4” (2), 1 ¾” x ¾”
- Parakeet Party – 4” x 1 5/8”, scrap
- Vellum – 2 ½” x 2 ½”
- Early Espresso – scrap
- 2022-2024 In Color DSP – 4 ½” x 1 ¼” (red dot pattern)
Instructions:
- Emboss one piece of the Basic White cardstock with the Painted Texture 3D Embossing Folder. Attach to Sweet Sorbet card base with Stampin’ Seal.
- Add the Parakeet Party cardstock to the base as shown above. Layer the DSP on top of this.
- Die cut a circle with the Stylish Shapes Dies from the Vellum cardstock.
- Punch the cherry, stem, and leaf from cardstock scraps. Use Mini Glue Dots to assemble the cherry. Pop up on the Vellum circle with Stampin’ Dimensionals.
- Attach Stampin’ Dimensionals to the back of the Vellum circle
- Use an Early Espresso Stampin’ Write marker to color just the “thank you” sentiment. Stamp on the small white piece.
- Place the sentiment on the card front with Stampin’ Dimensionals.
- Add Red Rhinestone Basic Jewels.
- Adhere remaining Basic White cardstock to card center.
Click here to see a post with other Sweetest Cherries samples and a video.
Thanks for stopping by my blog today. I hope I provided some paper crafting inspiration.
Need more ideas? Sign up to receive my free, email newsletter by clicking here. I send two to three newsletters a month that include a free tutorial, a video, class to go offers, and updates on Stampin’ Up! news. (Then be sure to check your email for a confirmation from AWeber. They want to be sure you really want to receive my emails!)
Sweetest Cherries Thank You Card Supply List
Click on any of the product pictures below to shop directly from my online store.
May 2, 2022 | 2021-2022 Annual Catalog, Annual Catalog, Gallery, January-June 2022 Mini Catalog, Kim's Creations, Tutorial |

Stampin’ Up!’s Artfully Composed Suite makes you think of the tropics with its large leaf images. They complement the Artfully Composed 12 x 12 Designer Series Paper. Find it on pages 32-34 of Stampin’ Up!’s January-June 2022 Mini Catalog.
(See this post for a slimline card using these same products.)
Today’s post features a free tutorial and additional samples that use this bundle of products.
Artfully Layered Free Tutorial
Stampin’ Up! Supplies:
- STAMPS – Artfully Layered (157752), Artfully Layered Bundle (157761)
- PAPER – Basic White Card Stock (159276), Thick Basic White Card Stock (159229)
- INK – Evening Evergreen (155576), Calypso Coral (147101), Garden Green (147089), Pale Papaya (155670)
- OTHER – Champagne Rhinestone Jewels (151193)
Cutting & Scoring:
- Thick Basic White Card Stock — 11 x 5 1/2″, scored at 4 1/4″, fold in half
- Basic White Card Stock — 5 1/4″ x 4″
Instructions:
- Using Evening Evergreen ink, stamp off first to lighten ink tone, then stamp fern leaves in bottom right corner of the 5 1/4″ x 4″ white card base.
- With Garden Green ink, stamp the large leaf at full strength.
- Using Calypso Coral ink, stamp off first to lighten ink tone, then stamp smaller leaves behind larger leaf from step above.
- With Pale Papaya ink, stamp off first to lighten ink tone, then stamp newstype works in open white space in upper left and lower right images of stamped leaves.
- Using Evening Evergreen ink, stamp sentiment in upper left white space of card front.
- Attach stamped sheet to Thick Basic White Card Stock Base.
- Embellish with Champagne Rhinestone Jewels.

The card above features the heat embossing technique to create a handmade thank you card.

I used the Vellum 12 x 12 Layering Designs, some of the Tropical Layers Dies, and a tag from Stylish Shapes (a brand-new die cut set coming soon) to create the birthday card above.

These treat packets also use supplies from the versatile suite.
Thank you for visiting my blog. I hope you enjoyed these projects. Please let me know if I can help you in any way.
Need more inspiration? Sign up to receive my free email newsletter. I send two to three newsletters each month that include a free tutorial, video, and Stampin’ Up! news, notes, and specials. Click here and then watch your inbox for a confirmation email from Aweber. They want to be sure you really want to receive my messages!
Kim
Click on any of the links below to shop directly from my online store. Thank you for choosing me as your Stampin’ Up! demonstrator.
Mar 19, 2022 | 2021-2022 Annual Catalog, Annual Catalog, Birthday, Gallery, Kim's Creations, Tutorial |

Love the beach and the ocean? Stampin’ Up! has a new catalog sneak peek for you! It’s the Waves of the Ocean Collection ($79.25). It includes:
- The Waves of Inspiration stamp set
- Waves Dies
- Waves of the Ocean 12 x 12 Designer Series Paper (limited availability; while supplies last)
- Blue Foils 12 x 12 Specialty Paper (limited availability; while supplies last)
- Rhinestone Waves Basic Jewels (limited availability; while supplies last)

Please enjoy this free tutorial using elements from this collection.
Waves of Inspiration Free Tutorial
Stampin’ Up! Supplies:
- STAMPS – Waves of Inspiration (158833)
- PAPER – Night of Navy Card Stock (100867), Basic White Card Stock (159276), Waves of the Ocean 12 x 12 Designer Series Paper (159982), Blue Foils 12 x 12 Specialty Paper (159983)
- INK – Night of Navy (147110), Versamark (102283)
- OTHER –Waves Dies (158840), Layering Circles Dies (151770), Bark 3D Embossing Folder (155431), Basics Stampin’ Emboss Powders (155554), Heat Tool (129053), Stampin’ Seal (152813), Stampin’ Dimensionals (104430), Mini Glue Dots (103683), Stampin’ Cut & Emboss Machine (149653)
Cutting & Scoring:
- Night of Navy – 8 ½” x 5 ½” scored at 4 ¼” and folded in half, 5 ¼” x 4”, scrap
- Basic White Card Stock – 3 ¼” x 3 ¼”, 5 ¼” x 4”
- Waves of the Ocean DSP – 4 ¼” x 2 ¾”
- Blue Foils Specialty DSP — Night of Navy 1” x 5”, Silver 3 ¼” x ¼”
Instructions:
- Emboss the 5 ¼” x 4” Night of Navy Card Stock with the Bark 3D Embossing Folder. Attach to Night of Navy Card Base.
- Adhere Waves of the Ocean DSP on top of this layer.
- Add the Night of Navy foil.
- Die cut the Basic White Card Stock with the largest circle from the Layering Circles Dies.
- Stamp the pelican three times in Night of Navy ink on the circle.
- Adhere to front of card with Stampin’ Dimensionals.
- Heat emboss the Happy Birthday sentiment with white embossing powder on the Night of Navy scrap.
- Die cut with the label from the Waves Dies.
- Thread the Silver foil through the end slots of the label.
- Add to front of the card.
- Stamp three birds on the 5 ¼” x 4” Basic White Card Stock with Night of Navy ink. Adhere to the middle of the card.
Here’s another card sample that uses the same layout.

Looking for more card samples using this collection? See this post on my blog. Look for a how-to video, as well.
Thanks so much for visiting my blog today. I appreciate it. If you need additional inspiration, sign up for my free email newsletter. I send two to three newsletter each month that include a free tutorial, video, and updates on Stampin’ Up! news. Click here. Then check your email to find a communication from Aweber. They want to confirm you want my emails!
Kim
Click on any of the graphics below to shop directly from my online store:
Feb 19, 2022 | 2021-2022 Annual Catalog, Annual Catalog, Gallery, January-June 2022 Mini Catalog, Kim's Creations, Punches, Tutorial |
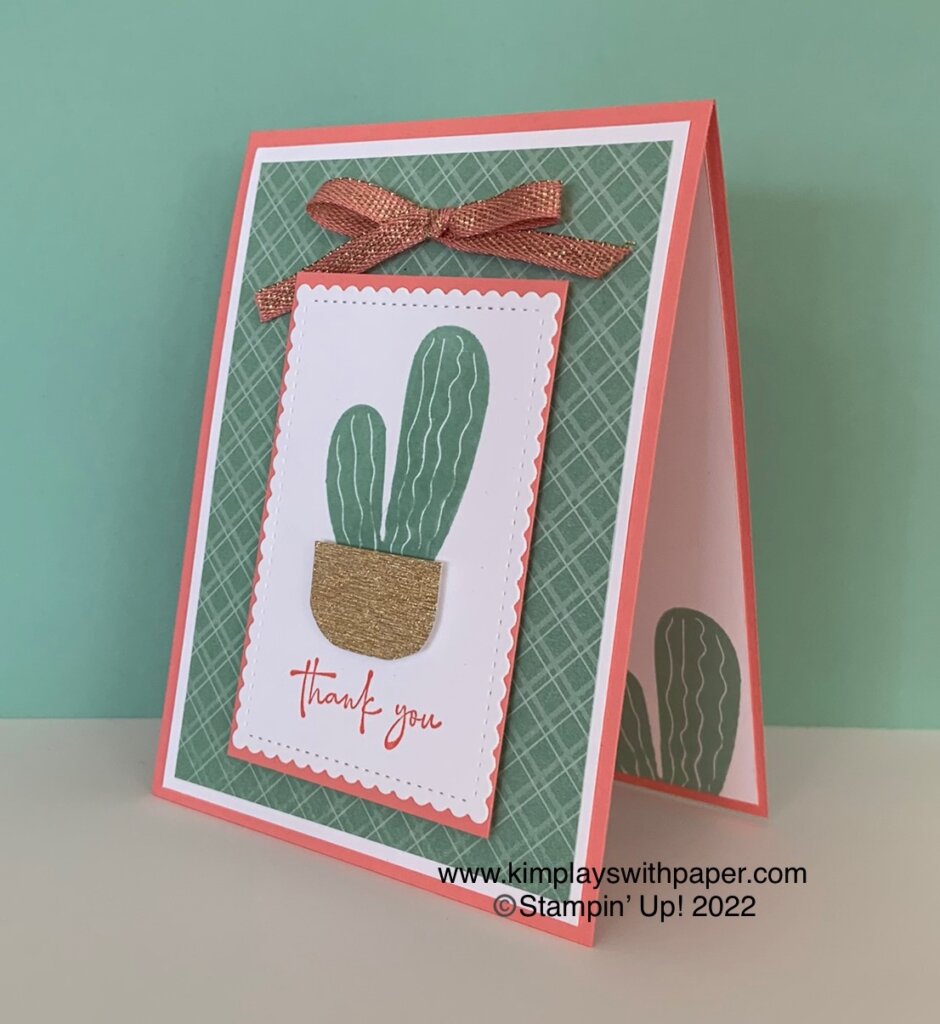
Since moving to Arizona more than two years ago, I’ve gained a newfound love for everything cactus. In my head, I imagined that deserts and cactus were dry and dull. This is far from true. The majestic saguaros are absolutely amazing. And in the spring, the cactus come alive with blooms of many and various colors.
When Stampin’ Up! releases a new cactus stamp set, I’m sure to place it in my collection. I love the Cactus Cuties Bundle that includes the Cactus Cuties Stamp Set and Cactus Builder Punch. Buy them as a bundle and save 10 percent. Find it on pages 66 and 67 of Stampin’ Up!’s January-June 2022 Mini Catalog.
Thanks to Brayce Campagna for giving me the inspiration for the card above.

Cactus Cuties Thank You Card Tutorial
Please enjoy this free card tutorial.
Stampin’ Up! Supplies:
- STAMPS – Cactus Cuties Bundle (158058), Happy & Heartfelt (158005)
- PAPER – Flirty Flamingo Card Stock (141416), Basic White Card Stock (159276), 6 x 6 Subtles Designer Series Paper Assortments (DSP) (155229), Gold 6 x 6 Metallic Specialty Paper (156844)
- INK – Flirty Flamingo (147052), Mint Macaron (147106)
- OTHER – Stitched So Sweetly Dies (151690), Flirty Flamingo ¼” Gold Metallic Ribbon (155610), Stampin’ Seal (152813), Stampin’ Dimensionals (104430), Mini Glue Dots (103683), Stampin’ Cut & Emboss Machine (149653)
Cutting & Scoring:
- Flirty Flamingo – 11” x 4 ¼” scored at 5 ½” and folded in half, 3 ¾” x 2 ½”
- Basic White Card Stock — 5 ¼” x 4” (2), 4” x 3”
- Mint Macaron DSP – 5” x 3 ¾”
- Gold Metallic Specialty Paper — scrap
- Ribbon – 8”
Instructions:
- Die cut the 4” x 3” Basic White card stock with the scallop rectangle from the Stitched So Sweetly Dies that measures 3 ½” x 2 ½”.
- Stamp the cactus with Mint Macaron ink and the sentiment with Flirty Flamingo ink on the white die cut.
- Punch the pot with the Gold Metallic Specialty Paper. Pop it up with dimensionsals.
- Adhere the stamped piece to the 3 ¾” x 2 ½” Flirty Flamingo piece.
- Attach large Basic White card stock to the card front.
- Add the Mint Macaron DSP.
- Use dimensionals to pop up the cactus layer.
- Tie a bow with the ribbon and add it to the card front with a Glue Dot.
- Stamp the cactus on the remaining white piece and glue it to the inside of the card.
Thanks so much for stopping by today. I hope you enjoyed this free card making tutorial. Want more inspiration? Sign up here to receive my free email newsletter. I send two to three newsletters a month that include a free tutorial, video, and Stampin’ Up! updates.
Kim
Click on any of the photos below to shop directly from my online store.
Jan 15, 2022 | 2021-2022 Annual Catalog, Annual Catalog, Birthday, Gallery, January-June 2022 Mini Catalog, Kim's Creations, Tutorial |

My January calendar shows a ton of birthdays. I need to make a stack of cards and get them in the mail. I pulled out Stampin’ Up’s Blessings of Home stamp set, now available in the January-June 2022 Mini Catalog.
Below, I offer a free tutorial and include 14 additional card samples using this stamp set and coordinating Flowers of Home Dies. (Purchase the Blessings of Home stamp set and Flowers of Home Dies as a bundle and receive a 10 percent discount.) See this post for another card and video using products from the Blessings of Home Bundle.
Blessings of Home Birthday
Stampin’ Up! Supplies:
- STAMPS – Blessings of Home (157390)
- PAPER – Very Vanilla Card Stock (101650), Night of Navy Card Stock (100867
- INK – Night of Navy (147110)
- OTHER – Tasteful Textile 3D Embossing Folder (152718), Stitched So Sweetly Dies (151690), Pearl Basic Jewels (144219), Night of Navy Stampin’ Bends Combo Pack (154891), Stampin’ Seal (152813), Mini Stampin’ Dimensionals (144108), Stampin’ Cut & Emboss Machine (149653)
Cutting & Scoring:
- Night of Navy – 8 ½” x 5 ½” scored at 4 ¼”, 4 ¼” x 3”
- Very Vanilla – 5 ¼” x 4” (2), 4 ½” x 3 ¼”, 3 ¾” x ½”
Instructions:
- Die cut the 4 ½” x 3 ¼” piece of Very Vanilla Card Stock with the scallop rectangle from the Stitched So Sweetly Dies that measures 4” x 3”.
- Stamp the smaller flower bouquet from the Blessings of Home stamp set onto the above die cut piece with Night of Navy ink.
- Use Stampin’ Seal to adhere this piece to the 4 ¼” x 3” piece of Night of Navy Card Stock.
- Emboss one of the 5 ¼” x 4” piece of Very Vanilla Card Stock with the Tasteful Textile 3D Embossing Folder.
- Fold the Night of Navy base in half and adhere the embossed piece to the front of the card.
- Add the stamped and layered image to the top of the card.
- Stamp the birthday sentiment with Night of Navy ink on the 3 ¾” x ½” Very Vanilla Card Stock.
- Use Mini Stampin’ Dimensionals to pop this up on the card front near the bottom of the card as shown above.
- Color three of the Pear Basic Jewels with the Night of Navy Dark Stampin’ Blends. Add them to the front of the card.
- Stamp a portion of the flower image with Night of Navy ink onto the remaining Very Vanilla Card Stock. Adhere to the center of the card.
Blessings of Home Card Samples
Please enjoy this other card samples created by members of my team, Kim’s Paper Krafers, for a recent swap during Stampin’ Up!’s virtual gathering. I hope you find some papercrafting inspiration!
Thanks so much for stopping by my blog today. I’d love to help you with your paper crafting journey. Contact me for catalogs and for schedules of local area classes in Mesa, Arizona.
Please subscribe to my free email newsletter by clicking here. I send to to three emails each month that include a free tutorial, a video, and Stampin’ Up! updates and special.
Kim
Click on any of the graphics below to shop directly from my online store:


