Now that Christmas has passed, my attention turns to Valentine’s Day! As a Stampin’ Up! demonstrator, I have the opportunity to preorder products from upcoming catalogs. One of my first choices was the Sweet Talk Suite. It’s available beginning Tuesday, January 4, in Stampin’ Up!’s January-June 2022 Mini Catalog. See this post for a host of other card samples.
The suite (#157629–$86.25) includes:
Sweet Conversations Bundle: Sweet Conversations stamp set and coordinating Sweet Heart Dies.
Sweet Talk 12 x 12 Designer Series Paper
Gingham Embossing Folder
Sweet Little Boxes
Iridescent Rhinestone Basic Jewels
Real Real 3/8″ Faux Linen Ribbon
Sweet Talk Suite Free Tutorial
Stampin’ Up! Supplies:
STAMPS – Sweet Conversations (157618)
PAPER –Basic White Card Stock (159276), Real Red Card Stock (102482), Sweet Talk 12 x 12 Designer Series Paper (157616)
INK – Real Red (147084), Highland Heather (147103), Pool Party (147107)
Real Red – 11” x 4 ¼” scored at 5 ½”, 2 ½” x 2 ½”, 3” x 3”
Basic White –5 ¼” x 4” and scraps
DSP – 5 ¼” x 1 ¼” (3) pattern shown above, 2 ½” x 2 ½” and scrap Petal Pink design
Instructions:
Fold the Real Red card stock in half.
Adhere the three DSP pieces equal distance apart on the front of the card.
Die cut a scallop circle from the 2 ½” x 2 ½” Real Red card stock. Die cut a nesting circle from the Petal Pink design DSP. Adhere these together and use Stampin’ Dimensionals to pop up on the front of the card.
Die cut the mini envelope from the Sweet Hearts Dies from the 3” x 3” Real Red card stock piece. Fold on the score lines to make an envelope. Use adhesive to place on the top of the circle.
Stamp one each of the solid, middle-size heart with Pool Party and Highland Heather ink on the Basic White scraps. Die cut.
Stamp the Luv U sentiment with Real Red ink on the Petal Pink DSP scrap. Die cut.
Use Glue Dots to place the Pool Party and Highland Heather in the mini envelope.
Attach the Luv U heart to the front of the envelope.
Stamp the three-heart, solid stamp with Real Red ink on the 5 ¼” x 4” Basic White card stock. Adhere to the card middle.
Thanks so much for stopping by today. If you’re not currently working with a Stampin’ Up! demonstrator, I’d love to help you with your paper crafting needs. In addition to my blog, I offer a free, email newsletter. I send two to three emails a month that include a free tutorial, video, and updates on Stampin’ Up! news, notes, sales, and products. Subscribe by clicking here. Then, be sure to check your email for a confirmation from AWeber. They just want to be sure you want my emails!
PAPER –Basic White Card Stock (159276), Real Red Card Stock (102482)
INK – Real Red (147084), Versamark (102283)
OTHER – Stitched Rectangle Dies (151820), Tasteful Labels Dies (152886), Star-Crossed Embossing Folder (156567), Pearl Basic Jewels (144219), Playful Pets Trim Combo Pack (152466), Basics Stampin’ Emboss Powders (155554), Heat Tool (129053), Mini Glue Dots (103683), Stampin’ Seal (152813), Stampin’ Dimensionals (104430), Stampin’ Cut & Emboss Machine (149653)
Cutting & Scoring:
Real Red – 8 ½” x 5 ½” scored at 4 ¼”, 4 ½” x 3 1/8”, 4” x 2 ½”
Basic White –5 ¼” x 4” (2), 4 ½” x 3 ½”
Ribbon – 8” (Red and White Pattern)
Instructions:
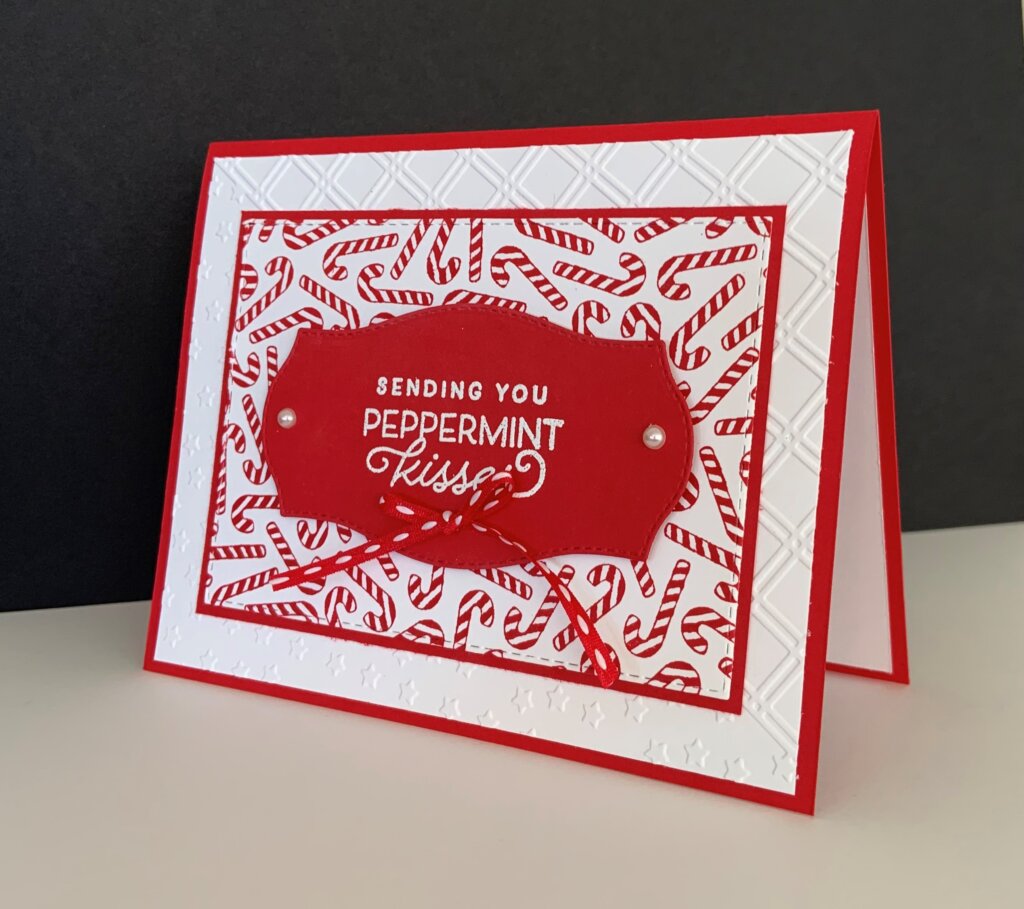
Ink the sentiment with Versamark Ink. Stamp it in the middle of the 4” x 2 ½” inch piece of Real Red Card Stock. Cover with White Embossing Powder and shake off excess. Heat with Heat Tool. Die cut with the label from the Tasteful Labels Dies.
Stamp the Candy Canes background stamp onto the 4 ½” x 3 ½” inch Basic White Card Stock with Real Red Ink. Die cut with the Stitched Rectangle Die that measures approximately 3” x 4 3/8”.
Glue the Candy Cane layer to the 4 ½” x 3 1/8” Real Red Card Stock.
Emboss one of the 5 ¼” x 4” pieces of Basic White Card Stock with the Star-Crossed Embossing Folder.
Fold the 8 ½” x 5 ½” card stock in half. Add the dry embossed white piece on top of this.
Adhere the Candy Cane/Real Red layer on top of the Star-Crossed embossed piece.
Use Stampin’ Dimensionals to pop up the sentiment in the middle of the Candy Cane piece.
Add a pearl to each side of the sentiment, as shown above.
Tie a bow with the ribbon and adhere to card front using a Glue Dot.
Adhere the last Basic White panel to the inside of the card.
Thanks for stopping by today.
Looking for more inspiration? Sign up here to receive my free email newsletter. I send two to three newsletters each month that include a free tutorial, video, and Stampin’ Up! updates. Once you click on the link, be sure to check your email for a confirmation from AWeber. They want to be sure you want my emails!
Click on any of the links below to shop directly from my online store:
I pulled together two stamp sets from Stampin’ Up!’s 2021-2022 Annual Catalog to create this Thanksgiving card — Beauty of Friendship and Banner Year. The card goes together easily and quickly. Enjoy the free tutorial below.
INK – Cajun Craze (147085), Early Espresso (147114)
OTHER – Stitched Rectangle Dies (151820), Gold 3/8” Fine Art Ribbon (154561), Champagne Rhinestone Basic Jewels (151193), Mini Glue Dots (103683), Stampin’ Seal (152813), Stampin’ Dimensionals (104430), Paper Snips Scissors (103579), Stampin’ Cut & Emboss Machine (149653)
Cutting & Scoring:
Basic White – 8 ½” x 5 ½” scored at 4 ¼”, 5 ¼” x 4”, 3 ¾” x 2 ½”
Gold Foil – ¼” x 5 ¼” (2)
DSP – 5 ¼” x 1 ½”
Ribbon – 4”
Instructions:
Die cut the 3 ¾” x 2 ½” Basic White Card Stock with the Stitched Rectangle Die that measures approximately 2 ¼’ x 3 ½”
Stamp the tree trunk/branches image with Early Espresso ink onto the die cut rectangle.
With Cajun Caze ink, stamp the large, more solid-looking foliage stamp on top of the trunk, creating a tree image. Set aside.
Choose the “Happy Thanksgiving” sentiment from the Banner Year stamp set and stamp with Cajun Craze ink in the bottom, right-hand corner of the 5 ¼” x 4” piece of Basic White card stock.
Tape the DSP piece (pattern shown above) to the 5 ¼” x 4” Basic White card stock, with the top edge about 1 ½” down from the top. Add each Gold Foil strip, one on top of the DSP and one on the bottom. These are nudged close to the DSP, but do not overlap.
Fold the 8 ½” x 5 ½” Basic White card stock in half. Adhere the 5 ¼” x 4” stamped and decorated piece on top of this.
Add Stampin’ Dimensionals to the back of the tree piece and place on the card front, on the left-hand side.
Tie a knot in the ribbon and place on the tree image with a Glue Dot. Trim ribbon as necessary.
Add three Champagne Rhinestone Basic Jewels to the card front.
Thanks so much for stopping by today.
Get More Inspiration
Looking for more inspiration? Subscribe to my free email newsletter by clicking here. (Then be sure to check your email for an email from Aweber confirming you really want to receive my emails!) I send two to three emails each month that include a free tutorial, video, updates on Stampin’ Up! news and products, and special offers to newsletter subscribers.
Kim
Click on any of the graphics below to shop directly from my online store.
So, I started to play and just let my imagination roll with it. Be sure to read the entire post to see other card samples and a video that shows the samples and explains them in more detail. In the video, I reveal a Stamparatus tip to help you with background stamps.
OTHER –Real Red 3/8” Mini Ruffled Ribbon (156323), Tasteful Labels Dies (152886), Mini Glue Dots (103683), Stampin’ Seal (152813), Stampin’ Dimensionals (104430), Red Rhinestone Basic Jewels (146924), Mini Stampin’ Cut & Emboss Machine (151003)
Cutting & Scoring:
Crumb Cake – 8 ½” x 4 ¼” scored at 4 ¼”, 3 ¾” x 3 ¾”, scrap
Real Red – 4” x 4”
Ribbon – 5“, 3”
Instructions:
Fold the 8 ½” x 4 ¼” Crumb Cake Card Stock in half.
Stamp the Candy Canes with Real Red ink on the 3 ¾” x 3 ¾” Crumb Cake Card Stock.
Die cut the Crumb Cake label with the Tasteful Labels Dies, as shown above.
Use Real Red ink to stamp the Merry Christmas sentiment from Perfectly Plaid onto the label.
Adhere the Candy Cane panel to the 4” x 4” Real Red Card Stock with your adhesive of choice.
Create a faux bow: Attach a Glue Dot to each end of the 5” ribbon. Wrap the ribbon around the Candy Cane panel, adhering the Glue Dots in the back. Slip the 3” ribbon under the ribbon on the card and tie a knot.
Attach this whole piece to the front of the Crumb Cake base with adhesive.
Place some Stampin’ Dimensionals on the back of the label and adhere to the front of the card, on the right, on top of the ribbon.
Embellish with a Red Rhinestone Basic Jewel.
Candy Canes Card Samples
With Frosted Gingerbread and a Fun Fold
Candy Canes with Stitched Rectangles
Candy Canes Card Samples Video
Thanks so much for stopping by today! I hope I provided some inspiration for your holiday card making! Please contact me if you have questions about any of the cards show here. I’d love to help you in your paper crafting journey.
Need more idea? Subscribe to my free, email newsletter by clicking here. I send two to three emails each month that include a free tutorial, video, Stampin’ Up! updates, and special offers for subscribers.
Kim
Click on any of the graphics below to shop for supplies directly from my online store.
This week, I’ve focused on using products from Stampin’ Up!’s current Sale-A-Bration sale.This sale allows you to earn FREE items with minimum purchases of $50 and $100 before tax and shipping. Choose from 10 different items.
I love the Penguin Playmates Designer Series Paper, especially the side of the paper without the penguins. Weird, right? But, the colors lend themselves to so many projects.
See this post for cards created with the Delicate Dahlias stamp set and the Penguin Playmates DSP.
Please enjoy this free Penguin Playmates Christmas Card Tutorial.
PAPER –Penguin Playmates (DSP) (158420), Fresh Freesia (155613), Soft Sea Foam (146988), Basic White (159276)
INK – Gorgeous Grape (147099)
OTHER – Fresh Freesia 3/8” Open Weave Ribbon (155615), Layering Circles Dies (151770), Wonderful Snowflakes (156340), Beautiful Trees Dies (155840), Mini Glue Dots (103683), Stampin’ Seal (152813), Stampin’ Dimensionals (104430), Mini Stampin’ Dimensionals (144108), Mini Stampin’ Cut & Emboss Machine (151003)
Cutting & Scoring:
Fresh Freesia – 8 ½” x 5 ½” scored at 4 ¼”, 3 ½” x 3 ½”
Soft Sea Foam – 3 ½” x 3 ½”
Basic White, 5 ¼” x 4”, scrap
DSP – 2 ½” x 5”, 1 ¼” x 5”
Ribbon – 6“, 3”
Instructions:
With Gorgeous Grape ink, stamp the Merry Christmas sentiment from the Peaceful Deer stamp set onto a Basic White scrap. Die cut with the rectangle label from the Beautiful Trees Dies.
Die cut the 3 ½” x 3 ½” Fresh Freesia card stock with the largest circle from the Layering Circle Dies and the largest scallop on the 3 ½” x 3 ½” Soft Sea Foam card stock. Adhere these together.
With adhesive of choice, place the two DSP pieces onto the 5 ¼” x 4” Basic White card stock, as shown above, with the 1 ¼” piece on the left and the 2 ½” piece placed right next to it, leaving a small white border around.
Place a Glue Dot on each end of the 6” piece of ribbon. Wrap the ribbon around the above layer and affix Glue Dots in the back.
With adhesive of choice, attach this piece to the front of Fresh Freesia 8 ½” x 5 ½” card stock that’s been folded in half to create a base.
Place one Glue Dot in the center of the snowflake. (Note: there is a shiny side and a matte side to the snowflake. I like the shiny side to face up.) Center the snowflake on the circle.
Pop up the snowflake circle on the front of the card with Stampin’ Dimensionals.
Put two or three Mini Stampin’ Dimensionals on the sentiment and place on top of the snowflake, near the bottom.
Tuck the 3” piece of ribbon underneath the ribbon on the card and tie a knot, as shown above.
Free Newsletter?
Would you like to receive tutorials just like this in your email? Click here to subscribe to my free, email newsletter. I send emails two to three times a month and include a tutorial, video, and updates on Stampin’ Up! news and notes.
Thanks so much for stopping by today.
Kim
Click on any of the images below to shop directly from my online store.
Sign up for my newsletter and get a free tutorial!
Get Updates!
Join our mailing list to receive the latest updates from Kim!
You have Successfully Subscribed!
Current Catalogs
Follow Me
Categories
Disclaimer
The content in this blog is the sole responsibility of Kim Quade as a Stampin’ Up!® Independent Demonstrator. The use of and content of classes, services or products offered is not endorsed by Stampin’ Up!