I love being a Stampin’ Up! demonstrator! One of the perks is being able to preorder products from new catalogs a month before the catalog goes live. My first purchase from the July-December 2022 Mini Catalog was the Sweet Candy Canes Bundle and the Sweetest Christmas 12 x 12 Designer Series Paper. Find them on pages 8 and 9 of the catalog. Click here to see a PDF of the catalog.
Sweet Candy Canes Samples
For the card above, I paired the Sweet Candy Canes stamp set and coordinating Candy Canes Dies with a SaleABration item: the Silver and Gold 6 x 6 Designer Series Paper. During SaleABraiton months, July and August, earn free, exclusive stamp sets, dies, and Designer Series Paper with minimum purchases of $50 and $100. (See something you like? Make sure to order before it’s gone. Supplies are limited.) Click here to see a PDF of the SaleABration brochure.
I heat embossed the candy canes with gold embossing powder, die cut them, and added them to a Basic White cardstock panel cut with the Deckled Rectangle Dies. Embellish with ribbon and jewels, and you have created an elegant, handmade greeting card.
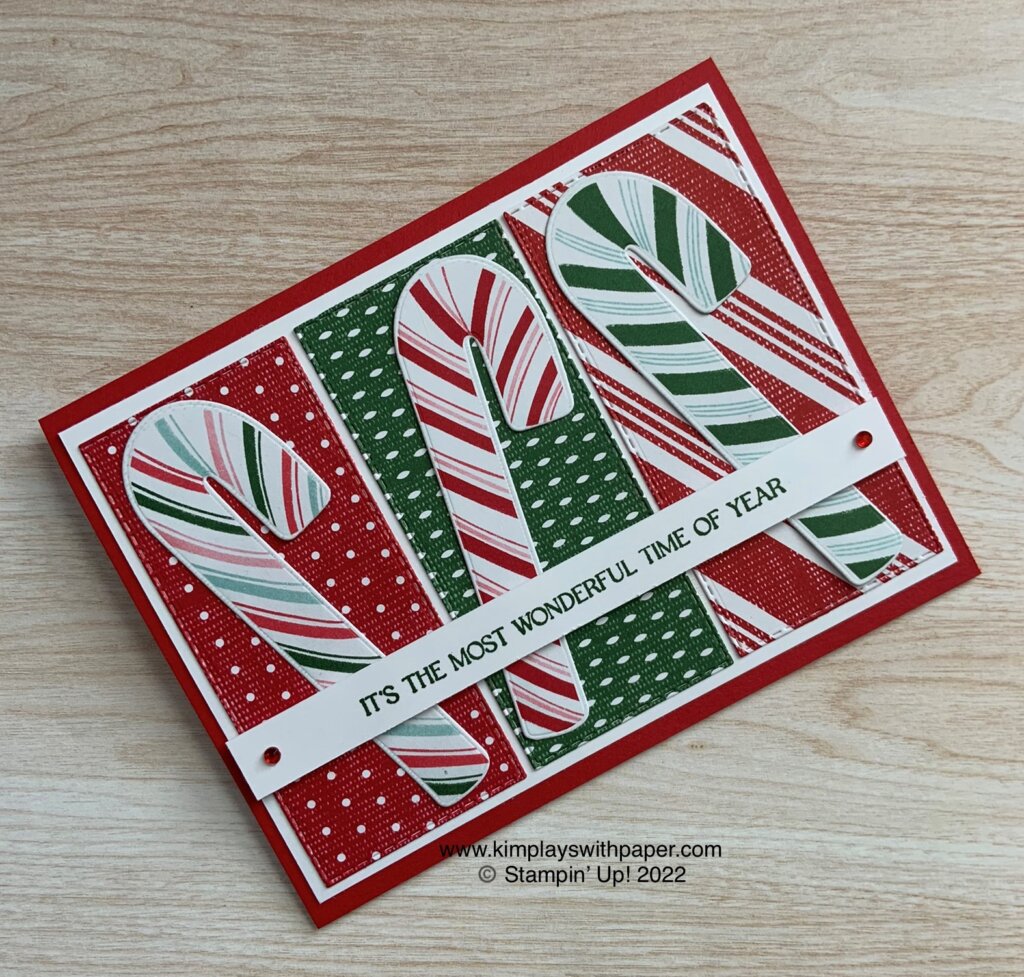
The card above showcases the Sweetest Christmas Designer Series Paper. I die cut the candy canes directly from the patterned paper and layered them on different panels of the paper. It makes for another quick and easy holiday card.
Here’s another example of a quick, cute, card. Stamp the candy canes with Real Red ink, die cut, and layer on a piece of the festive Designer Series Paper. Hint: Use a Stamparatus so you can restamp the candy canes to achieve deep, red images.
Here, I paired the Sweet Candy Canes stamp set with Stampin’ Up!’s Peekaboo Treat Bags. I love these bags. See another post here. Use the bags to gift everything from candy to gift cards.
Sweet Candy Canes Samples Video
Thanks so much for visiting my blog today. I hope you enjoyed the samples and are inspired to create something handmade of your own. Need more inspiration? Click here to sign up to receive my free, email newsletter. I send two to three newsletters each month that include a free tutorial, video, and updates on Stampin’ Up! news.
Kim
Click on any of the graphics below to visit my online store. You can purchase all of the items used to make today’s cards.
There’s a lot to love about the Kits Collection by Stampin’ Up!. Not only do the kits deliver a quick and easy all-inclusive project in a box, you have a stamp set and ink spot to help you create other projects. (Remember: now through June 30, the kits in the collection are on sale. Buy one, get one at half off. Click here to see the selection and shop.)
I have ordered several of the kits and decided to try out the Kindness Cards Kit. It contains the ingredients to create eight coaster cards—plus a cute travel-sized tin to hold it all. Each card is a story of kindness you can create and share. I plan to bring these cards with me on my upcoming trip to Colorado and Nebraska to visit team members.
But I’m also excited to show you the alternate above created with one of the stamps from the set. Using the Design a Daydream 12 x 12 Designer Series Paper, this pocket card is perfect for gift cards, small treats, and notes. Earn this as a hostess reward. It’s featured on page 170 of Stampin’ Up!’s 2022-2023 Annual Catalog.
Be sure watch this Facebook Live replay to see how I created this alternate pocket card.
Kindness Card Kit Alternate Video
Thanks so much for visiting my blog today. Please let me know how I can help you on your paper crafting journey.
Need more inspiration? Click here to sign up to receive my free, email newsletter. I send two to three newsletters each month that include a free tutorial, video, class to go announcements, and Stampin’ Up! updates. (Then, watch your email for a message from Aweber. They just want to confirm you want to receive my messages.)
Kim
Click on any of the photos below to shop directly from my online store.
Since moving to Arizona more than two years ago, I’ve gained a newfound love for everything cactus. In my head, I imagined that deserts and cactus were dry and dull. This is far from true. The majestic saguaros are absolutely amazing. And in the spring, the cactus come alive with blooms of many and various colors.
When Stampin’ Up! releases a new cactus stamp set, I’m sure to place it in my collection. I love the Cactus Cuties Bundle that includes the Cactus Cuties Stamp Set and Cactus Builder Punch. Buy them as a bundle and save 10 percent. Find it on pages 66 and 67 of Stampin’ Up!’s January-June 2022 Mini Catalog.
Thanks to Brayce Campagna for giving me the inspiration for the card above.
PAPER – Flirty Flamingo Card Stock (141416), Basic White Card Stock (159276), 6 x 6 Subtles Designer Series Paper Assortments (DSP) (155229), Gold 6 x 6 Metallic Specialty Paper (156844)
INK – Flirty Flamingo (147052), Mint Macaron (147106)
OTHER – Stitched So Sweetly Dies (151690), Flirty Flamingo ¼” Gold Metallic Ribbon (155610), Stampin’ Seal (152813), Stampin’ Dimensionals (104430), Mini Glue Dots (103683), Stampin’ Cut & Emboss Machine (149653)
Cutting & Scoring:
Flirty Flamingo – 11” x 4 ¼” scored at 5 ½” and folded in half, 3 ¾” x 2 ½”
Basic White Card Stock — 5 ¼” x 4” (2), 4” x 3”
Mint Macaron DSP – 5” x 3 ¾”
Gold Metallic Specialty Paper — scrap
Ribbon – 8”
Instructions:
Die cut the 4” x 3” Basic White card stock with the scallop rectangle from the Stitched So Sweetly Dies that measures 3 ½” x 2 ½”.
Stamp the cactus with Mint Macaron ink and the sentiment with Flirty Flamingo ink on the white die cut.
Punch the pot with the Gold Metallic Specialty Paper. Pop it up with dimensionsals.
Adhere the stamped piece to the 3 ¾” x 2 ½” Flirty Flamingo piece.
Attach large Basic White card stock to the card front.
Add the Mint Macaron DSP.
Use dimensionals to pop up the cactus layer.
Tie a bow with the ribbon and add it to the card front with a Glue Dot.
Stamp the cactus on the remaining white piece and glue it to the inside of the card.
Thanks so much for stopping by today. I hope you enjoyed this free card making tutorial. Want more inspiration? Sign up here to receive my free email newsletter. I send two to three newsletters a month that include a free tutorial, video, and Stampin’ Up! updates.
Kim
Click on any of the photos below to shop directly from my online store.
It’s that time of year! It’s gift-giving time. We buy a lot of gift cards. So, we need a special, hand-stamped holder for them.
I love this particular design. It fits perfectly in one of Stampin’ Up!’s medium envelopes.
Frosted Gingerbread Gift Card Holder
This card uses:
Stampin’ Up!’s Frosted Gingerbread stamp set and coordinating Gingerbread Dies. Buy the Frosted Gingerbread Bundle and save 10 percent.
Merry Melody 3D Embossing Folder
Layering Circles Dies
Gold heat embossing
Gold Foil
Very Vanilla Thick card stock and Very Vanilla regular card stock
Champagne Rhinestone Basic Jewels
Soft Suede ink
Here are some basic measurements:
Thick Very Vanilla base: 7 3/4 inches x 5 inches, scored at 2 1/2 inches and 6 inches
Front embossed pieces – Very Vanilla: 4 3/4 inches x 1 1/2 inches and 4 3/4 inches x 2 1/4 inches
Piece to stamp sentiment for inside – Very Vanilla: 4 3/4 inches x 1 1/2 inches
Belly Band — Very Vanilla: 8 1/2 inches x 1 inch, scored at 2 1/4 inch and 5 7/8 inch
Here’s a view of the inside of the holder.
I made another version of this card with more traditional colors.
Frosted Gingerbread Gift Card Holder Video
The Frosted Gingerbread Bundle, found in Stampin’ Up!’s July-December 2021 Mini Catalog, is just one of the many items that will be retiring January 3. Be sure to put this bundle on your next order before it sells out. Click here to see the Last Chance Products list. This list includes the paper crafting products that won’t be found in any future catalogs. Some of the items are discounted.
Thanks so much for stopping by today. Need more inspiration? Sign up to receive my free, email newsletter by clicking here. I send two to three emails each month that include a free tutorial, video, and updates on Stampin’ Up! news.
Kim
Click on any of the graphics below to purchase the products to create this gift card holder at home.
Welcome to Team Stamp It’s October blog hop. We are so glad you joined us! This month we feature holiday cards and projects, including Thanksgiving and Christmas. Be sure to visit all of the blogs on the hop. Leave a comment on each with the hashtag #stampitcontest to enter to win a free Hello Dear Friend card kit. See the list of hoppers below.
I love the background of this card. It features the rubbing alcohol and Stampin’ Blends technique. See the video below for a look at how this technique works.
Basically, choose the Stampin’ Blends colors you want to use. Scribble or color on a piece of Vellum Card Stock. For this card, I used Crushed Curry, Cherry Cobbler and Crumb Cake. Then, with a paint brush, drip 91 percent rubbing alcohol onto the colored parts. Watch as the ink spreads and merges to make a cool background. Once it’s dry, you can use the vellum for a variety of card-making purposes. You’ll get a different result each time you try this. Experiment and have fun with it!
I hope you’ve found some inspiration in today’s project. Be sure to visit all of the blogs on the hop and leave a comment. You could win a Hello Dear Friend card kit.
Congratulations to last month’s winner: Laura Klinkler.
List of Blog Hoppers
Click on the links below to visit participating blogs:
Click on any of the photos below to shop directly from my online store:
Sign up for my newsletter and get a free tutorial!
Get Updates!
Join our mailing list to receive the latest updates from Kim!
You have Successfully Subscribed!
Current Catalogs
Follow Me
Categories
Disclaimer
The content in this blog is the sole responsibility of Kim Quade as a Stampin’ Up!® Independent Demonstrator. The use of and content of classes, services or products offered is not endorsed by Stampin’ Up!