It’s that time of year! It’s gift-giving time. We buy a lot of gift cards. So, we need a special, hand-stamped holder for them.
I love this particular design. It fits perfectly in one of Stampin’ Up!’s medium envelopes.
Frosted Gingerbread Gift Card Holder
This card uses:
Stampin’ Up!’s Frosted Gingerbread stamp set and coordinating Gingerbread Dies. Buy the Frosted Gingerbread Bundle and save 10 percent.
Merry Melody 3D Embossing Folder
Layering Circles Dies
Gold heat embossing
Gold Foil
Very Vanilla Thick card stock and Very Vanilla regular card stock
Champagne Rhinestone Basic Jewels
Soft Suede ink
Here are some basic measurements:
Thick Very Vanilla base: 7 3/4 inches x 5 inches, scored at 2 1/2 inches and 6 inches
Front embossed pieces – Very Vanilla: 4 3/4 inches x 1 1/2 inches and 4 3/4 inches x 2 1/4 inches
Piece to stamp sentiment for inside – Very Vanilla: 4 3/4 inches x 1 1/2 inches
Belly Band — Very Vanilla: 8 1/2 inches x 1 inch, scored at 2 1/4 inch and 5 7/8 inch
Here’s a view of the inside of the holder.
I made another version of this card with more traditional colors.
Frosted Gingerbread Gift Card Holder Video
The Frosted Gingerbread Bundle, found in Stampin’ Up!’s July-December 2021 Mini Catalog, is just one of the many items that will be retiring January 3. Be sure to put this bundle on your next order before it sells out. Click here to see the Last Chance Products list. This list includes the paper crafting products that won’t be found in any future catalogs. Some of the items are discounted.
Thanks so much for stopping by today. Need more inspiration? Sign up to receive my free, email newsletter by clicking here. I send two to three emails each month that include a free tutorial, video, and updates on Stampin’ Up! news.
Kim
Click on any of the graphics below to purchase the products to create this gift card holder at home.
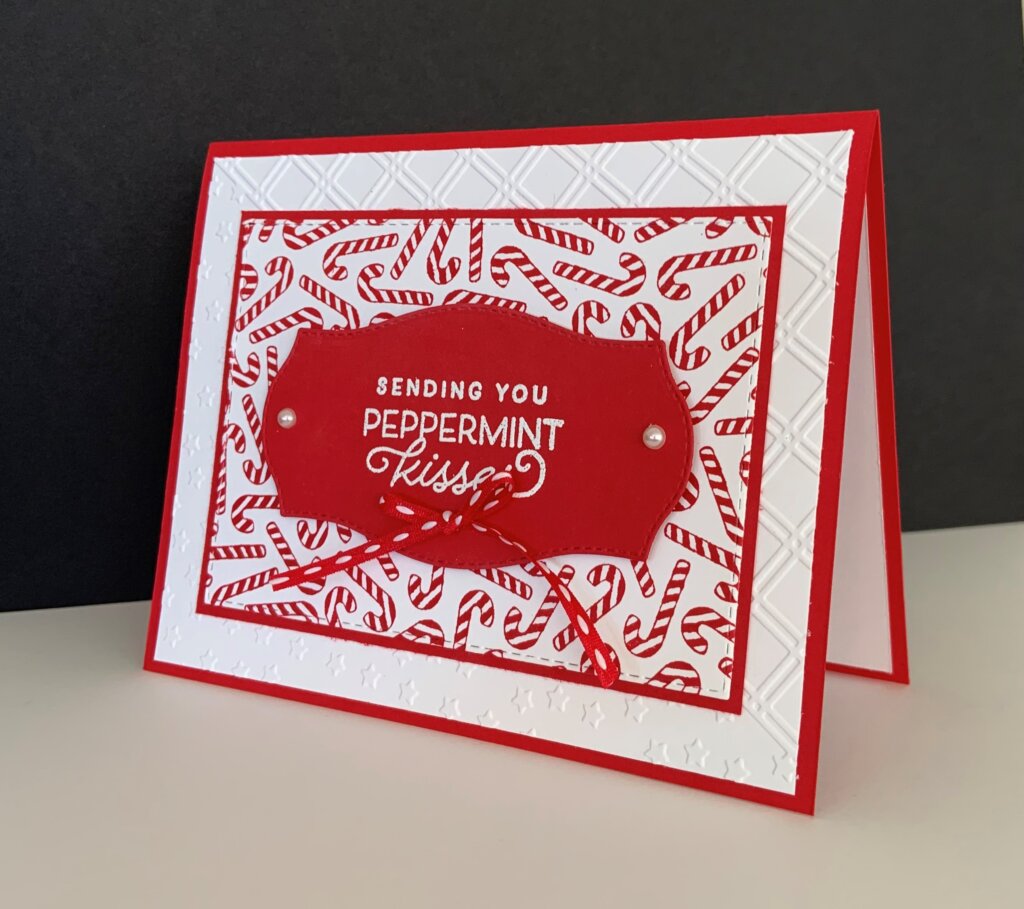
PAPER –Basic White Card Stock (159276), Real Red Card Stock (102482)
INK – Real Red (147084), Versamark (102283)
OTHER – Stitched Rectangle Dies (151820), Tasteful Labels Dies (152886), Star-Crossed Embossing Folder (156567), Pearl Basic Jewels (144219), Playful Pets Trim Combo Pack (152466), Basics Stampin’ Emboss Powders (155554), Heat Tool (129053), Mini Glue Dots (103683), Stampin’ Seal (152813), Stampin’ Dimensionals (104430), Stampin’ Cut & Emboss Machine (149653)
Cutting & Scoring:
Real Red – 8 ½” x 5 ½” scored at 4 ¼”, 4 ½” x 3 1/8”, 4” x 2 ½”
Basic White –5 ¼” x 4” (2), 4 ½” x 3 ½”
Ribbon – 8” (Red and White Pattern)
Instructions:
Ink the sentiment with Versamark Ink. Stamp it in the middle of the 4” x 2 ½” inch piece of Real Red Card Stock. Cover with White Embossing Powder and shake off excess. Heat with Heat Tool. Die cut with the label from the Tasteful Labels Dies.
Stamp the Candy Canes background stamp onto the 4 ½” x 3 ½” inch Basic White Card Stock with Real Red Ink. Die cut with the Stitched Rectangle Die that measures approximately 3” x 4 3/8”.
Glue the Candy Cane layer to the 4 ½” x 3 1/8” Real Red Card Stock.
Emboss one of the 5 ¼” x 4” pieces of Basic White Card Stock with the Star-Crossed Embossing Folder.
Fold the 8 ½” x 5 ½” card stock in half. Add the dry embossed white piece on top of this.
Adhere the Candy Cane/Real Red layer on top of the Star-Crossed embossed piece.
Use Stampin’ Dimensionals to pop up the sentiment in the middle of the Candy Cane piece.
Add a pearl to each side of the sentiment, as shown above.
Tie a bow with the ribbon and adhere to card front using a Glue Dot.
Adhere the last Basic White panel to the inside of the card.
Thanks for stopping by today.
Looking for more inspiration? Sign up here to receive my free email newsletter. I send two to three newsletters each month that include a free tutorial, video, and Stampin’ Up! updates. Once you click on the link, be sure to check your email for a confirmation from AWeber. They want to be sure you want my emails!
Click on any of the links below to shop directly from my online store:
When it comes to Christmas and the holidays, are you a traditionalist? Or do you prefer non-tradiational colors? I experimented with both using Stampin’ Up!’s Frosted Gingerbread Bundle. It comes with the Frosted Gingerbread Stamp Set and the coordinating Gingerbread Dies. Buy them as a bundle and save 10 percent.
The coordinating Gingerbread & Peppermint 6 x 6 Designer Series Paper makes this a versatile and fun combination of products. The colors include Real Red, Old Olive, Early Espresso, and Cinnamon Cider — what might be called your traditional colors.
I love this pack of 48 sheets, You can use the dies to cut the images directly from the paper, as well as use it for accents and backgrounds.
Frosted Gingerbread Mini Cards
I had much fun experimenting with this bundle and just had to make some 3 x 3 mini cards in a variety of designs. Here’s a sample of the traditional colors using pieces cut from the patterned paper.
Mini cards make great teacher gifts, hostess gifts, and stocking stuffers. Or, use them as your own gift tags. They are so easy to make. Cut your base card stock at 6 inches x 3 inches and score at 3 inches. Fold and decorate.
In addition, Stampin’ Up! offers mini envelopes as well as fun acetate boxes that can be decorated to coordinate with the cards. Be sure to view the product list below.
Frosted Gingerbread Mini Cards Video
Thanks so much for visiting Kim Plays with Paper today! I hope you are inspired!
I’d love to have you subscribe to my free email newsletter. Click here (and then check your email inbox for a verification from AWeber to complete your subscription). I send two to three emails each month that include a free tutorial, video, updates on Stampin’ Up! products and specials, and sometimes, special subscriber offers.
Kim
Click on any of the images below to shop for the products used to create these cute cards.
Welcome to Team Stamp It’s October blog hop. We are so glad you joined us! This month we feature holiday cards and projects, including Thanksgiving and Christmas. Be sure to visit all of the blogs on the hop. Leave a comment on each with the hashtag #stampitcontest to enter to win a free Hello Dear Friend card kit. See the list of hoppers below.
I love the background of this card. It features the rubbing alcohol and Stampin’ Blends technique. See the video below for a look at how this technique works.
Basically, choose the Stampin’ Blends colors you want to use. Scribble or color on a piece of Vellum Card Stock. For this card, I used Crushed Curry, Cherry Cobbler and Crumb Cake. Then, with a paint brush, drip 91 percent rubbing alcohol onto the colored parts. Watch as the ink spreads and merges to make a cool background. Once it’s dry, you can use the vellum for a variety of card-making purposes. You’ll get a different result each time you try this. Experiment and have fun with it!
I hope you’ve found some inspiration in today’s project. Be sure to visit all of the blogs on the hop and leave a comment. You could win a Hello Dear Friend card kit.
Congratulations to last month’s winner: Laura Klinkler.
List of Blog Hoppers
Click on the links below to visit participating blogs:
Click on any of the photos below to shop directly from my online store:
Love this super easy treat packet! Perfect for teacher gifts, stocking stuffers, and treats for friends. I was inspired by a video by Katherine Themann back in August. So many fun ways to change these up with different patterned papers, rubber stamps, holidays and themes. Be sure to watch my video below showing visually how these go together.
Start with piece of Real Red card stock measuring 10 inches by 3 1/4 inches.
Score at 1 inch, 4 3/4 inches, and 6 1/4 inch. Fold.
Decorate the front and the back of the packet with either stamped card stock (like the Candy Canes) or Designer Series Paper. You need two pieces that measure 3 inches x 3 1/2 inches and one piece that measure 3 inches by 3/4 inches.
Add a sentiment and embellish.
Trim three inches from one of Stampin’ Up!’s 3 x 9 gusseted cellophone bags. Fill with candy of choice. (This is the best part! — and eating the extras!) Adhere the bag to the inside of the treat packet.
Close the treat package with self-adhesive Velcro.
Top off with complementary ribbon.
Enjoy a couple of other samples.
Candy Canes Treat Packet Video
Thanks for joining me today. Please let me know if you have questions about this project or any other rubber stamping and card making techniques.
Looking for more inspiration? Sign up for my free email newsletter by clicking here. I send two to three emails each month that include a free tutorial, video, and more. (Once you click this link, watch your InBox for a confirmation email from AWeber. They want to be sure you want emails from me!)
Kim
Click on any of the graphics below to shop directly from my online store.
Sign up for my newsletter and get a free tutorial!
Get Updates!
Join our mailing list to receive the latest updates from Kim!
You have Successfully Subscribed!
Current Catalogs
Follow Me
Categories
Disclaimer
The content in this blog is the sole responsibility of Kim Quade as a Stampin’ Up!® Independent Demonstrator. The use of and content of classes, services or products offered is not endorsed by Stampin’ Up!