I’m offering a Heartwarming Hugs Free Tutorial today as well as a video.
I love a lot of things about this card. It:
Showcases the Heartwarming Hugs Designer Series Paper.
Is festive!
Features the Gift Wrapped stamp set and coordinating Gift Bow Builder Punch.
Goes together very easily and can be adapted to a variety of papers and sentiments.
Heartwarming Hugs Free Tutorial
Stampin’ Up! Supplies:
STAMPS – Gift Wrapped Bundle (155155)
PAPER – Heartwarming Hugs Designer Series Paper (153492), Pear Pizzaz (131201), Real Red (102482), Whisper White (100730)
INK – Real Red (147084), Mossy Meadow (147111)
OTHER – Gold Cord-Wonder of the Season Ribbon Combo Pack (153537), Mini Glue Dots (103683), Paper Snips (103579), Stampin’ Seal (152813), Stampin’ Dimensionals (104430)
Cutting & Scoring:
Pear Pizzazz Card Stock – 8 ½” x 5 ½” – score at 4 ¼”, 3” x 3” scrap
Real Red Card Stock – 5 1/4” x 4”
Whisper White – 4 ½” x ¾”, 5 ¼” x 4”
Heartwarming Hugs Designer Series Paper – three varied designs – 1 ½” x 3 ¾”
Gold Cord – 8”
Instructions:
Fold the 8 ½” x 5 ½” Pear Pizzazz Card Stock in half at the score line.
Using Stampin’ Seal, afix the three pieces of Heartwarming Hugs DSP onto the Real Red piece, equally spaced.
Adhere this piece to the Pear Pizzazz base.
Stamp the “A Very Merry Christmas” sentiment with Real Red ink on the Whisper White 4 ½” x ¾” piece toward the right-hand side, leaving space to add the bow later.
Adhere the sentiment to the front of the card with Glue Dots.
Stamp a bow from the Gift Wrapped stamp set with Mossy Meadow ink onto the 3” x 3” Pear Pizzazz scrap.
Punch the image using the coordinating Gift Bow Builder Punch.
With Stampin’ Dimensionals, place the bow on the card front, on top of the sentiment piece, to the left of the print, as shown in the photo above.
Create a bow with the Gold Cord. Attach to the top of the paper bow in the center with a Glue Dot.
Attach the 5 ¼” x 4” Whisper White panel to the inside of the card.
Thank you for stopping by today! Please let me know if you have questions about this card or any other paper crafting project. I’d love to be you Stampin’ Up! demonstrator.
Kim
Video Directions
List of Products Used
Click on any of the graphics below to shop directly from my online store.
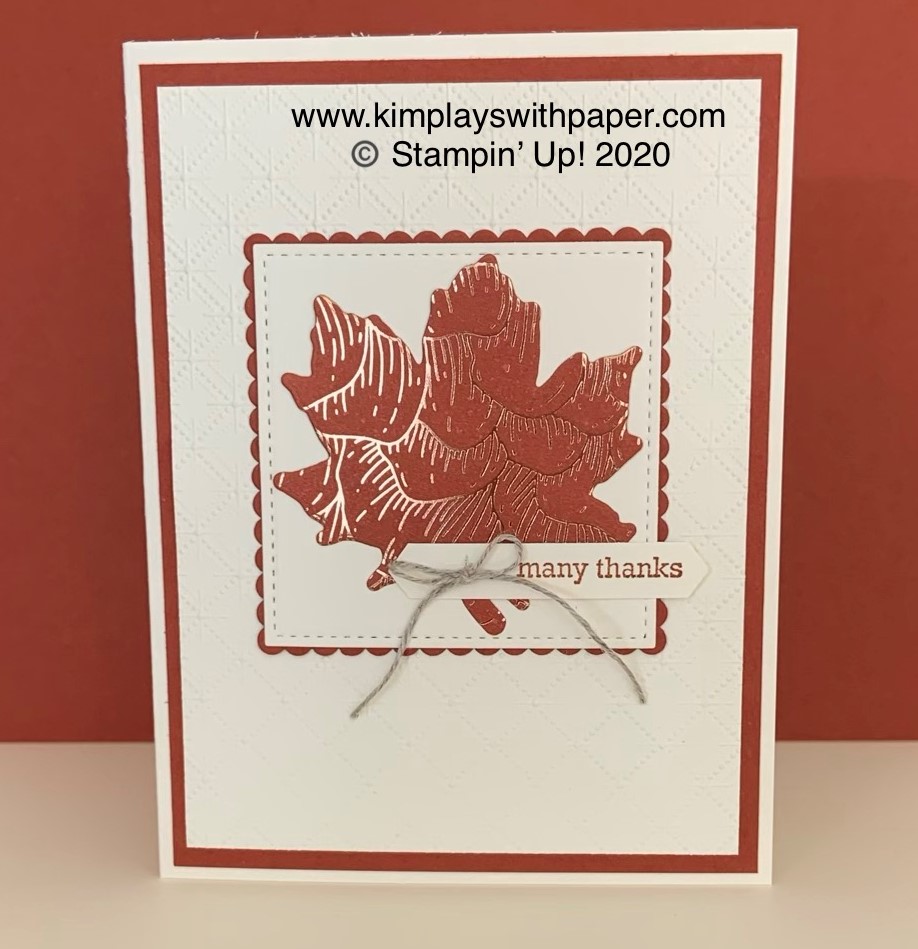
Today I’m sharing a free, fall thank-you card tutorial.
Stampin’ Up!’s Gilded Autumn Designer Series Paper ranks as one of my faves right now. I just love all of the foil sheets. Look for it and the Gathered Leaves Dies in the August-December 2020 Mini Catalog.
Enjoy this free tutorial!
Stampin’ Up! Supplies:
STAMPS – Itty Bitty Greetings (151331)
PAPER – Gilded Autumn Specialty Designer Series Paper (153520), Cajun Craze (119684), Very Vanilla (101650), Thick Very Vanilla (144237)
INK – Cajun Craze (147805)
OTHER – Gathered Leaves Dies (150662), Stitched Shapes (152323), Layering Squares (151772), Classic Label Punch (141491), Dainty Diamonds 3D Embossing Folder (152702), Linen Thread (104199), Mini Glue Dots (103683), Paper Snips (103579), Stampin’ Seal (152813), Stampin’ Cut & Emboss Machine (149653)
Cutting & Scoring:
Very Vanilla Thick Card Stock – 8 ½” x 5 ½” – score at 4 ¼”
Very Vanilla Card Stock – 5” x 3 ¾”, 3” x 3”, and a scrap
Cajun Craze – 5 ¼” x 4” and 3” x 3”
Gilded Autumn Specialty Designer Series Paper – 3” x 3”
Linen Thread – 8”
Instructions:
Fold the 8 ½” x 5 ½” Very Vanilla Thick Card Stock in half at the score line.
Emboss the 5” x 3 ¾” Very Vanilla Card Stock with the Dainty Diamonds 3D Embossing Folder in the Stampin’ Cut & Emboss Machine.
Using Stampin’ Seal, afix the embossed sheet onto the 5 ¼” x 4” Cajun Craze Card Stock.
Adhere this piece to the Very Vanilla base.
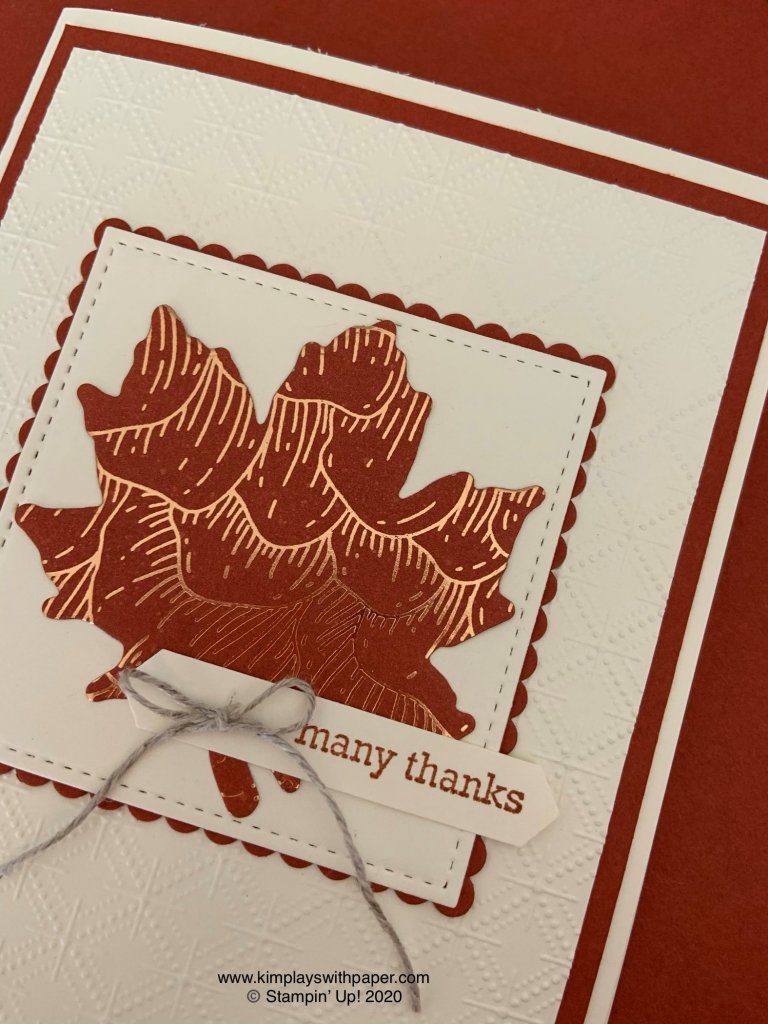
Die cut the big leaf from the Gathered Leaves dies with the Gilded Autumn Specialty DSP, the Stitched Square from the 3” x 3” Very Vanilla, and a scallop square from the 3” x 3” Cajun Craze.
Layer the Very Vanilla square onto the Cajun Craze scallop square. Add die cut leaf using Glue Dots.
Place this layer onto the card front about 2” from the top of the card.
Stamp “Many Thanks” sentiment onto a scrap of Very Vanilla. Punch with Classic Label Punch.
Use Glue Dots to adhere the sentiment on top of the leaf, as shown in the photo above.
Tie the Linen Thread into a bow and place on the front of the card with a Glue Dot.
Thanks for stopping by today! Click on any of the graphics below to go directly to my online store. Please let me know if you have questions. If you aren’t already working with a Stampin’ Up! demonstrators, I’d love to help you with your paper crafting projects.
OTHER – Layering Circles Dies (151770), Tasteful Textures 3D Embossing Folder (152718), Banners Pick a Punch (153608); Basket Weave & Metallic Ribbon Combo Pack (153553); Gilded Gems (152478; Stampin Cut & Emboss Machine (149653), Paper Trimmer (152392), Paper Snips (103579), Stampin’ Dimensionals (104430), Stampin’ Seal + (149699); Stampin’ Seal (152813)
Cutting & Scoring:
Early Espresso: 8 ½” x 5 ½”
score @ 4 ¼” and fold
Very Vanilla: 3 5¤16” x 4 9¤16”
Early Espresso: 3 ¼” x 4 ½”
Cajun Craze: 3 ¼” x 3 ¼”
Gilded Autumn (strip) DSP: 1 ½” x 5 ½”
Gilded Autumn (metallic strip) DSP: 2” x 2”
Early Espresso: 2” x 2”
Very Vanilla: 2 ¼”x 2”
Very Vanilla: 3 x ½”
Mint Macaron Basket Weave Ribbon: 6”
Instructions:
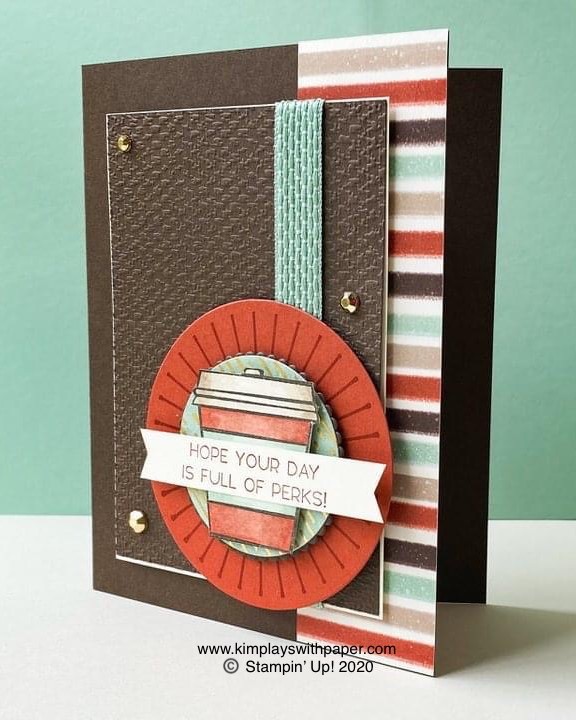
Attach striped DSP to card base with Seal.
Emboss (3 ¼” x 4 ½”) Early Espresso panel with Tasteful Textures folder and attach to Very Vanilla panel with Seal. Wrap ribbon around panel and attach with Seal+ on back of panel. Attach to card base with Dimensionals.
Die cut the Cajun Craze panel with the largest smooth circle from the Layering Circles Dies. Stamp the “ray’s stamp” in Cajun Craze Ink 2 times on the Cajun Craze circle die. Attach to card base with Dimensionals.
Die cut the 2” x 2” Early Espresso with the 5th largest scallop circle die. Die cut the 2” x 2” Gilded Autumn DSP with the 4th largest smooth circle die. Attach both dies together with Seal. Attach to Cajun Craze circle die with Dimensionals.
Stamp coffee cup in Early Espresso Ink on 2 ¼” x 2 Very Vanilla Cardstock and color with Stampin’ Blends (top = Crumb Cake; cup = Cajun Craze; center = Mint Macaron). Attach to DSP circle with Dimensionals.
Stamp greeting on ½” x 3 Very Vanilla Cardstock in Cajun Craze Ink, and punch both ends with the Banners Pick a Punch. Attach to coffee cup with Seal.
Attach three Gilded Gems to the card base.
Click on any of the graphics below to shop directly from my online store.
The catalog offers a host of fun products. I chose the Banner Year stamp set on page 65. It includes sentiments and images for all of the upcoming holidays. Purchase it as a bundle with the Banners Pick a Punch and save 10 percent. I also used the Magic in This Night Designer Series Paper as a feature point.
Happy Haunting Free Card Tutorial
Stampin’ Up! Supplies:
STAMPS – Banner Year (153464)
PAPER – Magic in This Night Designer Series Paper (153517), Cajun Craze (119684), Basic Black (121045), Whisper White (100730)
INK – Cajun Craze (147805), Black Memento (132708)
OTHER – Stitched Shapes (152323), Layering Circles (151770), 3/8” Glittered Organdy Ribbon (147897), Mini Glue Dots (103683), Stampin’ Dimensionals (104430), Paper Snips (103579), Stampin’ Seal (152813), Die Cutting Machine
Cutting & Scoring:
Cajun Craze – 11” x 4 1/4” – score at 5 ½”, and 2 ¼” x 2 ¼” scrap
Basic Black – 4 ¼” x 1 ¼”
Magic in This Night Designer Series Paper – 3 ½” x 5 ½” and 4 ¼” x 1”
Whisper White – 5 ¼” x 4” and 2” x 2” scrap
3/8” Glittered Organdy Ribbon – one piece 5” and one piece 3”
Instructions:
Fold the Cajun Craze card stock in half.
Using adhesive of choice, adhere the 3 ½” x 5 ½” inch piece of Magic in This Night DSP to the Cajun Craze base.
Attach the 4 ¼” x 1” piece of DSP to the 4 ¼” x 1 ¼” Basic Black piece.
Place a Glue Dot on each end of the 5” inch piece of Glittered Organdy Ribbon. Stretch the ribbon across the front of the DSP/black piece, sticking the Glue Dots to the back of it.
With adhesive, adhere this entire piece to the card front, about halfway down.
Create a “faux” box with the 3” Glittered Organdy Ribbon. (Slip the piece underneath the ribbon already attached to the card stock. Tie a knot.)
Die cut the white scrap with a circle from the Stitched Shapes and the Cajun Craze with a scallop circle.
Stamp the spider web image with Cajun Craze ink onto the white circle three times, stamping off once for each web. Use Memento Black ink to stamp the “Happy Haunting” sentiment in the middle of the white circle and on top of the webs.
Place the white circle on top of the Cajun Craze scallop with Glue Dots. With Dimensionals, pop this circle up on top of the ribbon on the left-hand side of the card.
Stamp the word “Boo” in Black Memento on the 5 ¼” x 4” Whisper White. Attach to the inside of the card.
See the list of products I used to create this card below. Click on any of the graphics to go directly to my online to purchase.
Please let me know if you have questions. I’d love to help.
In just two short weeks, Stampin’ Up!’s August-December Mini Catalog (formerly the Holiday Catalog) goes live. Beginning August 4, look for a brand-new catalog filled with a host of products for Halloween, fall, Thanksgiving, Christmas, winter and more.
(I’m working to get these catalogs distributed. Contact me if you don’t currently have a Stampin’ Up! demonstrator. I’ll get a catalog to you.)
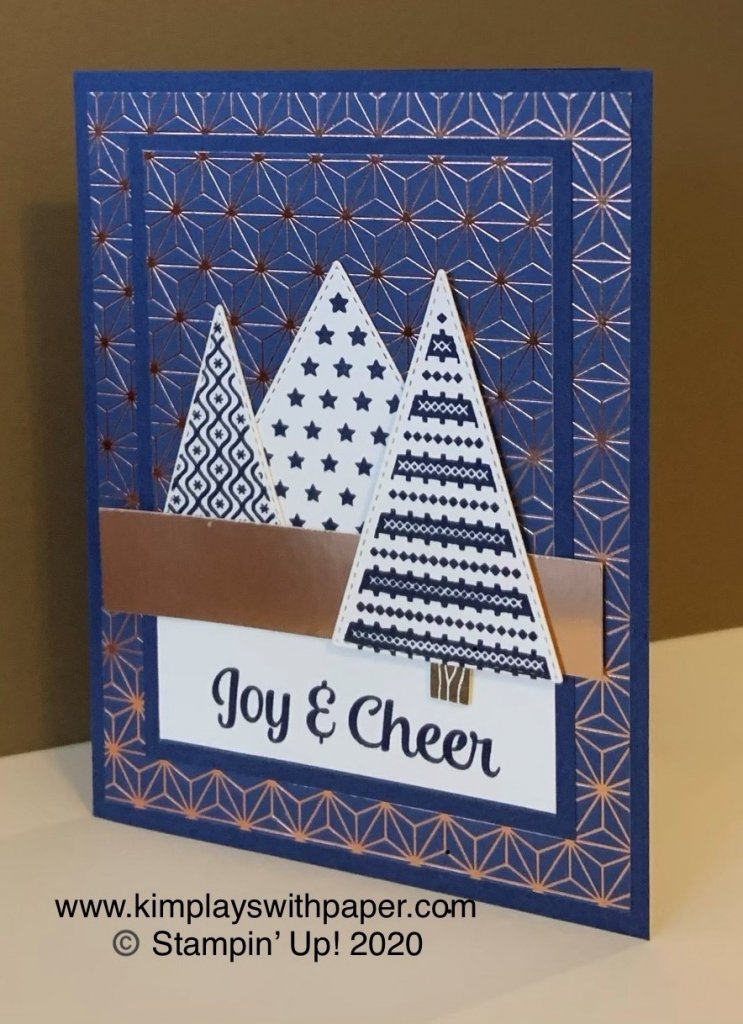
It’s Thursday and time for my Christmas in July feature. See the directions below for making this holiday card. I use a brand-new stamp set called Tree Angle in conjunction with the Stitched Triangles Dies and the Brightly Gleaming Designer Series Paper (a returning favorite).
Tree Angle Free Card Tutorial
Stampin’ Up! Supplies:
STAMPS – Tree Angle (153442)
PAPER – Very Vanilla (101650), Night of Navy (100867), Copper Foil (142020), Brightly Gleaming Specialty Designer Series Paper (150429)
INK – Night of Navy (147110), Soft Suede (147115)
OTHER – Stitched Triangles (152710), Mini Glue Dots (103683), Stampin’ Dimensionals (104430), Paper Snips (103579), Stampin’ Seal (152813), Die Cutting Machine
Cutting & Scoring:
Night of Navy Card Stock – 8 ½” x 5 ½” – score and fold at 4 ¼” and 3 ¼” x 4 ½”,
Copper Foil – ¾” x 3 ¾”
Brightly Gleaming Specialty Designer Series Paper – 5 ¼” x 4”, 3” x 3”
Very Vanilla – 1 ¼” x 3”, 3” x 6”, 5 ¼” x 4”, scrap
Instructions:
Fold the Night of Navy card stock in half.
Using Glue Dots or adhesive of choice, adhere the 5 ¼” x 4” Brightly Gleaming DSP to the Night of Navy base.
Attach the 3” x 3” Brightly Gleaming DSP at the top of the 3 ¼” x 4 ½” Night of Navy piece.
Stamp the “Joy and Cheer” sentiment in Night of Navy ink on the 1 ¼” x 3” piece of Very Vanilla. Adhere this piece on the Night of Navy 3 ¼” x 4 ½” piece, just below the DSP.
Stamp each of the three trees pictured above onto the 3” x 6” Very Vanilla in Night of Navy ink, leaving space between each to die cut the trees.
Using the coordinating triangles from the Stitched Triangles Dies, die cut the trees.
Stamp the tree stump with Soft Suede ink onto the Very Vanilla scrap. Fussy cut with Paper Snips.
Attach the stump to the tallest tree, the tree you’ll feature in the front.
Place the remaining two trees on the front of the 3 ¼” x 4 ½” piece that’s layered with the DSP and the sentiment.
Attach, with Glue Dots or Stampin’ Seal, the Copper Foil piece on top, covering the seam.
Place the tallest tree with the stump, on top of the Copper Foil strip, as pictured above. (Note: I used a Stampin’ Dimensional on the back near the top and a Glue Dot near the bottom.)
Adhere the 5 ¼” x 4” Very Vanilla panel to the inside of the card.
Thanks for stopping by today. Please contact me if you have questions about this card or any stamping projects. I’d love to help!
Kim
Stampin’ Up! Products Used to Create this Card
Click on any of the products below to shop directly from my online store 24/7. (Please note: The Tree Angle stamp set and Brightly Gleaming Designer Series Paper are available August 4.)
Sign up for my newsletter and get a free tutorial!
Get Updates!
Join our mailing list to receive the latest updates from Kim!
You have Successfully Subscribed!
Current Catalogs
Follow Me
Categories
Disclaimer
The content in this blog is the sole responsibility of Kim Quade as a Stampin’ Up!® Independent Demonstrator. The use of and content of classes, services or products offered is not endorsed by Stampin’ Up!