Enjoy the Tree Angle Free Card Tutorial!
In just two short weeks, Stampin’ Up!’s August-December Mini Catalog (formerly the Holiday Catalog) goes live. Beginning August 4, look for a brand-new catalog filled with a host of products for Halloween, fall, Thanksgiving, Christmas, winter and more.
(I’m working to get these catalogs distributed. Contact me if you don’t currently have a Stampin’ Up! demonstrator. I’ll get a catalog to you.)
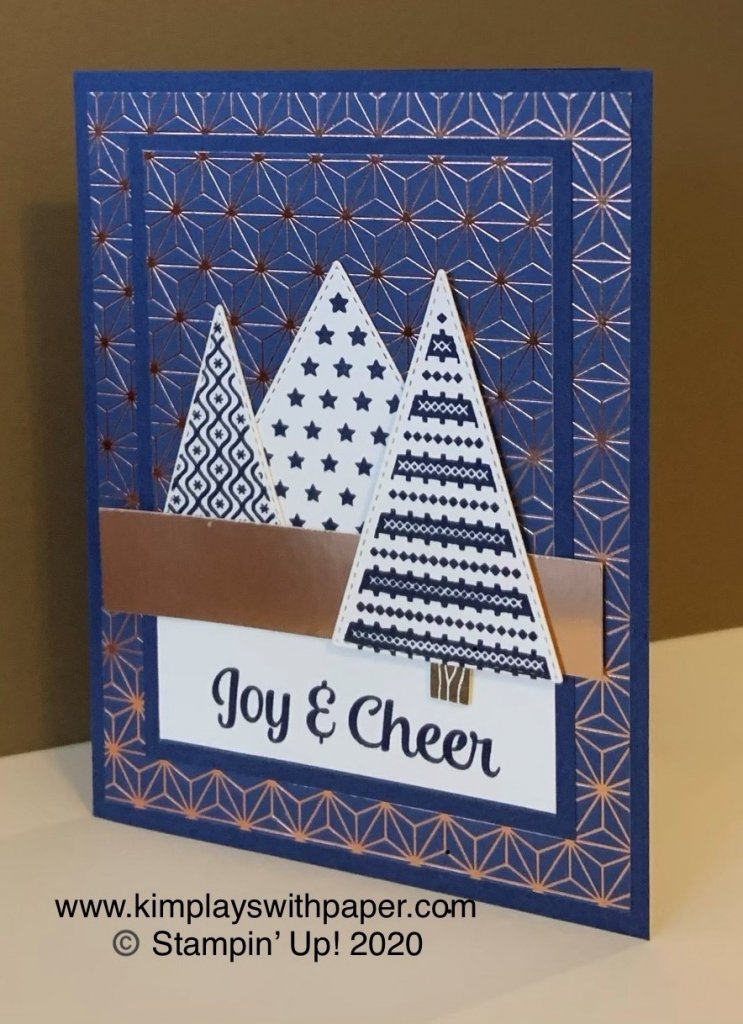
It’s Thursday and time for my Christmas in July feature. See the directions below for making this holiday card. I use a brand-new stamp set called Tree Angle in conjunction with the Stitched Triangles Dies and the Brightly Gleaming Designer Series Paper (a returning favorite).
Tree Angle Free Card Tutorial
Stampin’ Up! Supplies:
- STAMPS – Tree Angle (153442)
- PAPER – Very Vanilla (101650), Night of Navy (100867), Copper Foil (142020), Brightly Gleaming Specialty Designer Series Paper (150429)
- INK – Night of Navy (147110), Soft Suede (147115)
- OTHER – Stitched Triangles (152710), Mini Glue Dots (103683), Stampin’ Dimensionals (104430), Paper Snips (103579), Stampin’ Seal (152813), Die Cutting Machine
Cutting & Scoring:
- Night of Navy Card Stock – 8 ½” x 5 ½” – score and fold at 4 ¼” and 3 ¼” x 4 ½”,
- Copper Foil – ¾” x 3 ¾”
- Brightly Gleaming Specialty Designer Series Paper – 5 ¼” x 4”, 3” x 3”
- Very Vanilla – 1 ¼” x 3”, 3” x 6”, 5 ¼” x 4”, scrap
Instructions:
- Fold the Night of Navy card stock in half.
- Using Glue Dots or adhesive of choice, adhere the 5 ¼” x 4” Brightly Gleaming DSP to the Night of Navy base.
- Attach the 3” x 3” Brightly Gleaming DSP at the top of the 3 ¼” x 4 ½” Night of Navy piece.
- Stamp the “Joy and Cheer” sentiment in Night of Navy ink on the 1 ¼” x 3” piece of Very Vanilla. Adhere this piece on the Night of Navy 3 ¼” x 4 ½” piece, just below the DSP.
- Stamp each of the three trees pictured above onto the 3” x 6” Very Vanilla in Night of Navy ink, leaving space between each to die cut the trees.
- Using the coordinating triangles from the Stitched Triangles Dies, die cut the trees.
- Stamp the tree stump with Soft Suede ink onto the Very Vanilla scrap. Fussy cut with Paper Snips.
- Attach the stump to the tallest tree, the tree you’ll feature in the front.
- Place the remaining two trees on the front of the 3 ¼” x 4 ½” piece that’s layered with the DSP and the sentiment.
- Attach, with Glue Dots or Stampin’ Seal, the Copper Foil piece on top, covering the seam.
- Place the tallest tree with the stump, on top of the Copper Foil strip, as pictured above. (Note: I used a Stampin’ Dimensional on the back near the top and a Glue Dot near the bottom.)
- Adhere the 5 ¼” x 4” Very Vanilla panel to the inside of the card.
Thanks for stopping by today. Please contact me if you have questions about this card or any stamping projects. I’d love to help!
Kim
Stampin’ Up! Products Used to Create this Card
Click on any of the products below to shop directly from my online store 24/7. (Please note: The Tree Angle stamp set and Brightly Gleaming Designer Series Paper are available August 4.)


