While Stampin’ Up!’s Peace on Earth Photopolymer Stamp Set lends itself for holiday card crafting, it also offers a variety of sentiments to show you care.
In December, make an online purchase of $50 (before tax, shipping, and any redeemed rewards) and I’ll send you the ingredients (excluding stamped elements and gems), to create one each of the four cards pictured above. Make a $75 purchase (before tax, shipping, and any redeemed rewards), and you’ll receive the card kit and a full package of the 2025-2027 In Color Flat Pearls.
Kits include envelopes, all cut card stock and die cut pieces, linen thread, and ribbon. Sorry, no stamped images as per Stampin’ Up! policy.
When the kits ship, I’ll email you a basic PDF to help you put the cards together.
To complete the card kits as shown, you’ll need the Peace on Earth stamp set and Secret Sea ink pad as well as your favorite adhesive. Or feel free to just use what you have in your stash.
Click here to shop. Be sure you’re enrolled in the rewards program and opt in for contact so I can send you the kit.
(Note: Offer not valid with BOGO sale or orders associated with class attendance.)
Happy stamping!
Thank you for visiting my blog and choosing me as your Stampin’ Up! demonstrator.
Kim Quade, Stampin’ Up! demonstrator in Mesa, Arizona
Supply List
Click on any of the graphics below to shop for the products to create these cards at home:
PAPER – Peach Pie Cardstock (163799), Basic Beige Cardstock (164511), Basic White Cardstock (166780)
INK – Tuxedo Black Memento Ink Pad (132708)
OTHER – Basic Beige 3/8” Classic Ribbon (165216), Pressed Flower Motifs (165215), Beautiful Butterfly Bundle (164615), Damask Designs Embossing Folder (165214), Meant to Bee Dies (166582), Peach Pie Stampin’ Blends Combo Pack (163827), Lost Lagoon Stampin’ Blends Combo Pack (161860), Stampin’ Seal (152813), Mini Glue Dots (103683), Multipurpose Liquid Glue (110755), Stampin’ Cut & Emboss Machine (149653)
Cutting & Scoring:
Peach Pie Cardstock – 8 ½” x 5 ½”, scored and folded at 4 ¼”; ¾” x 4”
Basic Beige Cardstock – 4” x 3 ½”
Basic White Cardstock – 5 ¼” x 4”, 3” x 4 ½”
DSP – 5 ¼” x 4”
Ribbon – 9”
Instructions:
Stamp the flower image with Memento ink on the 3” x 4 ½” Basic White Cardstock. Die cut with coordinating die from the Gallery Blooms Bundle.
Color the image with the Peach Pie and Lost Lagoon Stampin’ Blends Combo Pack.
Die cut the Basic Beige Cardstock with the third largest hexagon die from the Meant to Bee Dies.
Emboss the hexagon with the Damask Designs Embossing Folder.
Stamp the “Thinking of You” sentiment for the Beautiful Motifs stamp set on the ¾” x 4” Peach Pie Cardstock. Stamp this closer to the right-hand side. Die cut with the large label from the Beautiful Butterflies Bundle.
Adhere the DSP to the Peach Pie Cardstock base.
Layer the Basic Beige hexagon on top.
Adhere flower on top of this.
Pop up sentiment with Stampin’ Dimensionals.
Tie a bow with ribbon and add to the sentiment label on the left-hand side.
Add three Pressed Flower Motifs gems.
Place remaining Basic White Cardstock in the middle of the card.
Click here to see a post (with a video included) that offers more samples using this awesome suite.
Thanks so much for visiting my blog today. Please let me know if you have questions about this card or other projects. I’m happy to help.
Welcome to the Stampers Dozen Blog Hop! Thanks so much for joining us. This month, we feature cards and projects using flowers. Be sure to visit all of the participating stampers and leave a comment. We love to hear from you!
Simply Zinnia Double Z Fold
Today, I’m sharing a Double Z Fold design fun fold using Stampin’ Up!’s Simply Zinnia stamp set and the coordinating Flowering Zinnias Designer Series Paper. Find these as part of Stampin’ Up!’s Online Exclusives. I just love the bright and cheery colors in this paper; it makes it so easy to create eye-catching and beautiful cards.
Here are the measurements for the card stock and Designer Series Paper (working from the bottom up)
Highland Heather card base measuring 11 x 4 1/4, scored and folded at 5 1/2
Lemon Lime Twist (to make the z fold) measuring 9 3/4 x 4, scored at 5 1/4 ad 7 1/2
Designer Series Paper measuring 5 x 3 3/4 and 3 3/4 x 2
Basic White card stock 4 1/4 x 2 3/4 for stamped image — colored with Stampin’ Blends (Highland Heather, Granny Apple Green, and Lemon Lolly)
Highland Heather card stock measuring 4 1/2 x 3 to layer stamped image
Highland Heather card stock 3 3/4 x 1/2 for sentiment heat embossed with white
This design allows the card to stand up and be displayed.
How to Video
I recorded a video from my craft room in Mesa, Arizona, to show you how to create this Double Z Fold.
Thanks so much for visiting my blog today. Hop along to the other stampers by clicking on the links below. Enjoy a host of crafting inspiration!
All paper crafters take note! World Card Making Day is Saturday, October 7, 2023 Celebrate with a virtual stamp-a-long sponsored by Stampin’ Up! Click here to see all of the details and to register.
The event features cards created with three of Stampin’ Up!’s bundles including Circle Sayings, Earthen Textures and a brand-new, sneak peek offering from an upcoming catalog: Heartfelt Hexagon (Item number 162889 for $37.75). You’ll love the sentiments and the ease of using a punch to create cute and quick cards.
Today, I share three cards created with this stamp set and punch bundle.
The sympathy card above uses a piece of Designer Series Paper from the Masterfully Made 12 x 12 paper (5 1/2″ x 4 1/4″), a layer of vellum (5″ x 3 3/4″), and Berry Burst leaves punched with the Bough Punch and from the Soft Shimmer 12 x 12 Specialty Paper.
Below, I use the Glorious Gingham 6 x 6 Designer Series Paper (Berry Burst and Blueberry Bushel each measuring 2″ x 4 3/4″) to make a quick and easy birthday card. The embossing folder is part of the Basics 3D Embossing Folder Collection found online in Stampin’ Up!’s Online Exclusives.
And, next is a thinking of you card using Stampin’ Up!’s Countryside Inn 12 x 12 Designer Series Paper and another embossing folder from the Basics 3D Embossing Folder Collection.
Don’t you just love the versatility of the stamp set and punch combo? During World Cark Making Day, you’ll gain even more ideas on how to use this bundle.
Heartfelt Hexagon Card Samples Video
Thanks so much for visiting my blog today. I encourage to sign up for the free World Card Making Day event. It’s a great opportunity to stamp with others and gain so card-making inspiration. Please contact me if you have questions or if I can help in any way!
Kim
Click on the photos below to shop from my online store to purchase the products to create the sympathy card.
Each month, Stampin’ Up! issues a #simpletstamping challenge to its demonstrators. This month: Make a handmade card with a hello theme with just rubber stamps, ink, and paper and a punch. It’s all about getting back to the very basics of stamping.
Today, I share my card for this month’s challenge. I use the brand-new Circle Sayings Bundle. The bundle includes the Circle Sayings stamp set and a 2 3/8-inch circle punch. Buy the set and punch as a bundle and save 10 percent. Look for it in Stampin’ Up!’s brand-new 2023-2024 Annual Catalog on page 17. It goes live May 2. Be sure to put this bundle on your wish list.
It’s perfect for creating quick and easy cards. And it includes a variety of sentiments that work well for all occasions: thank you, birthday, hello, smile, thinking of you, and celebrate. Mix and match the images and sentiments to create the perfect card.
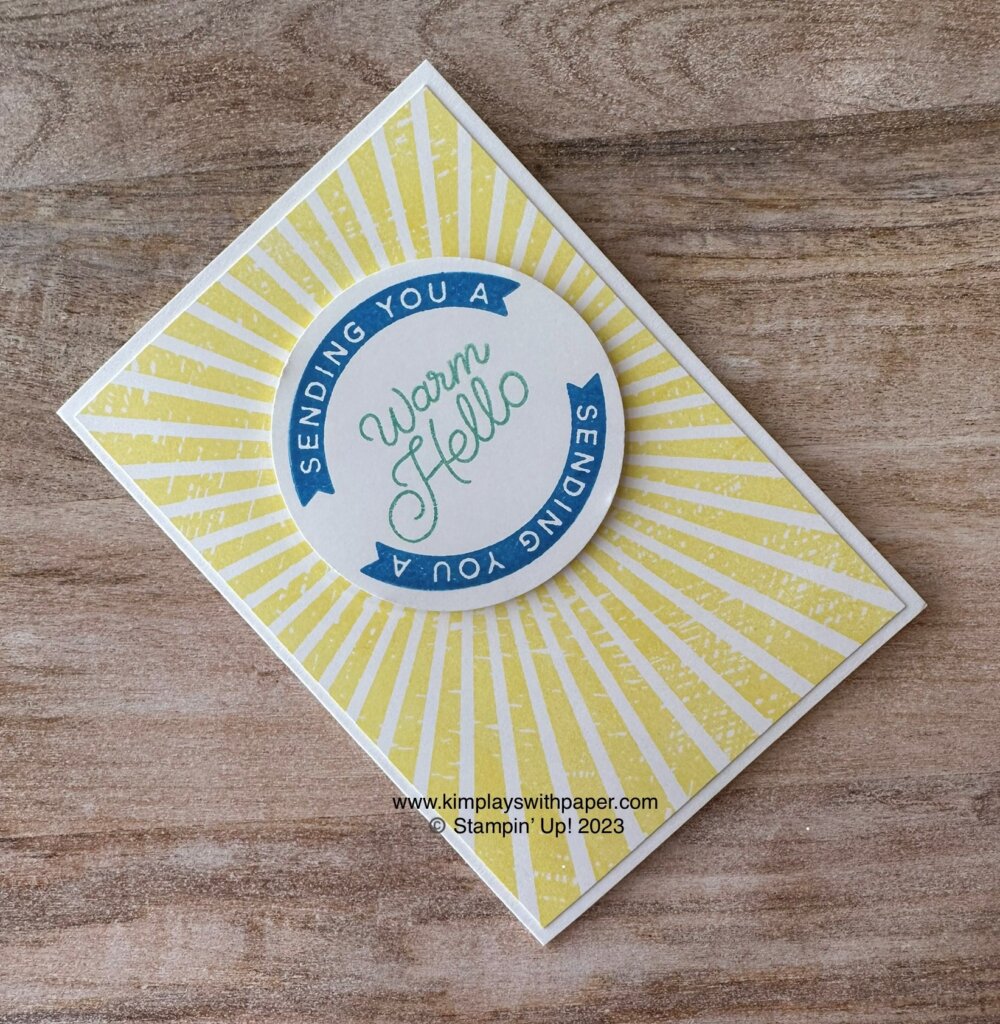
Circle Sayings #simplestamping Card
Here are a few details of this card:
Used Stampin’ Up!’s Basic White Notecards and Envelopes. You receive 20 pre-cut and scored notecards and 20 envelopes for $8. Not only are these a great value, but they save time, too.
Rays of Light Stamp Set for the background. Stamped with the new Lemon Lolly Classic Stampin’ Pad
“Sending You A” sentiment stamped with the new Azure Afternoon Classic Stampin’ Pad
“Warm Hello” sentiment stamped with Pool Party ink
Quick note: I punched the circle first (I generally stamp first, punch second) and then stamped the “Sending You ” sentiment. I found it easier to place the sentiment at the top and bottom. But do whatever works best for you.
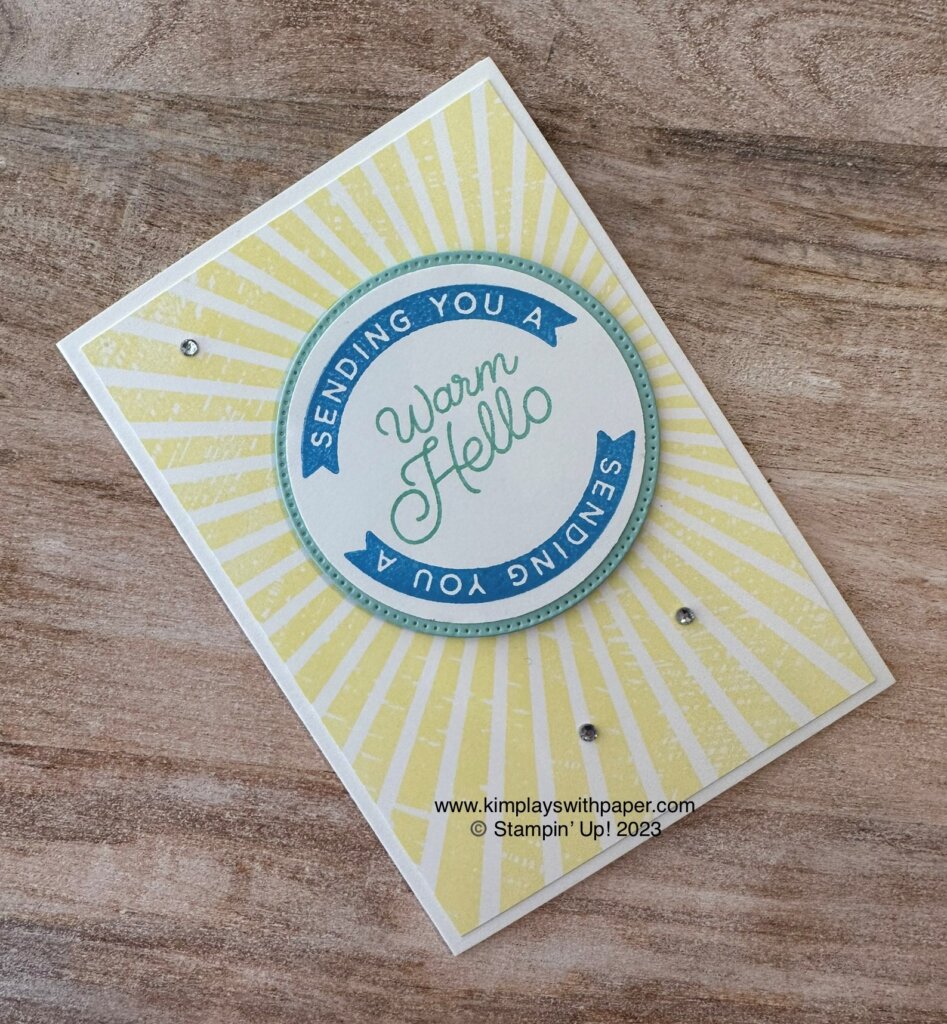
Here is a “stepped up” version of the card above. I added a Pool Party stitched circle from the Stylish Shapes Dies and some Basic Rhinestone Jewels.
Thanks so much for visiting my blog today. Enjoy this #simplestamping card and make some of your own to send.
Kim
Click on any of the links below to shop directly from my online store to purchase the products used to make this card. Just a note: If you’re visiting before May 2, remember that some of the items aren’t available until then.
Sign up for my newsletter and get a free tutorial!
Get Updates!
Join our mailing list to receive the latest updates from Kim!
You have Successfully Subscribed!
Current Catalogs
Follow Me
Categories
Disclaimer
The content in this blog is the sole responsibility of Kim Quade as a Stampin’ Up!® Independent Demonstrator. The use of and content of classes, services or products offered is not endorsed by Stampin’ Up!