Mar 19, 2020 | 2019-2020 Annual Catalog, 3D Projects, Annual Catalog, Gallery, January-June 2020 Mini Catalog, Kim's Creations |
Welcome to the Stampin’ Friends Blog Hop where I’m featuring a wedding wishes card and gift card holder!

Thanks for joining us on this blog hop today. We’re showcasing cards for grads, dad, babies, and brides. Visit all of the blogs to get a host of creative ideas for upcoming celebrations. All of the links are listed after the project descriptions. Please leave a comment; we love to hear what you think of our creations.

The Wedding Wishes Card
I really wanted to use Stampin’ Up!’s Detailed Heart Die, purchased with the intent of creating Valentine cards. But that didn’t happen! I couldn’t let the season pass without using this beautiful die.
The card features:
- Detailed Hearts Die with Gold Foil
- Gold heat embossed sentiment from the So Sentimental stamp set
- Die cuts from the Stitched So Sweetly Dies
A comprehensive shopping list is included at the end of the post, after the list of hoppers.
Wedding Wishes Gift Card Holder
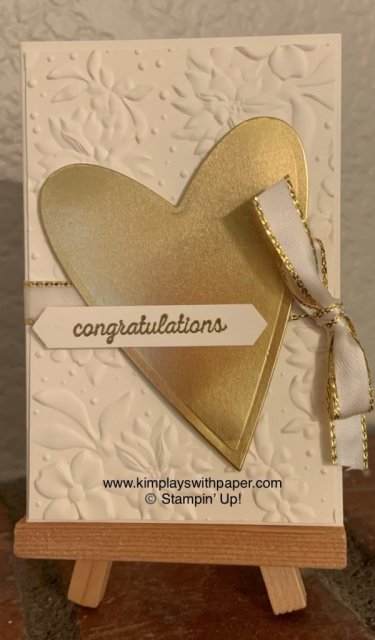
This is such an easy gift card holder to create. (I had forgotten all about this style.) Here’s how it goes together.
- Start with one of Stampin’ Up!’s envelopes. I used Very Vanilla for this project.
- Fold the envelop in half and score.
- With the flap facing you, use a Paper Snips to trim the top right corner.
- Moisten the remaining flap and seal closed. The right side now becomes the holder for the gift card.
- Decorate the front and inside cover.

Here are some of the materials I used to create the gift card holder:
- Very Vanilla envelope
- Very Vanilla panel embossed with the Country Floral 3D Embossing Folder
- Gold Foil Heart die cut with a heart from the Stitched Be Mine Framelits
- Heat-embossed (gold) sentiment from Itty Bitty Greetings
- Classic Label Punch
- Country Floral 3D Embossing Folder
- Gold Metallic-Edge Ribbon
Use these links to the view participating stampers. Enjoy!
- Rachel Rife – https://rachthestamper.com/stampin-friends-congrats-grads-brides-and-babies-blog-hop/
- Teri Pocock – http://www.stampinmagic.com/2020/03/stampin-friends-blog-hop-babies.html
- Katja Ettig – https://www.kleine-stempelmiez.de/2020/03/19/stampin-friends-blog-hop-congrats-grads-brides-and-babies/
- Jean Beaulieu – https://danantmom.blogspot.com/2020/03/march-2020-stampin-friends-blog-hop.html
- Kim Quade (US) – https://kimplayswithpaper.com/home/stampin-friends-wedding-wishes/
- Maureen Rauchfuss (US) – https://crazystampinglady.blogspot.com/2020/03/sf-2020-march-congrats-grads-brides-and.html
- Anne Marie Hile (US) – http://www.stampinanne.com/2020/03/march-2020-stampin-friends-blog-hop.html
- Steph Jandrow – https://stampinandscrappinwithsteph.weebly.com/home/Stampin-Friends-March-Hop-Congrats-Grads-Brides-and-Babies
- Barbara Welch – https://creativestampinspot.blogspot.com/2020/03/stampin-friends-march-2020-blog-hop.html
- Tiziana Milano – https://stampinwtiziana.blogspot.com/2020/03/stampin-friends-blog-hop-babies.html
Mar 16, 2020 | Annual Catalog, Gallery, January-June 2020 Mini Catalog, Tutorial |
Today, I’m offering a free card tutorial for Stampin’ Up’s Dressed to Impress stamp set.

I’m part of a monthly card sharing co-op, and this is card I created for it. I love the message, and I love the the deep rich color of Blackberry Bliss. So I combined these using a timeless layout. I’ve included free, step-by-step directions to make this card at home. This stamp set, Dressed to Impress can be found on page 56 of the January-June 2020 Mini Catalog.
Dressed to Impress Card Tutorial
Stampin’ Up! Supplies:
- STAMPS – Dressed to Impress Bundle (153832)
- PAPER – Whisper White (100730), Mint Macaron (138337), Blackberry Bliss (133675), Pretty Peacock (150880), Best Dressed 6 x 6 Designer Series Paper (DSP) (151319)
- INK – Blackberry Bliss (147092)), Black Memento (132708)
- OTHER –Brights Stampin’ Write Markers (147157), Regals Stampin’ Write Markers (147155), Subtles Stampin’ Write Makers (147156), Stitched Shapes (145372), Layering Circles (141705), Stitched Be Mine (148527), Glue Dots (103683), SNAIL (104332), Stampin’ Dimensionals (104430), Paper Trimmer (152392), Die Cut Machine
Cutting & Scoring:
- Mint Macaron Card Stock – 8 ½” x 5 ½” – score and fold at 4 ¼” and 3” x 3” for scallop circle
- Blackberry Bliss Card Stock – 5 ¼” x 4 “
- Best Dressed DSP (Flower design with Blackberry Bliss) – 5 ¼” x 2 ¼”
- Pretty Peacock – 5 ¼” x ¾”
- Whisper White – 3 x 3 for sentiment and scraps for flowers
Instructions:
- Fold the Mint Macaron base in half.
- With SNAIL, affix the Blackberry Bliss card stock to front of the Mint Macaron base.
- Die cut the long, scallop edge from the Stitched Be Mine dies with the Pretty Peacock piece.
- Using Glue Dots, affix the Pretty Peacock edge piece under the right edge of the Best Dressed DSP piece.
- Tape this whole piece on top of the Blackberry Bliss, aligning the left edges.
- Die cut a Scallop Circle from the Mint Macaron scrap.
- Die cut a Stitched Circle from the 3” x 3” Whisper White scrap. Stamp the sentiment in Blackberry Bliss ink onto the stitched circle on the right-hand side of the circle.
- Stamp the flowers onto the Whisper White scraps. Color with Stampin’ Writer Markers (Daffodil Delight, Purple Posy, Pretty Peacock and Blackberry Bliss) and then use the coordinating die cuts to cut out.
- With Glue Dots, attach the flowers onto the stitched circle. Use Glue Dots to place this circle onto the scallop circle.
- Use Stampin’ Dimensionals on the back of this focal point and position on the front of the card.
Thanks for stopping by today. Please let me know if you have questions about this card or any other crafting projects.
Kim
Mar 14, 2020 | 2019-2020 Annual Catalog, Annual Catalog, January-June 2020 Mini Catalog, Kim's Creations |
Stampin’ Up!’s all-inclusive card kits provide a much-needed creative escape.

Have you decided to stay home away from crowds? Are you practicing social distancing? Are your kids bored? Do you need a creative outlet?
Stampin’ Up!’s all-inclusive card kits provide the perfect activity. It’s a chance to have fun and be creative during the downtime. Just add some adhesive to your order, and you’re set to create! The kits will be delivered to your door! And, I’ll pay the shipping. *If you order directly from my online store: https://www.stampinup.com/ecweb/category/102000/kits?dbwsdemoid=2078804
I’ll reimburse you for the shipping via personal check, PayPal, or Venmo. Or, contact me to help you place your order, and I’ll deduct the shipping from your total.
For each kit purchased by March 31, I’ll enter your name into a drawing to win a free Paper Pumpkin kit.
All-Inclusive card Kits
Looking Up Card Kit
 Create beautiful all-occasion cards in minutes using the Looking Up Card Kit. Perfect for new crafters, busy crafters, or crafters on the go. Makes 15 cards; folded card size: 4” x 6” (10.2 x 15.2 cm). Kit includes the Looking Up Stamp Set. Complete using your choice of adhesive. Also available in French. Cost is $27.
Kit includes:
* Set of 7 photopolymer stamps and a clear acrylic block
* 15 card bases: 3 each of 5 designs
* 15 printed envelopes
* Ink spot and embellishments
Notes of Kindness Card Kit
 This kit makes it easy to create and send your heartfelt greetings. Cost is $35.
* Makes 20 cards: 5 each of 4 designs
* Folded card size: 3.5″ x 5″ (8.9 x 12.7 cm)
Kit Includes:
* Set of 6 photopolymer stamps
* Clear stamp block
* 20 printed card bases and coordinating printed envelopes
* Giftable kraft box
* Die-cut stickers and accents
* Archival Basic Black Ink Stampin’ Spot
* Baker’s Twine
* Stampin’ Dimensionals
* Adhesive-backed pearls
Lots of Happy Card Kit
 This kit makes it easy to create and send your heartfelt greetings. Cost is $35.
* Makes 20 cards: 5 each of 4 designs
* Folded card size: 3.5″ x 5″ (8.9 x 12.7 cm)
Kit Includes:
* Set of 6 photopolymer stamps
* Clear stamp block
* 20 printed card bases and coordinating printed envelopes
* Giftable kraft box
* Die-cut stickers and accents
* Archival Basic Black Ink Stampin’ Spot
* Baker’s Twine
* Stampin’ Dimensionals
* Adhesive-backed pearls
Three Cheers for You Kit

Create beautiful all-occasion cards in minutes using the Three Cheers for You Card Kit. This kit is perfect for new crafters, busy crafters, or crafters on the go. It’s one of our all-inclusive project kits, so everything you need is inside the box!** This fun DIY card kit makes a great gift for crafters or aspiring crafters. This kit is also available in French.**Complete using your choice of adhesive. Cost is $27.
* Kit includes the Three Cheers for You Stamp Set
* Makes 12 cards: 3 each of 4 designs
* Folded card size: 5-1/2″ x 4-1/4″ (14 x 10.8 cm)
* Includes 6″ x 4-3/4″ x 1-13/16″ (15.2 x 12.1 x 4.6 cm) printed designer box
* Complete using your choice of adhesive
Mar 13, 2020 | 2019-2020 Annual Catalog, 2020 Sale-A-Bration, Annual Catalog, Easter, January-June 2020 Mini Catalog, Punches |
Sharing an Easter card idea, refreshed and updated from a card I created last year. See the details below.

I created a version of this Easter card last year. See the previous card here. I’ve made a couple of changes using current Stampin’ Up! products. It’s just a fun, springy card to send to anyone!
The Card
Here’s what I used:
- Timeless Tulips stamp set (found on page 43 of Stampin’ Up!’s January-June 2020 Mini Catalog.)
- Waterfront stamp set (for the sprinkles)
- Daisy Punch
- Grapefruit Grove, Balmy Blue, Granny Apple Green, Highland Heather and Daffodil Delight card stock
- 6 x 6 In Color 2018-2020 Designer Series Paper
- Polka Dot Tulle Ribbon
Two Weeks Left to Sale-A-Brate
Stampin’ Up!’s most fun promotion of the year is coming to end. The last day to get FREE items with your purchases of $50 and $100 is March 31. (If you see something you like, get it sooner rather than later as a number of items have been so popular and are sold out.)
Remember: There are three ways to Sale-A-Brate:
Shop: Spend $50 and $100 and choose free product such as exclusive stamp sets, Designer Series Paper, and more. At the end of this post, I’ve included the offerings for both the $50 spend selections and the $100 spend selections.
Host: Host a party (this can even be done online) with $300 in sales or purchase $300 (great time to stock up on those supplies) and receive the free Ladybug stamp set.
Join: This is Stampin’ Up!’s ultimate bundle! For just $99, receive your choice of $125 in product (that’s your choice) and it’s shipped free. In addition, get a free mini paper cutter and a 6 x 6 sampler package of Designer Series Paper. And, there’s more. Also receive one additional stamp set of your choice FREE. Then, just enjoy your discount. There is no obligation or requirement to host parties or workshops or sell to anyone else. What do you have to lose? Have questions? Please contact me; I’d love to chat.
I hope you’ve enjoyed today’s card. Thanks for stopping by today.
Kim
Free with a $50 purchase:
Free with a $100 purchase:
Mar 8, 2020 | 2019-2020 Annual Catalog, 2020 Sale-A-Bration, Annual Catalog, Gallery, January-June 2020 Mini Catalog |
Stampin’ Up!’s Tropical Oasis Suite is one of my faves! Read further to see how I created this pineapple delight!

I can “hear” you frantically flipping through the January-June 2020 Mini Catalog (or maybe even the Annual Catalog) looking for the pineapple stamp. (Stampin’ Up! offered one a few years ago, and it’s retired). Inspired by Gina Shappa, I actually “created” my own stamps using the In the Tropics Dies and foam adhesive sheets (purchased from a big box craft store). Isn’t it super fun? I’m just loving the results.
Here’s the process/sandwich I used to make the “rubber” stamp images:
- Use the Big Shot Platform as the bottom layer.
- Working up, add a clear plate.
- Place a piece of the adhesive foam (adhesive side down) on the clear plate.
- Put your die cut on top of the foam, cut side down.
- Add the retired tan embossing pad. (You can also use the current Silicone Craft Sheet, but it may make some cut marks in the silicone.)
- Top it off with the 3D Embossing Folder Plate.
- Run through the die cut machine. (I will caution you that the sandwich is a little tight, so practice with different shims until you can cut the foam with the die cuts. You don’t want to injure your die cut machine.)
When I had the foam images, (aren’t they amazing?) I placed them on a clear block, applied ink and stamped away. The colors used for this delightful pineapple are Old Olive and Daffodil Delight, coordinating colors in the Tropical Oasis Designer Series Paper.
Sale-A-Bration Continues
Be sure to take advantage of Stampin’ Up!’s Sale-A-Bration promotion. With minimum purchases, you earn the opportunity to select FREE product. Who doesn’t like free? Choose from exclusive stamp sets, a punch, and Designer Series Paper. Sale-A-Bration runs through March 31, so there’s about three weeks left to shop. Please let me know if you have questions about Sale-A-Bration. I can help!
Thanks so much for stopping by today.
Kim


