Welcome to the Stampers Dozen December Blog Hop. This month, we feature gift packaging and tags. Be sure to visit all of the blogs on the hop to get that last-minute inspiration for your holiday crafting. Or save the ideas to use for Christmas in July and beyond. (Or use other stamps in your collection to create birthday — or other — themed packaging.)
Sparkling Snowflakes Gift Packaging
Do you need some last-minute gift packaging? Or do you just want to have some fun with your stamping supplies? Either way, I think you’ll love today’s project. From my craft room in Mesa, Arizona, I transform a sheet of basic white tissue paper and a brown lunch bag into fun, holiday themed DIY gift wrapping.
For both the tissue paper and the bag, I use Stampin’ Up!’s Sparking Snowflakes stamp set from the September-December 2023 Mini Catalog. The stamp set is still available for purchase through January 3, 2024. Save 10 percent when you purchase the stamp set and the coordinating dies as a bundle.
For the bag, I chose two of the snowflakes and used the Azure Afternoon and Balmy Blue Classic Stampin’ Pads and stamped randomly to cover the bag.
I used three colors (Azure Afternoon, Night of Navy and Balmy Blue) for the tissue paper. I designated a different snowflake for each color and began stamping the tissue paper. Super fun. See part of the project below.
And then I added a tag. The tag, from the Merriest Trees Bundle, is die cut in Balmy Blue and then stamped with Azure Afternoon ink. I stamped the snowflake in Azure Afternoon on a basic white die cut circle punched with the 2 3/8-inch Circle Punch, layered on an Azure Afternoon die cut from the Stylish Shapes Dies. It’s topped it off with an Azure Afternoon ribbon and an Iridescent Pearl.
I hope you enjoyed this project. I love finding ways to use my Stampin’ Up! products in creative ways. Please let me know if you have questions about this or other stamping techniques.
Thanks for stopping by today!
Kim
Blog Hop Participants
And, remember, visit all of the talented stampers participating in the blog hop today. Click on the links below.
Who loves a fun fold card? A fun fold gives me an opportunity to be creative in my card making and surprise and delight the recipient at the same time. Today’s card appears to be a traditional front-opening card. However, it’s not. The tree itself is where the card actually opens. See the photo below.
For this project, I use Stampin’ Up!’s Merriest Trees Bundle. It’s a favorite in the September-December 2023 Mini Catalog. This tree and die cutting technique I use today also lends itself to making some cute packaging tags or even standalone Christmas cards.
Merriest Trees Fun Fold
Here are some basic directions for making this card:
Basic White Card Stock base measures 5 1/2 x 4 1/4
Real Red Card Stock panel measuring 5 1/4 x 4 die cut with Tiny Christmas Trees Die (retiring and on sale)
Dotted piece of Vellum Basics measuring 4 3/4 x 3 1/2
Thick Basic White Card Stock measuring 8 1/2 x 3 1/2 burnished well and folded in half
Large tree stamped in Garden Green ink on above piece making sure the top of tree “runs off the page” at the top of the fold. (Be sure to watch the video below to see how this works.)
Die cut with large tree die, making sure the top of the tree is off the paper. You’re creating a folded card image.
Stamp sentiment in Real Red ink on die cut label (Cracker &Treat Box Dies)
Real Red ribbon
Iridescent Pearl Basic Jewels colored with Real Red Stampin’ Blends Combo Pack
How-To Video
As a Stampin’ Up! demonstrator in Mesa, Arizona, I love to show you what I’ve been working on in my craft room. This Facebook Live replay from 12/5/2023, shows step-by-step instructions for creating this fun fold.
Thank you so much for visiting my blog today. I hope you’re inspired to try this project. See the list of products I used below.
Need more inspiration? Subscribe to my free, email newsletter. I send two to three newsletters each month that include a free card-making tutorial, paper crafting video, and updates to Stampin’ Up! updates and specials. Click here.
Kim
Click on any of the pictures below to purchase the products needed to make this Christmas card at home.
Every once in awhile, the scraps and leftover pieces on the craft table serve to inspire another project. I had a pile of little trees — remnants of Stampin’ Up!’s Tiny Christmas Trees Die — sitting on my table. A friend asked what I was going to do with all those little pieces. Create a shaker card, of course.
Today, I’m sharing that fun shaker card project with you.
Merriest Trees Shaker Card
Here are measurements for the projects and a recap of the Stampin’ Up! products I used:
Thick Basic White Card Stock measuring 8 1/2 x 5 1/2, scored and folded at 4 1/4
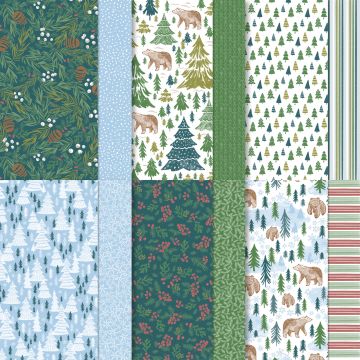
A Walk in the Forest Designer Series Paper (tree design), measuring 5 1/2 x 4 1/4
Thick Basic White Card Stock measuring 5 1/4 x 4, die cut with largest tree from Merriest Trees Dies, and embossed with Snowflake Sky 3D Embossing Folder
Window Sheets, 5 x 3 3/4 (2)
Sentiment from Merriest Trees heat embossed in gold
Foam Adhesive Strips
Festive Pearls (gold)
Gold 1/8″ Trim (Online Exclusive)
Mini die cuts trees from Tiny Christmas Tree Die (Old Olive)
Be sure to watch the video below. I give step-by-step instructions from my craft room in Mesa, Arizona, to help you create this project at home.
Shaker Card How to Video
Did you know the A Walk in the Forest Designer Series Paper (used in today’s shaker card project) s a “give back” product? That means that Stampin’ Up! donates $3 from the sale of each package will be donated to organizations helping kids having a good Christmas.
Need more inspiration? Subscribe to my free, email newsletter. I send two to three newsletters each month that include a free, card-making tutorial, a paper crafting video, and updates on Stampin’ Up! news and specials. Click here.
Thanks so much for visiting my blog today. I hope you’re inspired to go get into your craft room and create. Please let me know if you have any questions.
Thanks,
Kim
Click on any of the pictures below to shop for the products to create this card at home.
Have you seen cards created by others and posted online and just need to try them? That’s how I felt with the rocker cards. I’ve seen them posted on a lot of paper crafting web sites in the last few weeks. They look so fun and cute. My teammate, Dawn Seelhoff, shared a rocker card on her blog, Dawn’s Inklings. So today, I’m trying one. And, I have a video with step-by-step instructions from my craft room in Mesa, Arizona, where I’m a Stampin’ Up! demonstrator. Be sure to catch the Facebook live replay below.
A Walk in the Forest Rocker Card
This card uses a variety of current Stampin’ Up! product. I recap it for you below:
Second largest circle from the Deckled Circles Dies. Cut from Balmy Blue card stock measuring 5 1/2 x 5 1/2, folded in the middle. Burnish well with a Bone Folder.
Third largest circle from the Deckled Circles Dies. Cut from dotted white pattern from A Walk in the Forest Designer Series Paper — DSP measures 5 1/4 x 5 1/4. Cut this in half and will make two cards.
Basic White measuring 5 1/4 x 5 1/4 die cut with the third largest circle from the Deckled Circle Dies. Cut in half. Serves as middle piece for two cards.
Sentiment from Merriest Trees stamp set stamped in Garden Green ink on Basic White label die cut from Labels Aglow Dies.
Add some bling with Iridescent Rhinestone Jewels
This fun, handmade greeting card still fits in one of Stampin’ Up!’s Medium Envelopes. And it’s super cute to display!
A Walk in the Forest Designer Series Paper
There’s a lot to love about this Designer Series Paper. Find it in Stampin’ Up!’s September-December 2023 Mini Catalog on page 5 for $12.50.
$3 from the sale of every package will be donated to support organizations dedicated to spreading cheer and providing support to those in need.
Some of the tree images coordinate with the die cuts from the Merriest Trees dies, allowing you to easily add these cuts to your projects.
The paper contains images that coordinate with the Beary Cute Punch.
How to Video
Thanks so much for visiting my blog today! I hope you enjoyed learning how to make this fun rocker card with A Walk in the Forest Designer Series Paper and the Deckled Circles Dies. Please let me know if you have questions.
Need more inspiration? Subscribe to my free, email newsletter. I send two to three newsletters each month that include a free card making tutorial, a paper crafting video, and updates on Stampin’ Up! news and specials. Click here.
Thanks,
Kim
Click on any of the pictures below to purchase the products used to create this card at home.
Are you in the mood for another fall card? When Stampin’ Up! first introduced the new 2023-2025 In Colors, I just knew the color palette would work really well for fall-themed cards, especially the Wild Wheat.
With today’s card, I feature a flap fun fold, Stampin’ Up’s Cheers to the Season Stamp set (Stampin’ Up!’s September-December 2023 Mini Catalog), the Wild Wheat In Color Luster Specialty Paper (Annual Catalog), and Leaf Fall 3D Embossing Folder (Online Exclusive). Be sure to watch the video below to view step-by-step instructions for creating this handmade greeting card at home.
Cheers to the Season Flap Fold
Here are a few measurements to help you get started:
Early Espresso cardstock base measuring 5 1/2 x 6, scored at 1 3/4
Early Espresso 4″ x 4″, scored at 1/2
Copper Clay: 3 3/4 x 3 1/4 and 5 1/4 x 1 1/2
Wild Wheat In Color Luster Specialty Paper: 3 x 3 1/2 and 5 x 1 1/4, embossed with the Leaf Fall 3D Embossing Folder
Very Vanilla 5 x 3 3/4
Leaf image stamped with Copper Clay on Very Vanilla and cut by hand
Sentiment for inside (Pick of the Patch) stamped with Copper Clay
Gold Simply Elegant Trim
Copper Clay In Color Dots
Have a peek inside the card.
Flap Fold Video How To
Thanks so much for visiting my blog today. Need more inspiration? Subscribe to my free, email newsletter. I send two to three newsletters each month that include a free card-making tutorial, a paper crafting video, and updates on Stampin’ Up! news and specials. Click here. Then check your email for a confirmation. AWeber wants to be sure you really want to receive my messages.
Kim
Click on any of the pictures below to shop from my online store to purchase the products to create this card at home.
Sign up for my newsletter and get a free tutorial!
Get Updates!
Join our mailing list to receive the latest updates from Kim!
You have Successfully Subscribed!
Current Catalogs
Follow Me
Categories
Disclaimer
The content in this blog is the sole responsibility of Kim Quade as a Stampin’ Up!® Independent Demonstrator. The use of and content of classes, services or products offered is not endorsed by Stampin’ Up!