The season is ripe for strawberries! They make a sweet treat and snack.
Stampin’ Up!’s Sweet Strawberry Bundle adds to the fun. (Buy the stamp set and punch together and receive a 10 percent discount.)
Enjoy the free tutorial below. And, be sure to watch the video (a Facebook Live replay) to see how this card goes together.
Sweet Strawberry Bundle Birthday Free Tutorial
Stampin’ Up! Supplies:
STAMPS – Sweet Strawberry Bundle (159523)
PAPER –Basic White (159276), Real Red (102482), Old Olive (100702), Pattern Party Designer Series Paper (DSP) (155426)
INK – Real Red (147084), Memento (132708)
OTHER –Mini Glue Dots (103683), Stampin’ Seal (152813), Stampin’ Dimensionals (104430), Red Rhinestone Basic Jewels (146924)
Cutting & Scoring:
Real Red – 8 ½” x 5 ½” scored at 4 ½”, 4 ½” x 3”
Basic White – 3 ¼” x 4 ¾”, 5 ¼” x 4”, 1” x 2 ¼”, and a scrap
Old Olive – scrap
DSP (black and white design) – 2 ¾” x 4 ¼”
Instructions:
Fold the 8 ½” x 5 ½” Real Red Card Stock in half.
Using adhesive of your choice, layer the DSP onto the 4 ½” x 3” Real Red Card Stock. Adhere this piece to the 3 ¼” x 4 ¾” Basic White Card Stock. Center this panel onto the Real Red Card Stock base.
With Real Red ink, stamp the birthday sentiment onto the 1” x 2 ¼” Basic White Card Stock. Adhere it to the top of the card, as shown above with Stampin’ Seal or Mini Glue Dots.
Stamp the strawberry outline on a Basic White scrap with Memento Ink. With Real Red ink, stamp the strawberry “body” or solid image in the center of the black outline.
Stamp the stem outline with Memento ink onto the Old Olive scrap.
Punch both the strawberry and the stem with the Strawberry Builder Punch.
Use a Mini Glue Dot to attach the stem to the strawberry.
Place Stampin’ Dimensionals on the back of the strawberry and place on card, as shown above, hovering around the sentiment.
Scatter three Red Rhinestone Basic Jewels on the card front.
Attach the remaining Basic White piece to the inside of the card.
Thanks so much for stopping by today. Please let me know how I can help in your papercrafting journey.
Kim
Click on any of the links below to shop directly from my online store.
Welcome to the February 2021 Maui Achievers Blog Hop!
We’re a group of Stampin’ Up! demonstrators from around the world who have achieved the Stampin’ Up! bonus of the Maui incentive trip. We celebrate this achievement by organizing a monthly hop which helps us continue to inspire you creatively.
You may be starting here or have come from someone else’s blog – either way there’s a list at the end of this post to help you move around to all the different blogs and gather many amazing ideas. We have all listed our country – so if you’re looking for a demonstrator, these are top demonstrators in their country and would love to help you with your Stampin’ Up! shopping or if you’d like to join our Stampin’ Up! teams. Visit all of the blogs and leave a comment. We love to hear from you.
Get Inspired
As crafters and creators, we all experience those days when we need a little inspiration. Maybe you’ve lost your mojo. Perhaps you’re just feeling blah. How do you get inspired to dust off the ink and make a card?
I often reach for Stampin’ Up!’s catalogs, browsing the many pages of samples created by the company’s talented design artists. The inspiration for this card popped out at me from page 32 of the January-June 2021 Mini Catalog. The sample of the 3 x 3 card on the top right-hand corner caught my eye. But I really wanted to create a full-size version. I made a few adjustments, substituted like products for some I don’t have, and there it was.
I’m so excited about how this turned out! Inspired, I’m thinking of ways I can mix these products up with different color combinations and shapes.
Thanks for stopping by today. Please contact me if you have questions about this card or other paper crafting questions. Be sure to visit all of the blogs listed below for more inspiration.
February 2021 Maui Achievers Blog Hop
Stampin’ Up! Products Used to Create this Card
Click on any of the graphics below to go directly to my online store to purchase these items.
The medley offers a set of coordinating products. Use them as you like to create something unique to you. Add your own style or flair. Or look for inspiration from others. A refill is also available for $23.
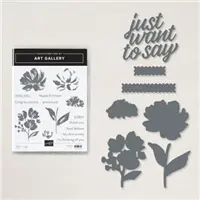
Medley Contents
11-piece photopolymer stamp set (clear stamp blocks sold separately);
48 sheets of 6″ x 6″ Designer Series Paper, 8 each of 6 double-sided designs;
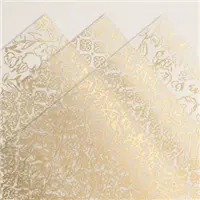
Very Vanilla 6″ x 6″ dry embossed sheets, 2 each of 3 designs;
die cuts with gold foil accents, 2 sheets each of 3 designs;
Night of Navy 1/2″ Frayed Grosgrain Ribbon, 10 yards;
Very Vanilla/gold 1/4″ Pleated Ribbon, 10 yards;
paper flowers, 20 each in 2 sizes;
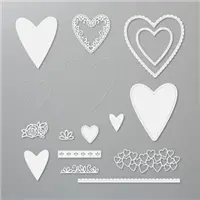
12-piece Boho Indigo Dies
The stamp sentiments (A Bunch of Birthday Love to You, Thank You, Such Happy News, and Sorry You’re Feeling Blue), Designer Series Paper, and embossed sheets lend themselves well to a huge variety of designs and uses. Add your special touches with the ribbon included. Think about purchasing some Gold Foil Sheets to add fun accents to this medley. See this past post for other great card samples.
Cutting Directions
Misty Moonlight: one piece cut at 5 1/2″ x 4 1/4″ (for the base) and another piece cut at 8 1/2″ x 3 1/4″ scored at 4 1/4″ (this is the front flap). Also need a scrap to die cut a scallop circle for layering the sentiment.
Very Vanilla pre-embossed sheet included in the kit: one piece of your favorite design cut at 5 1/4″ x 4″
Very Vanilla card stock: 3 x 4 (for the inside) and a scrap for the sentiment (a circle cut from the Stitched Shapes)
Designer Series Paper of your choice from the medley: 3 x 4
Watch this video (a Facebook Live replay) to watch exactly how this card goes together.
Thanks for stopping by today! Click the graphic below to go directly to my online store to shop for the Boho Indigo Product Medley and other fun papercrafting products.
Sign up for my newsletter and get a free tutorial!
Get Updates!
Join our mailing list to receive the latest updates from Kim!
You have Successfully Subscribed!
Current Catalogs
Follow Me
Categories
Disclaimer
The content in this blog is the sole responsibility of Kim Quade as a Stampin’ Up!® Independent Demonstrator. The use of and content of classes, services or products offered is not endorsed by Stampin’ Up!