Card-making inspiration comes from many places. For today’s card and free tutorial, I spotted a sketch on Pinterest and adapted it to fit the Season of Chic stamp set. Find it on page 99 of Stampin’ Up!’s Annual Catalog.
Click here to see another blog post with additional cards using this sketch.
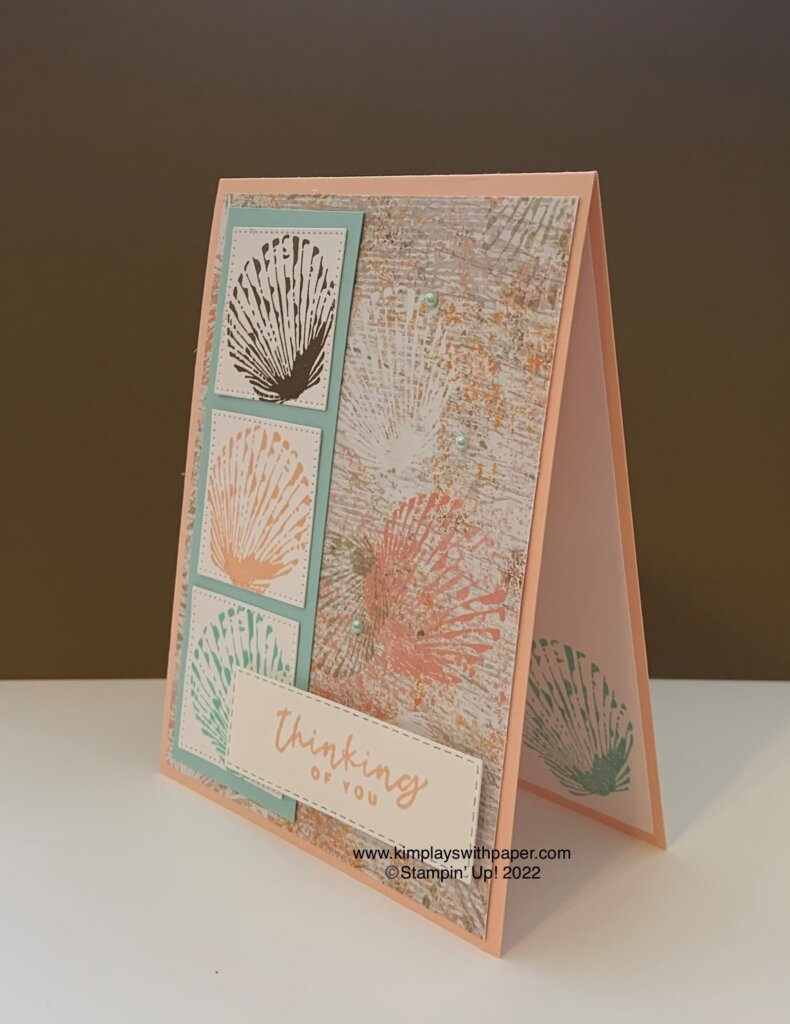
PAPER – Petal Pink (146985), Pool Party (159259), Texture Chic 12 x12 Designer Series Paper (158808), Basic White Cardstock (159276)
INK – Pool Party (147107), Petal Pink (147101), Soft Suede (147115)
OTHER – Stylish Shapes Dies (159183), Stitched Rectangle Dies 151820) Pool Party Stampin’ Blends (154894), Pearl Basic Jewels (144219), Stampin’ Seal (152813), Stampin’ Dimensionals (104430), Mini Glue Dots (103683), Stampin’ Cut & Emboss Machine (149653)
Cutting & Scoring:
Petal Pink – 11” x 4 ¼”, scored at 5 ½” and folded in half
Pool Party – 1 ¾” x 5”
Basic White Card Stock – 2” x 5”, 3 ½” x 1”, 5 ¼” x 4”
Texture Chic DSP – 5 ¼” x 4” (seashell pattern)
Instructions:
With the 1 ½” square from the Stylish Shapes Dies, die cut three squares from the 2” x 5” Basic White Card Stock.
Die cut a Stitched Rectangle 3” x 3/4” from the 3 ½” x 1” Basic White Card Stock.
Stamp the seashell on each square: one with Pool Party, one with Soft Suede, and one with Petal Pink.
Ink the sentiment with Pool Party and stamp on the rectangle.
Add the DSP to the Petal Pink card front.
Adhere squares on the Pool Party Card Stock. With adhesive of choice, glue this piece to the DSP on the lefthand side, as shown above.
Place Stampin’ Dimensionals on the back of the sentiment and place on the card front.
Color three pearls with the Pool Party Stampin’ Blends.
Add pearls to card front.
Stamp a seashell on the remaining Basic White Card Stock and adhere to center of card.
Thanks so much for visiting my blog today. Get more ideas by signing up to receive my free email newsletter. Click here. I send two to three newsletters each month that include a free tutorial, video, and updates on Stampin’ Up! news.
Kim
Click on any of the graphics below to shop directly from my online store.
I was scrolling Pinterest one day. That’s all i need to say, right? But a card by Colleen Magness caught my eye. She shared a video demonstrating the die stenciling technique. So fun! I had to try it for myself. In case, you haven’t seen it, I’m sharing my interpretation of her technique.
Blessings of Home Die Stenciling Technique
This is how it works:
Choose a stamp set with a die. Flower sets generally work well. Here, I use Blessings of Home. (Find it on page 75 of Stampin’ Up!’s 2022-2023 Annual Catalog. ) The Nature’s Prints stamp set also works well. See a sample of that card below.
Die cut the flower image. It helps to use Thick Basic White card stock.
Stamp the flower image on your card front. (I used a die cut from the new Deckled Rectangle Dies.)
Lay the stencil over the top of the flower.
With a blending brush, apply ink to the image within the stencil portion. I used the same color ink for both. (Blackberry Bliss)
Remove the stencil.
Cool technique, right?
You can then add your own Designer Series Paper, sentiment, and embellishments. Here, I added used a piece of patterned paper from the Design a Daydream 12 x 12 Designer Series Paper (have a party and you could earn this free), a sentiment from the Art Gallery stamp set, White Seam Binding, and Pearl Basic Jewels colored with Black Berry Bliss Stampin’ Blends.
See the card below for a card that uses a Pool Party color scheme in conjunction with the die stenciling technique.
The card above uses the Nature’s Print stamp set
Blessings of Home Die Stenciling Technique Video
Thanks so much for visiting my blog today! I hope you enjoyed learning a new card-making technique. Look through your stamp collection to see which bundles will work for this project.
Need more inspiration? Sign up to receive my free, email newsletter by clicking here. I send two to three emails each month that include a free tutorial, video, and updates regarding Stampin’ Up! news and specials.
Kim
Click on any of the pictures below to shop directly from my online store.
The bundle includes the Cactus Cuties photopolymer stamp set and Cactus Builder Punch. Purchase them as a bundle and save 10 percent.
Cactus Cuties Card Samples
This card uses patterned paper from the 6 x 6 2 In Color 2021-2023 Designer Series Paper Assortments. These are also available in 2020-2022 In Color Assortments as well as Brights, Regals, Subtles,and Neutrals. I selected Polished Pink, Evening Evergreen, and Soft Succulent.
Stampin’ Up!’s large color palette makes it easy to stamp the cactus in a variety of colors. It offers a lot of green hues: Granny Apple Green, Mossy Meadow, Old Olive, Garden Green, Shaded Spruce, Soft Sea Foam, Pear Pizzazz, Mint Macaron, and Just Jade. Imagine all of the possibilities!
The card above uses Pear Pizzazz, Garden Green, and Poppy Parade.
The clean and simple card above uses a strip of Designer Series Paper from SaleABration’s Sunshine & Rainbows. (You might have a package of this laying around.)
I chose the color combination of Crushed Curry and Cajun Craze for the card above and used Stampin’ Up!’s note cards. Precut and scored, you receive 20 cards and envelopes for $20. Very easy to use to create a lot of cards in a hurry.
Another with the easy note cards. Love the little glimmer flowers.
Cactus Cuties Card Samples Video
Thanks so much for stopping by my papercrafting blog today. I hope you found some inspiration. I’d love to have you subscribe to my free email newsletter. I send two to three newsletters a month that include a free tutorial, video, and updates about Stampin’ Up! products and specials. Click here and then watch your email for a confirmation from Aweber.
Kim
Click on any of the graphics below to shop directly from my online store.
Just two weeks left of Stampin’ Up!’s SaleABration promotion. Receive your choice of free, exclusive stamp sets and patterned paper packages with minimum purchases of $50 and $100 (before tax and shipping). Click here to see a PDF copy of the SaleABration brochure.
The card featured above uses the Friendly Hello stamp set and Friendly Hello 12 x 12 Designer Series Paper. Get this combo free with a $100 order (before tax and shipping). What a card combination.
I used the components to create a pocket card. Here are some basic directions for creating the pocket card. (Be sure to watch the video below for step-by-step instructions). Read below to see a few more samples of this fun card design.
Friendly Hello Pocket Card
Form the base with a piece of Pool Party card stock that measures 11 x 4 1/4 inches. Score at 1 1/4 inches and 5 1/2 inches.
Round the edges with the Detailed Trio Punch.
Fold the card in half, and then fold the small piece down toward you.
Adhere a piece of the patterned paper measuring 4 x 3 inches to the bottom. Glue another design measuring 1 4 x 4 inches on the small flap.
With Tear and Tape, as close to each edge as possible. form the pocket. Tape the small flap down.
Decorate with any stamp sets, dies, and inks you like. For this card, I stamped the Hello Friend sentiment in Memento Ink and die cut with a shape from the Tasteful Labels Dies. Add embellishments such as ribbons and jewels.
Card insert: Colored, coordinating card stock border piece measures 5 x 3 inches and the Basic White measures 3 3/4 x 2 3/4 inches.
This pocket card uses two additional free SaleABration products: Catching Butterflies stamp set and Simply Marbelous 6 x 6 Designer Series Paper.
The above card uses the free SaleABration Daffodil Afternoon 12 x 12 Designer Series Paper and the medium daisy punch. Sentiment comes from the Catching Butterflies SaleABration stamp set.
Another pocket card. This one uses the free SaleABation Sunshine & Rainbows 6 x 6 Designer Series Paper. The sentiment comes from the Special Moments stamp set (free during SaleABration with a $100 order before tax and shipping).
Pocket Card Video
Thanks so much for reading my blog today. I hope you found some inspiration. As Stampin’ Up! demonstrator in Mesa, Arizona, I’m here to help you paper craft with rubber stamps, ink, and paper. Please sign up for my email newsletter by clicking here. I send two to three newsletters a month that include a free tutorial, video, and updates on Stampin’ Up! news.
Kim
I used the following Stampin’ Up! products to create today’s card. Click on any of the graphics below to shop directly from my online store:
SaleABration runs through February 28. Here are the products available free with a minimum $50 purchase before tax and shipping.
The two items below are free with a $100 purchase before tax and shipping.
As a demonstrator, I was able to order many of the components of the Heart & Home Suite. It’s a robust suite that includes two stamp sets, two coordinating die cut sets, the Hive 3D Embossing Folder, Denim Ribbon, Classic Matte Dots, Heart & Home Doilies, memories and more cards and envelopes, and the Heart & Home Designer Series Paper (DSP).
Blessings of Home Card Sample
The card above uses the Blessings of Home stamp set in conjunction with the Heart & Home Designer 12 x 12 Designer Series Paper. The die cuts comes from the Stitched So Sweetly Die Cuts.
I’ve seen a lot of cards on Pinterest and Facebook that feature this “block” design for Designer Series Paper. It allows you to showcase three different designs all on one card. The large piece on the left measures 5 1/16 inch x 1 7/8 inch. The two squares on the right each measure 1 7/8 inch by 2 1/2 inches I can see using this design for all of the packages of awesome DSP Stampin’ Up! offers.
I used the coordinating colors of Pale Papaya, Fresh Freesia, and Garden Green.
Stayed tuned for Saturday’s blog post where I share a host of other card samples using this same suite!
Blessings of Home Card Sample
Thanks so much for stopping by my blog today. Looking for more inspiration? Sign up to receive my free email newsletter by clicking here. I send two to three newsletters a month that include a free tutorial, video and Stampin’ Up! news and updates.
Kim
Click on any of the graphics below to shop for the products used to create this card.
Sign up for my newsletter and get a free tutorial!
Get Updates!
Join our mailing list to receive the latest updates from Kim!
You have Successfully Subscribed!
Current Catalogs
Follow Me
Categories
Disclaimer
The content in this blog is the sole responsibility of Kim Quade as a Stampin’ Up!® Independent Demonstrator. The use of and content of classes, services or products offered is not endorsed by Stampin’ Up!