With the turn of the calendar to September, many cities, towns, and states can expect a shift to lower temperatures. The foliage begins to turn colors. Fall is on the way. My card sample today reflects those changes. Stampin’ Up!’s Gathering Together 12 x 12 Specialty Designer Series Paper definitely captures the beauty of fall. The colors include: Basic Beige, Cajun Craze, Crushed Curry, Early Espresso, champagne, and Old Olive.
Look for this gorgeous patterned paper in the newest September Online Exclusives. Click here to view the store online. Or, click here to check out a full-color PDF sharing all of the newest products.
The Gathering Together DSP is part of the Gathering Together Suite Collection:
Measurements and Details
Today’s thankful card uses elements from the suite, but focuses on the paper. I offer a few details to help you get started.
Basic Beige cardstock base measuring 8 1/2 x 5 1/2, scored and folded at 4 1/4
Cajun Craze leaf design from Gathering Together DSP measuring 5 1/2 x 3
Plaid design measuring 4 1/4 x 3
Largest Stylish Shapes Dies circle die cut from leaf pattern
Sentiment stamped in Cajun Craze. Die cut from Many Messages.
Cajun Craze & Gold Dots
Gold Striped 3/8-inch ribbon
I’ve created a couple of other cards using this fall suite and recorded videos. See the links below to view the other proejcts.
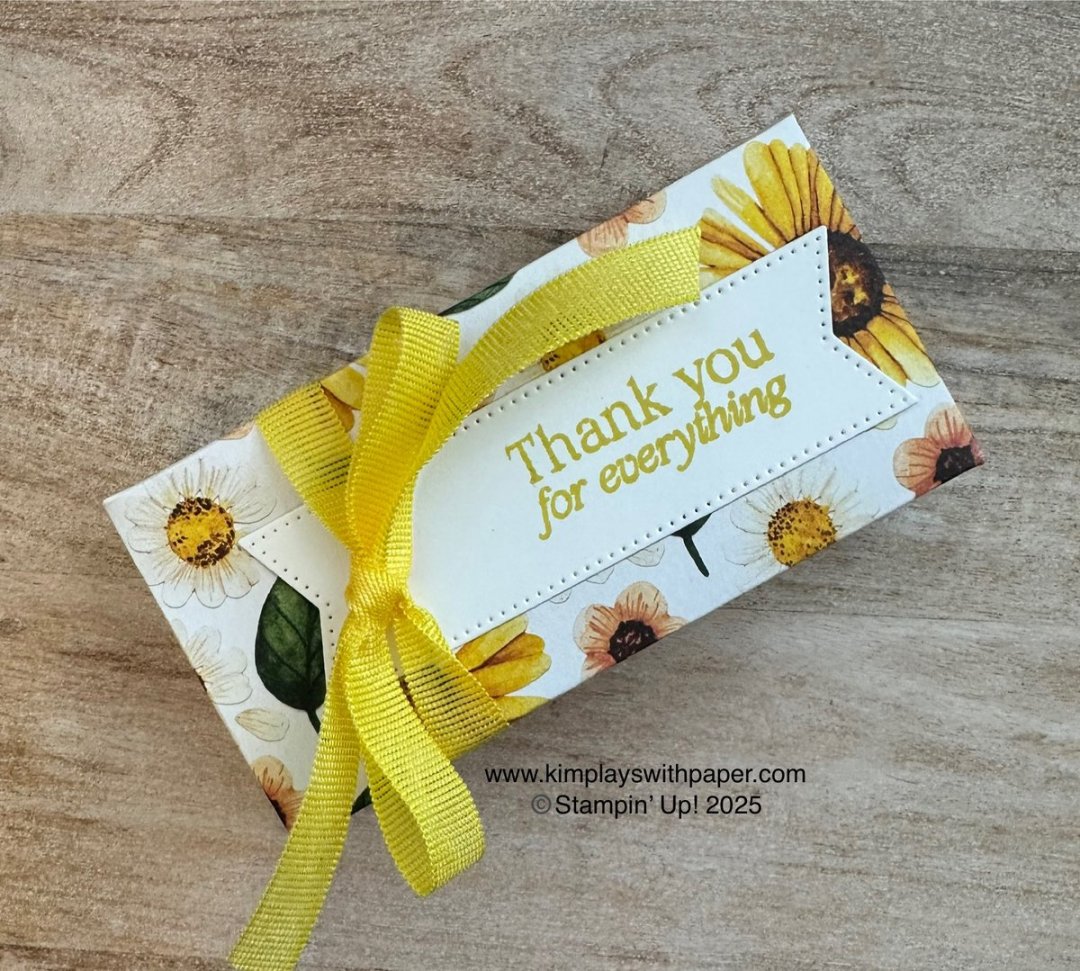
Sometimes you just need a quick little box to package a gift. Today, I show you a quick, easy-peasy gift box that uses one-third of a piece of 12 x 12 patterned paper. That means you can make three boxes from one sheet. The boxes are perfect for small treats such as lip balms, mini candy bars, three Lindt chocolates, and more.
Note: Stampin’ Up! shared the directions for this box during Creativity Now, an online demonstrator event held in June. I loved it so much I just had to share with all of you.
Measurements and Details
Paper measuring 11 x 4. For today’s featured card, I used the sunflower pattern from the Blooms Impressions Designer Series Paper. (Hint: This Designer Series Paper is currently 15 percent off as part of Stampin’ Up!’s August 2025 sale on In Color products. Click here to see what’s on sale.) In addition to Designer Series Paper, I experimented with two-tone card and also tried regular card stock.
On the 11-inch side, score at 3 inches, 4 inches, 8 inches, and 9 inches. On the 4-inch side score at 1 inch ad 3 inches.
Cut on the score lines on the 11-inch side. (Be sure to watch the video below to see how this box comes together.)
Adhere small tabs to create box.
Embellish any way you like. For this box, I used the Stylish Shapes Dies, a sentiment from Beautiful Motifs, Darling Duckling ink, and Darling Duckling ribbon.
This next sample uses products from Stampin’ Up!’s brand-new Peaceful Garden Suite Collection. It’s available for order beginning September 3 in the September-December 2025 Mini Catalog. Want to get your hands on some of the holiday orders BEFORE September 3? Purchase Stampin’ Up!’s Starter Kit and add holiday catalog items to your kit. Contact me for more information. Or, click here to join my team.
For this final sample, I grabbed a piece of Petunia Pop two-tone card stock and stamped it with the large flower from the Gallery Blooms stamp set as well as the sentiment from Simply Said and Petunia Pop ribbon.
I hope you give these boxes a try. They are so quick and easy and can be made with almost any patterned paper or card stock.
How-To Video
From my craft room in Mesa, Arizona, I offer step-by-step directions for creating this little box. I also share a variety of other samples.
Thanks so much for visiting my blog today. I appreciate you! Please let me know if you have questions about this or any other paper crafting project.
Kim Quade, Stampin’ Up! demonstrator, Mesa, Arizona
Supply List
Click on any of the graphics below to shop from my online store to purchase the products to create this box at home.
Ok, one more card using this versatile layout. (Now that it’s the beginning of August, I’ve moved on from Christmas in July. Not to worry, I’ll resume sharing the holiday cards again soon.)
I’ve had Stampin’ Up!’s Cheers Sips Bundle for awhile, and I haven’t had a chance to dig into it. I love how the layout works for this card, too. (See this post for the original card and layout.)
I think this is just a fun, upbeat, and celebratory bundle. Find it as one of Stampin’ Up!’s Online Exclusives.
Measurements and Details
Below, I offer some information to help you create this card at home:
Strawberry Slush cardstock base measuring 8 1/2 x 5 1/2, scored and folded at 4 1/4
Basic White cardstock panel measuring 5 1/4 x 4. Emboss the top with the “glass” folder from the Glass & Garden Embossing Folders.
Secret Sea card stock panel measuring 4 x 2 1/4
Celebratory Sips Designer Series Paper measuring 4 x 2
Secret Sea circle die cut with Spotlight on Nature Dies.
Glass image die cut from Celebratory Sips Designer Series Paper. Fun tip: I covered the image in Versamark ink, covered in clear embossing powder, and heated. It gives the glass a shiny look.
Sentiment from the Cheers & Sips stamp set stamped with Secret Sea ink.
Strawberry Slush bakers twine (Pack Your Bags Twine Three Pack)
2025-2027 In Color Flat Pearls
Thanks so much for visiting my blog. I hope you enjoyed this handmade card. Please let me know if you have questions about this creation or any other paper crafting project.
Kim Quade/Stampin’ Up! demonstrator, Mesa, Arizona
Project Supply List
Click on any of the graphics below to purchase the supplies to create this card at home:
Are you looking for a versatile and fun layout? I love this one so much. In fact, I’ve made so many cards using this basic design. See the card below that inspired me.
The cards use totally different products and sport totally different themes. But they both employ the same basic layout.
Measurements and Details
See these details below to help you create the holiday card featured at the top of the page:
Real Red cardstock base measuring 8 1/2 x 5 1/2, scored and folded at 4 1/4
Basic White cardstock base measuring 5 1/4 x 4
Silver Foil Sheet measuring 4 x 2, embossed with the Forever Plaid 3D Embossing Folder
Bells from the Jolly Holly Bundle heat embossed with silver on Basic White cardstock. Die cut with coordinating dies from the Jolly Holly Dies.
Real Red cardstock punched with 2 3/8 inch circle punch
Silver Foil Sheet die cut with circle from the Stylish Shapes Dies
Sentiment stamped in Real Red ink
Silver 1/8-inch trim
Adhesive-Backed Metallic Gems (Silver)
What do you think of this layout? I can definitely feel myself using this again.
Thanks so much for visiting my blog today! This is my last post featuring my Christmas in July projects. Are you inspired to start working on yours?
Please contact me if you have questions about this card or any other paper crafting project.
Kim Quade/Stampin’ Up! demonstrator in Mesa, Arizona
Project Supply List
Click on any of the graphics below to shop directly from my online store to purchase the supplies to create this card at home:
Sign up for my newsletter and get a free tutorial!
Get Updates!
Join our mailing list to receive the latest updates from Kim!
You have Successfully Subscribed!
Current Catalogs
Follow Me
Categories
Disclaimer
The content in this blog is the sole responsibility of Kim Quade as a Stampin’ Up!® Independent Demonstrator. The use of and content of classes, services or products offered is not endorsed by Stampin’ Up!