Welcome to the Stampin’ Friends Fall Card Blog Hop for October 2020 A group of talented stampers is sharing cards and projects revolving around a thankfulness theme.
Be sure to visit all of the blogs for inspiration and leave a comment. See the end of this post for the list of participating stampers.
Stampin’ Friends Fall Card Sample
What do you love most about fall? The cooler temperatures? The taste and smell of pumpkin spice? The brilliant fall colors and the changing of the seasons?
For me, it’s the fall foliage. That’s what I miss most about living in the Midwest. You can see some color change here in Arizona, but not as much as the brilliant maples of Minnesota, North Dakota, Wisconsin, and Nebraska. (I won’t, however, miss the snow when it falls in the Midwest!)
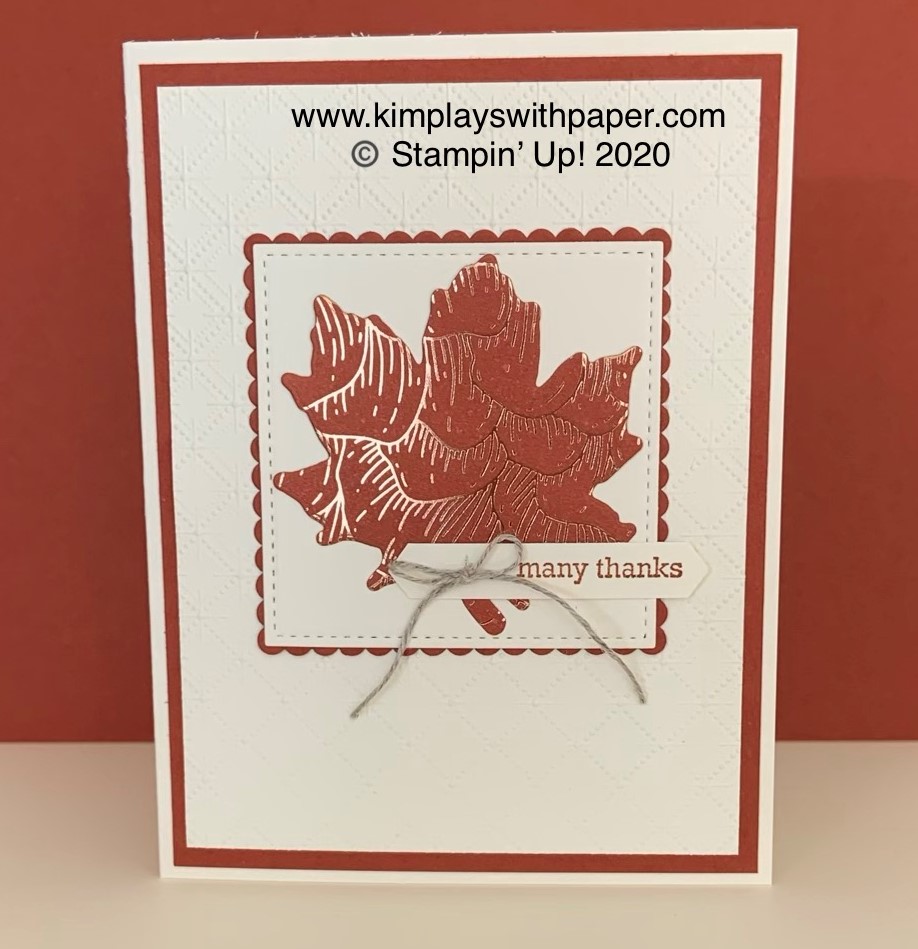
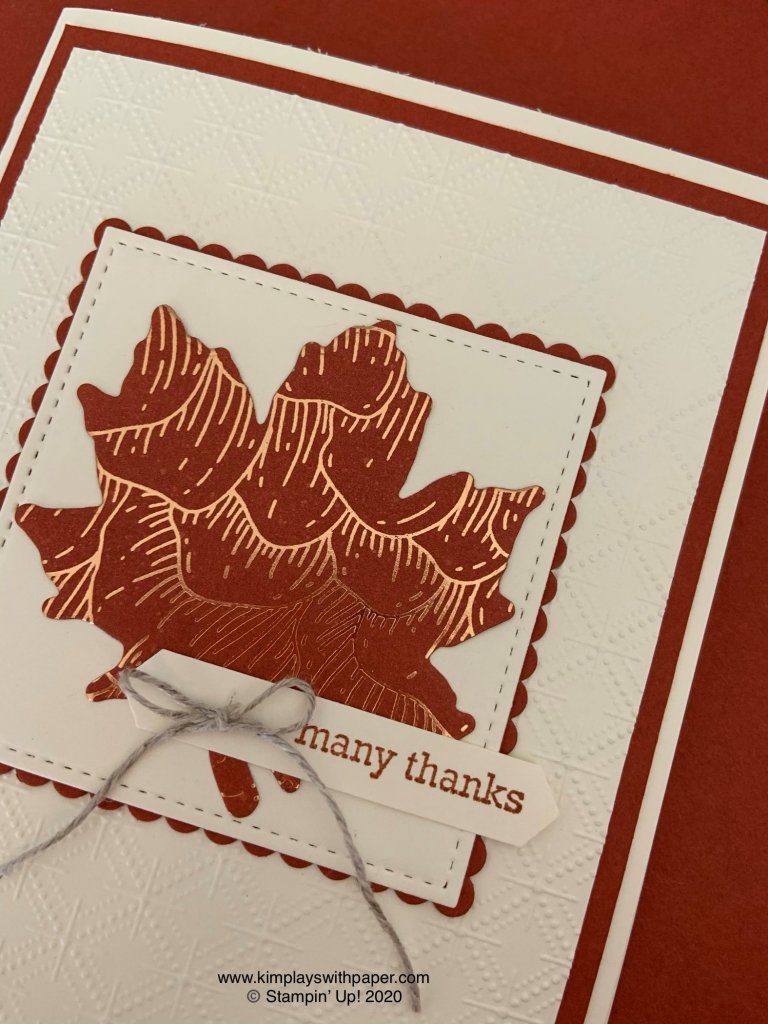
Today’s card and 3D treat package reflect some of that beautiful fall color.
Two leaves cut in Mango Melody and Cajun Craze card stock
Sentiment from Itty Bitty Greetings stamped with Blackberry Bliss ink and punched with Classic Label Punch
Bow created with Gold Cord (part of the Wonder of the Season Ribbon Combo Pack)
And, I made a matching treat box with one of Stampin’ Up!’s Gold Mini Pizza Boxes, using many of the same ingredients as the card above. Lots of fun treats fit in this gorgeous box.
Thanks for stopping by today! lease let me know if you have questions about this card or other paper crafting techniques. If you’re not already working with a Stampin’ Up! demonstrator, I’d love to help! Enjoy!
Here are the products I used to create the card and treat box. Click on any of the links to go directly to my online store to shop. I appreciate your support!
Today I’m sharing a free, fall thank-you card tutorial.
Stampin’ Up!’s Gilded Autumn Designer Series Paper ranks as one of my faves right now. I just love all of the foil sheets. Look for it and the Gathered Leaves Dies in the August-December 2020 Mini Catalog.
Enjoy this free tutorial!
Stampin’ Up! Supplies:
STAMPS – Itty Bitty Greetings (151331)
PAPER – Gilded Autumn Specialty Designer Series Paper (153520), Cajun Craze (119684), Very Vanilla (101650), Thick Very Vanilla (144237)
INK – Cajun Craze (147805)
OTHER – Gathered Leaves Dies (150662), Stitched Shapes (152323), Layering Squares (151772), Classic Label Punch (141491), Dainty Diamonds 3D Embossing Folder (152702), Linen Thread (104199), Mini Glue Dots (103683), Paper Snips (103579), Stampin’ Seal (152813), Stampin’ Cut & Emboss Machine (149653)
Cutting & Scoring:
Very Vanilla Thick Card Stock – 8 ½” x 5 ½” – score at 4 ¼”
Very Vanilla Card Stock – 5” x 3 ¾”, 3” x 3”, and a scrap
Cajun Craze – 5 ¼” x 4” and 3” x 3”
Gilded Autumn Specialty Designer Series Paper – 3” x 3”
Linen Thread – 8”
Instructions:
Fold the 8 ½” x 5 ½” Very Vanilla Thick Card Stock in half at the score line.
Emboss the 5” x 3 ¾” Very Vanilla Card Stock with the Dainty Diamonds 3D Embossing Folder in the Stampin’ Cut & Emboss Machine.
Using Stampin’ Seal, afix the embossed sheet onto the 5 ¼” x 4” Cajun Craze Card Stock.
Adhere this piece to the Very Vanilla base.
Die cut the big leaf from the Gathered Leaves dies with the Gilded Autumn Specialty DSP, the Stitched Square from the 3” x 3” Very Vanilla, and a scallop square from the 3” x 3” Cajun Craze.
Layer the Very Vanilla square onto the Cajun Craze scallop square. Add die cut leaf using Glue Dots.
Place this layer onto the card front about 2” from the top of the card.
Stamp “Many Thanks” sentiment onto a scrap of Very Vanilla. Punch with Classic Label Punch.
Use Glue Dots to adhere the sentiment on top of the leaf, as shown in the photo above.
Tie the Linen Thread into a bow and place on the front of the card with a Glue Dot.
Thanks for stopping by today! Click on any of the graphics below to go directly to my online store. Please let me know if you have questions. If you aren’t already working with a Stampin’ Up! demonstrators, I’d love to help you with your paper crafting projects.
Welcome to the Stampin’ Friends September 2020 Blog Hop! I’m featuring a Halloween card and a project using Stampin’ Up!’s Little Treats.
Thanks for joining us. This month, the participating stampers focus on Halloween, fall, and outdoor greeting cards and projects. Visit all of the blogs and leave a comment. Look for a list of participating stampers after the information about the card and project.
I love this set’s versatility. It contains sentiments and images for Halloween, fall, Thanksgiving, Christmas, general treat giving, and even weddings/engagements/anniversaries.
The Little Treats Box Dies uses a 6 x 6 sheets of card stock. Run it through the Stampin’ Cut & Emboss Machine just once. It comes out in one piece, all ready to put together.
In addition to the Little Treats stamp set and dies, I used the following products:
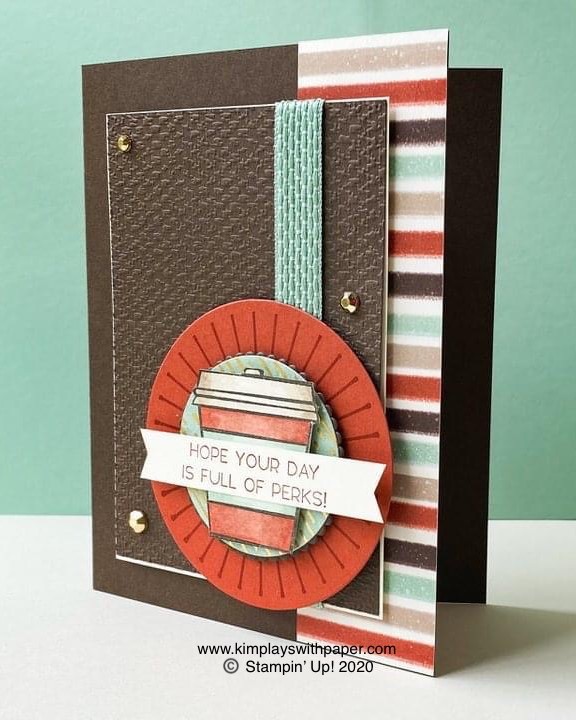
A fun combination of Gorgeous Grape and Pumpkin Pie.
The sparkly Black Glimmer Paper and Glittered Organdy Ribbon.
Cobwebs 3D Embossing Folder.
Stitched Shapes and Layering Circles Dies.
Pearl colored with Black Stampin’ Blends.
Thanks for stopping by. Please let me know if you have questions about these projects or any other stamping question.
Remember, visit all of the blogs to get a host of great papercrafting ideas.
OTHER – Layering Circles Dies (151770), Tasteful Textures 3D Embossing Folder (152718), Banners Pick a Punch (153608); Basket Weave & Metallic Ribbon Combo Pack (153553); Gilded Gems (152478; Stampin Cut & Emboss Machine (149653), Paper Trimmer (152392), Paper Snips (103579), Stampin’ Dimensionals (104430), Stampin’ Seal + (149699); Stampin’ Seal (152813)
Cutting & Scoring:
Early Espresso: 8 ½” x 5 ½”
score @ 4 ¼” and fold
Very Vanilla: 3 5¤16” x 4 9¤16”
Early Espresso: 3 ¼” x 4 ½”
Cajun Craze: 3 ¼” x 3 ¼”
Gilded Autumn (strip) DSP: 1 ½” x 5 ½”
Gilded Autumn (metallic strip) DSP: 2” x 2”
Early Espresso: 2” x 2”
Very Vanilla: 2 ¼”x 2”
Very Vanilla: 3 x ½”
Mint Macaron Basket Weave Ribbon: 6”
Instructions:
Attach striped DSP to card base with Seal.
Emboss (3 ¼” x 4 ½”) Early Espresso panel with Tasteful Textures folder and attach to Very Vanilla panel with Seal. Wrap ribbon around panel and attach with Seal+ on back of panel. Attach to card base with Dimensionals.
Die cut the Cajun Craze panel with the largest smooth circle from the Layering Circles Dies. Stamp the “ray’s stamp” in Cajun Craze Ink 2 times on the Cajun Craze circle die. Attach to card base with Dimensionals.
Die cut the 2” x 2” Early Espresso with the 5th largest scallop circle die. Die cut the 2” x 2” Gilded Autumn DSP with the 4th largest smooth circle die. Attach both dies together with Seal. Attach to Cajun Craze circle die with Dimensionals.
Stamp coffee cup in Early Espresso Ink on 2 ¼” x 2 Very Vanilla Cardstock and color with Stampin’ Blends (top = Crumb Cake; cup = Cajun Craze; center = Mint Macaron). Attach to DSP circle with Dimensionals.
Stamp greeting on ½” x 3 Very Vanilla Cardstock in Cajun Craze Ink, and punch both ends with the Banners Pick a Punch. Attach to coffee cup with Seal.
Attach three Gilded Gems to the card base.
Click on any of the graphics below to shop directly from my online store.
Featuring a Gilded Autumn thank you card with video.
For the last couple of weeks, I’ve been playing with all of the products in Stampin’ Up!’s Gilded Autumn Suite. I’m especially in love with the Gilded Autumn Specialty Designer Series Paper. Talk about gorgeous! Talk about hoarding material! The metallic highlights in select sheets make this 12 x 12 paper shine.
Today’s card features just one of the lovely sheets of this Designer Series Paper. Notice that the patterned paper covers the entire front of the card. Be sure to watch the video below for a tip on getting this panel on straight. Normally, I’ll put layers on the card front; they’re easier to line up and get straight. But this quick tip makes it so easy!
Get & Go Starter Kit Promotion
Do you have a long wish list of Stampin’ Up! products? (Who doesn’t with the two awesome catalogs?) Would you like to receive a discount on your future purchases?
In September, Stampin’ Up! is offering a great promotion. Purchase the Starter Kit for $99 + tax. Choose $125 worth of product from either catalog (and the clearance rack). It’s all shipped free.
In addition, receive free:
Queen Anne’s Lace stamp set;
So Much Love stamp set;
A package of Rhinestone Basic Jewels:
16 pre-cut papers packs to make 16 cards; and
A code to redeem for a free Paper Pumpkin kit.
When you purchase the Starter Kit, not only do you get future discounts on quality products, but you join an awesome group of crafty people who create awesome cards and projects. Don’t miss out on the fun!
Click here to begin the process. Or contact me (kimqskards@gmail.com), and I can help you get started.
Thanks for stopping by today! I appreciate you spending your time with me! Please let me know if I can help with you papercrafting questions.
Sign up for my newsletter and get a free tutorial!
Get Updates!
Join our mailing list to receive the latest updates from Kim!
You have Successfully Subscribed!
Current Catalogs
Follow Me
Categories
Disclaimer
The content in this blog is the sole responsibility of Kim Quade as a Stampin’ Up!® Independent Demonstrator. The use of and content of classes, services or products offered is not endorsed by Stampin’ Up!