Look at these super cute jungle animals included in Stampin’ Up!’s Silly Safari stamp set. I’ve had the best crafting experience playing with them and the sentiments. Find this adorable set in Stampin’ Up!’s 2025-2026 Annual Catalog on page 83. Combine it with the 1 7/8″ Circle Punch as a bundle and save 10 percent.
I thought it was fun to try to include all five creatures.
Measurements and Details
Cloud Cover cardstock base measuring 8 1/2 x 5 1/2, scored and folded at 4 1/4
Timeless Plaid 6 x 6 Designer Series Paper measuring 5 1/4 x 4
Animals stamped with black Memento ink on Basic White cardstock and colored with a variety of Stampin’ Blends
Images punched with the 1 7/8″ Circle Punch and a circle from the Stylish Shapes Dies
Neutral Matte Dots (Pecan Pie)
From birthday cards to thank you cards and baby cards, Silly Safari offers a really fun variety to help you celebrate a variety of occasions. And, they definitely have the cute factor.
How to Video
From my craft room in Mesa, Arizona, I share a handful of handmade card samples using Silly Safari and a variety of Stampin’ Up! papers, inks, and embellishments.
Thanks so much for visiting my blog. I hope you enjoy this project and the others in the video.
Need more inspiration? Subscribe to my free, email newsletter. I send three to four newsletters each month that include a paper crafting video, a card making tutorial, and updates to Stampin’ Up! news and specials. Click here to subscribe.
Kim Quade/ Stampin’ Up! demonstrator in Mesa, Arizona
Project Supply List
Click on any of the graphics below to shop for the products to create this card at home:
All week, I’ve been playing with Stampin’ Up!’s Silly Safari Photopolymer Stamp Set. I’m in love with the little jungle animals. Who can resist these sweet faces? And, the sentiments are perfect for creating and sending upbeat and cute cards.
Click on the links below to visit other blog posts featuring this stamp set.
Just too much fun creating with Stampin’ Up!’s Silly Safari stamp set. The images and sentiments lend themselves to some fun cards. Such cute jungle animals!
Click here to see another post where I share a super cute card.
In today’s post, I share four variations of the same card featuring the different animals. I use the same basic layout for all of the cards but switch out the colors and patterned papers.
The card the top of the post uses two of the brand-new 2025-2027 In Colors: Secret Sea and Cloud Cover. (Remember, through August 31, 2025-2027 In Color products are 15 percent off. This includes ink pads, refills, card stock, ribbon, gems, and Designer Series Papers.)
Measurements and Details
Cloud Cover cardstock base measuring 8 1/2 x 5 1/2, scored and folded at 4 1/4
Florals in Bloom 12 x 12 Designer Series Paper measuring 5 1/4 x 4
Cloud Cover cardstock die cut with the Textured Notes Dies
Basic White cardstock panel die cut with the Textured Notes Dies
Image and sentiment stamped in Memento. Leaves stamped in Garden Green.
Image colored with Cloud Cover Stampin’ Blends and Smoky Slate Stampin’ Blends
Linen Thread
2025-2027 In Color Flat Pearls
How sweet is this little monkey? This card uses the Timeless Plaid 6 x 6 Designer Series Paper with Pecan Pie cardstock.
This tiger card below uses the Celebratory Sips 12 x 12 Designer Series Paper with a Basic Black cardstock base.
And, lastly, here’s the giraffe. This card uses a piece of Garden Green patterned paper from the Regals 6 x 6 Designer Series Paper with a Crumb Cake card base.
How to Video
From my craft room in Mesa, Arizona, I give step-by-step directions for creating this card. In addition, I show a number of other samples using this cute stamp set.
Thanks so much for visiting my blog today. I hope you enjoyed these super cute cards.
Kim Quade/Stampin’ Up! demonstrator, Mesa, Arizona
Supply List
Click on any of the pictures below to shop for the products to create this card at home.
A customer asked me to create some cards for her using Stampin’ Up!s Silly Safari Photopolymer Stamp Set. Once I got started, I couldn’t quit. These jungle animals are just so stinkin’ cute.
In the next post or two, I’ll share some of my creations. Today’s card uses a go-to layout with the giraffe to create an upbeat thank-you card.
Click here to see another card using this layout with the Cheers & Sips stamp set. I love to adapt this layout using a variety of stamps, inks, sentiments, and patterned papers.
Measurements and Details
Basic Black cardstock base measuring 8 1/2 x 5 1/2, scored and folded at 4 1/4
Basic White cardstock panel measuring 5 1/4 x 4
Florals in Bloom 12 x 12 Designer Series Paper measuring 4 x 2 layered on Basic Black cardstock measuring 4 x 2 1/4
Circle die cut (Stylish Shapes Dies) from Timid Tiger cardstock.
Sentiment stamped in Timid Tiger cardstock.
Giraffe stamped in Memento ink and colored with Pecan Pie and Crumb Cake Stampin’ Blends
Leaves stamped in Garden Green ink and cut by hand
Linen Thread
2025-2027 In Color Flat Pearls (Timid Tiger)
I hope you enjoy this quick card! Please let me know if you have questions about this or any other paper crafting projects.
Kim
Project Supply List
Click on any of the graphics below to shop for the products to create this card at home.
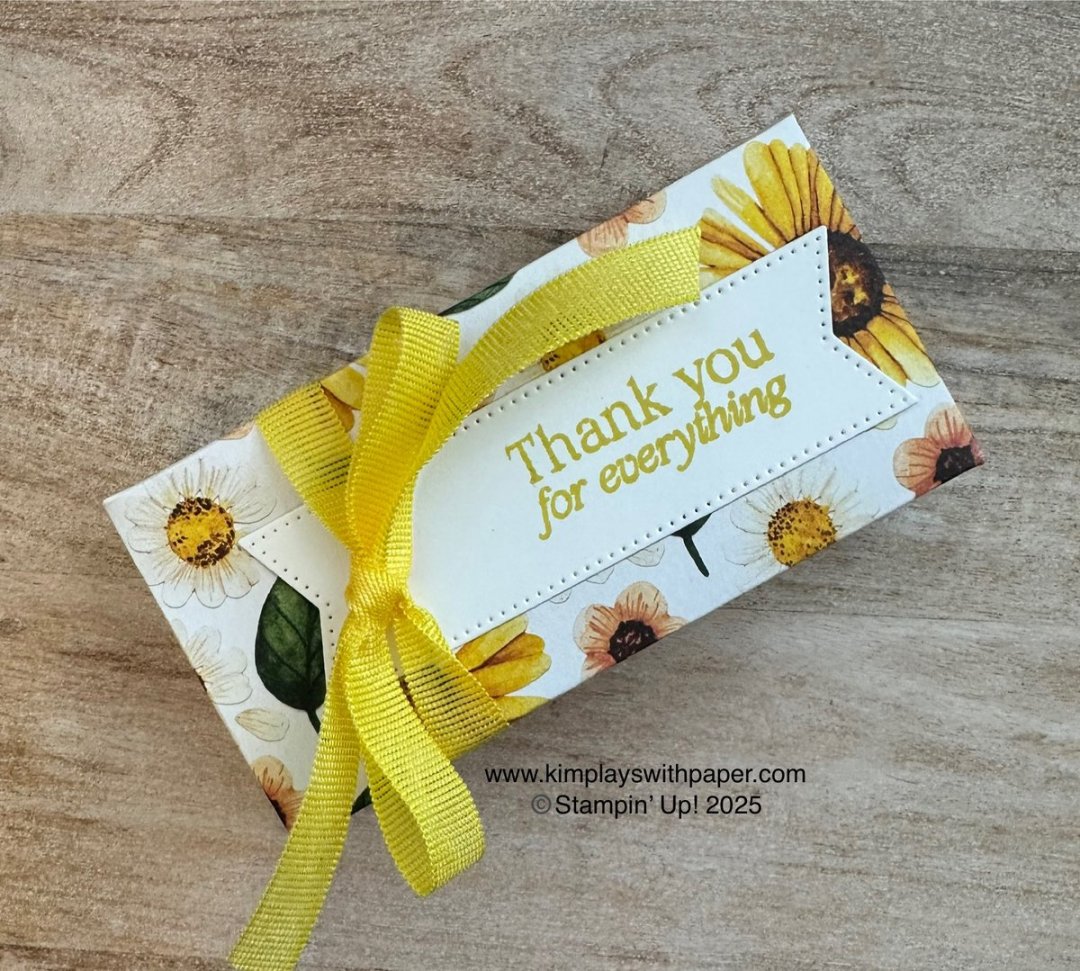
Sometimes you just need a quick little box to package a gift. Today, I show you a quick, easy-peasy gift box that uses one-third of a piece of 12 x 12 patterned paper. That means you can make three boxes from one sheet. The boxes are perfect for small treats such as lip balms, mini candy bars, three Lindt chocolates, and more.
Note: Stampin’ Up! shared the directions for this box during Creativity Now, an online demonstrator event held in June. I loved it so much I just had to share with all of you.
Measurements and Details
Paper measuring 11 x 4. For today’s featured card, I used the sunflower pattern from the Blooms Impressions Designer Series Paper. (Hint: This Designer Series Paper is currently 15 percent off as part of Stampin’ Up!’s August 2025 sale on In Color products. Click here to see what’s on sale.) In addition to Designer Series Paper, I experimented with two-tone card and also tried regular card stock.
On the 11-inch side, score at 3 inches, 4 inches, 8 inches, and 9 inches. On the 4-inch side score at 1 inch ad 3 inches.
Cut on the score lines on the 11-inch side. (Be sure to watch the video below to see how this box comes together.)
Adhere small tabs to create box.
Embellish any way you like. For this box, I used the Stylish Shapes Dies, a sentiment from Beautiful Motifs, Darling Duckling ink, and Darling Duckling ribbon.
This next sample uses products from Stampin’ Up!’s brand-new Peaceful Garden Suite Collection. It’s available for order beginning September 3 in the September-December 2025 Mini Catalog. Want to get your hands on some of the holiday orders BEFORE September 3? Purchase Stampin’ Up!’s Starter Kit and add holiday catalog items to your kit. Contact me for more information. Or, click here to join my team.
For this final sample, I grabbed a piece of Petunia Pop two-tone card stock and stamped it with the large flower from the Gallery Blooms stamp set as well as the sentiment from Simply Said and Petunia Pop ribbon.
I hope you give these boxes a try. They are so quick and easy and can be made with almost any patterned paper or card stock.
How-To Video
From my craft room in Mesa, Arizona, I offer step-by-step directions for creating this little box. I also share a variety of other samples.
Thanks so much for visiting my blog today. I appreciate you! Please let me know if you have questions about this or any other paper crafting project.
Kim Quade, Stampin’ Up! demonstrator, Mesa, Arizona
Supply List
Click on any of the graphics below to shop from my online store to purchase the products to create this box at home.
Sign up for my newsletter and get a free tutorial!
Get Updates!
Join our mailing list to receive the latest updates from Kim!
You have Successfully Subscribed!
Current Catalogs
Follow Me
Categories
Disclaimer
The content in this blog is the sole responsibility of Kim Quade as a Stampin’ Up!® Independent Demonstrator. The use of and content of classes, services or products offered is not endorsed by Stampin’ Up!