While in Raleigh, North Carolina, for Stampin’ Up!’s annual demonstrator gathering, I received a host of really fun swap cards. See that video by clicking here.
I really love a card I received from Cindy Westerink of Michigan. It uses a cutting technique I haven’t tried before. Today, I want to share that with you.
Here’s a look at Cindy’s card. She uses the awesome new Botanical Textures Suite Collection.
You can use this angle cut with a variety of patterned papers, card stock, rubber stamps, and dies. And, this technique helps you create three quick and easy cards. In addition, it shows off your pretty patterned paper and encourages you use your stash!
Measurements and Directions
Old Olive card stock base measuring 8 1/2 x 5 1/2, scored and folded at 4 1/4
Daffodil Delight card stock panel measuring 5 1/4 x 4
Three pieces of coordinating Designer Series Paper measuring 4 7/8 x 3 7/8. I used Stampin’ Up!’s Floral Delight Designer Series Paper. Be sure to watch the video below to see how I measured the paper to make the cuts.
Stamp the sentiment from Kindest Expressions stamp set onto a die cut circle from Stylish Shapes Dies with Daffodil Delight ink
Layer on a circle from the Spotlight on Nature Dies cut from Old Olive.
Add coordinating ribbon and gems.
Here’s a picture of the three cards created with this angle cut card technique.
How to Video
From my craft room in Mesa, Arizona, I offer step-by-step instructions for creating these angle cut card samples.
I enjoyed playing around with different patterned papers to see which ones worked best together. I hope you give this a try. Please let me know if you have questions about today’s DIY paper crafting project. I’d love to help.
Kim
Angle Cut Card Samples Supply List
Click on any of the graphics below to shop for the products to create these cards at home.
I just returned from Raleigh, North Carolina, where I attended Stampin’ Up!’s OnStage event, an annual gathering designed for Stampin’ Up! demonstrators. We received a copy of the 2025-2026 Annual Catalog (available for ordering May 6), saw stamping presentations, celebrated achievements, stamped a little, and gathered with friends from throughout the United States.
We also swapped our handmade greeting cards. I made 25 for an event and received 25 in return. Watch this video to see the cards I received.
Today, I share the card I created for the swap. This card features Stampin’ Up!’s Mixed Florals Photopolymer Stamp Set. Find it as one of the Online Exclusives.
Measurements and Details
Basic Black Card Stock base measuring 8 1/2 x 5 1/2, scored and folded at 4 1/4
Basic Black Card Stock panel measuring 4 3/4 x 3 1/2, die cut with the Perennial Postage Dies
Heat embossed the tulip image from the Mixed Florals Photopolymer Stamp Set with white on the above panel, as well as the sentiment (from the Beautiful Butterflies stamp set).
Petal Pink 3/8″ Scallop Ribbon
Low Profile Dots
I just love how this card turned out, and I hope you do, too.
Thanks so much for visiting my blog today. Please let me know if you have questions about this project or any other rubber stamping card projects. I can’t wait to help you in your paper crafting journey.
Kim
Mixed Florals Hello Card Supply List
Click on any of the graphics below to purchase the supplies needed to create this card at home.
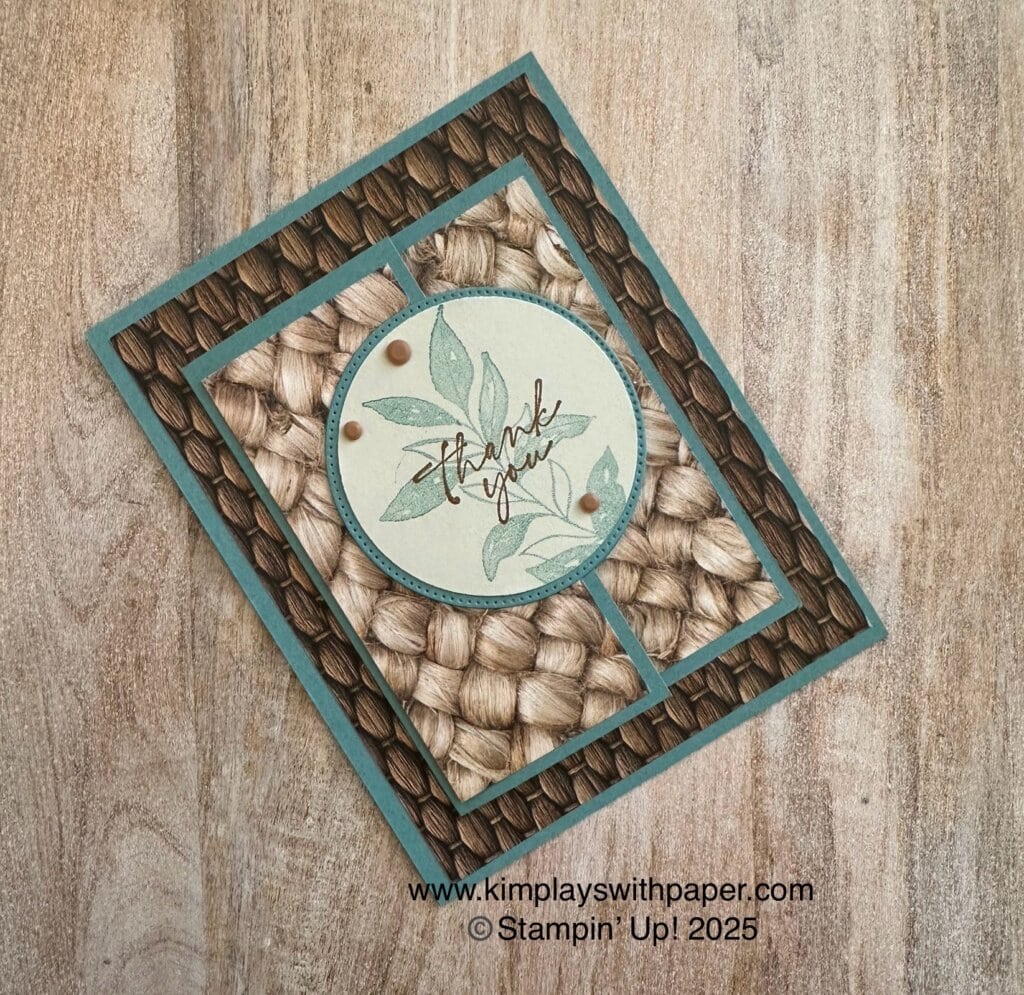
Earlier this month Stampin’ Up! released a new batch of paper crafting products. You seriously need to check out the Woven Textures 12 x 12 Designer Series Paper. The images are so life like. Although this patterned paper and the Textured Notes Bundle are perfect for any occasion, it works really well for those masculine themed cards.
Check out this post for a free tutorial using these products.
Measurements and Details
Lost Lagoon card stock base measuring 5 1/2 x 4 1/4
Woven Textures Designer Series Paper measuring 5 1/4 x 4
Lost Lagoon card stock measuring 5 1/4 x 4 1/4, scored at 3 1/4
Woven Textures Designer Series Paper measuring 4 x 1 and 4 x 1 3/4
Lost Lagoon and Basic Beige circles cut with 2 3/8 circle punch and Stylish Shapes Dies
Lost Lagoon and Pecan Pie Stampin’ Pad
Neutral Matte Dots
Here’s what the inside of the card looks like:
Here’s another of the fun fold samples. This time, I used the Mixed Media Florals Suite.
Here’s the inside:
I hope you’ve enjoyed this Textured Notes Fun Fold. Give it a try!
What do you do when you get new paper crafting products? Me? I go crazy creating, trying to exhaust all of the possibilities for that collection of products.
Today, I show a variety of cards I’ve made with the Mixed Media Florals Suite Collection. This collection is mega; it includes two stamps, two coordinating die cut sets, Designer Series Paper, an embossing folder, and embellishments. Click here to see all of the elements in the online store. You’re not required to buy the entire suite; all of the elements can be ordered individually, as well.
Below, I share some basic measurements and directions to create the card featured at the top. I follow with a few other samples. Be sure to watch the included video to see a host of inspiration not pictured in this post.
Measurements and Details
Smokey Slate card stock base measuring 8 1/2 x 5 1/2, scored and folded at 4 1/4
Petal Pink card stock panel measuring approximately 5 1/4 x 4, die cut with largest Textured Notes Die
Smokey Slate card stock panel measuring approximately 5 x 3 3/4, die cut with second largest Textured Notes Die
Country Bouquet (Petal Pink design) Designer Series Paper measuring approximately 4 1/2 x 3 1/2, die cut with third largest Textured Notes Die
Image stamped directly onto Designer Series Paper with Memento ink.
Sentiment stamped in Memento ink on Smokey Slate card stock die cut with long Textured Notes Die.
Neutral Matte Dots
Here’s another with the same design, with the colors reversed. Includes white heat embossing.
Below, I carry through with the white heat embossing, this time on Night of Navy.
And, one more! I used Stampin’ Blends to color the tulip image. Do you spot the new Textured Notes Dies and the Pattern of Friendship Die?
How to Video
From my craft room in Mesa, Arizona, I show a variety of samples using the Mixed Florals Suite Collection. And, I give step-by-step directions for making the first card featuring in the post.
I hope you’ve enjoyed today’s card samples. Click here to get a free tutorial to create a card using this suite of products.
Thanks for stopping by today.
Kim
Project Supply List
Click on any of the pictures to shop for the products to create this handmade card (featured at the top) at home.
From the outside, this looks like just an ordinary square card. But open it up for a surprise inside! In today’s post, I share the cutting directions, supply list, and a video showing you how to create this Mixed Florals fun fold. (Fun fold inspired by the West Coast Papercrafter.)
Petal Pink card stock measuring 8 1/2 x 8 1/2. Score on both sides at 4 1/4 and score diagonally on both sides/
Mixed Media Florals 12 x 12 Designer Series Paper: three pieces measuring 4 x 4
Basic White card stock measuring 4 x 4
Smaller pieces of DSP, if desired, for embellishments
Die cut circle from Spotlight on Nature Dies
Front image stamped with Memento ink and colored with Daffodil Delight, Smoky Slate, Petal Pink and Mossy Meadow Stampin’ Blends
Inside sentiment from Beautiful Butterflies stamp set stamped in Petal Pink ink.
Petal Pink & White Diagonal Ribbon — about 20 to 22 inches
Low Profile Dots
Here’s what the inside of this fun fold card looks like:
How to Video
Be sure to watch this video (a Facebook live replay from 3/4/2025) to see how this card comes together. From my craft room in Mesa, Arizona, I offer step-by-step instructions for creating this DIY fun fold.
I hope you enjoy this card and video. I appreciate you stopping by! For more inspiration, subscribe to my free, email newsletter. I send three to four newsletters each month that include a card making tutorial, a paper crafting video, and updates to Stampin’ Up! news and specials. Click here to subscribe.
Kim
Mixed Florals Fun Fold Supply List
Click on any of the graphics below to shop for the products to create this card at home:
Sign up for my newsletter and get a free tutorial!
Get Updates!
Join our mailing list to receive the latest updates from Kim!
You have Successfully Subscribed!
Current Catalogs
Follow Me
Categories
Disclaimer
The content in this blog is the sole responsibility of Kim Quade as a Stampin’ Up!® Independent Demonstrator. The use of and content of classes, services or products offered is not endorsed by Stampin’ Up!