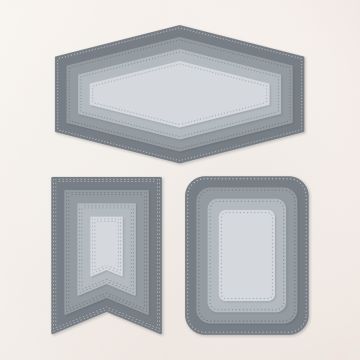
For my monthly in-person classes in my home in Meza, Arizona, I love to give every participant a treat packet. In September, I created this cute Halloween treat packet using Stampin’ Up!’s Nested Essential Dies, the Mini Alphabet Dies, and some Halloween Dies. No stamping here!
The elongated hexagon-shaped dies reminded me of a coffin, so I created a design that allowed me to include a chocolate treat.
Here’s what the treat packet looks like from the side. It fits a Fun-Size candy bar.
Measurements and Details
Here are a few details to help you make this packet at home:
Die cut the largest hexagon shape from the Nested Essentials Dies with Basic Black cardstock.
Use the second largest hexagon shape from the Nested Essentials Dies to cut a shape from the Spooky Sweet 12 x 12 Designer Series Paper (grey pattern)
Die cut letters using the Mini Alphabet Dies. (I recommend using Adhesive Sheets.)
Die cut two bats and one spider from the Spooky Halloween Dies and the Fright Night Dies in Basic Black
I added a Black & Gold Ribbon
The “kickstand” and candy bar hold measures 1 x 8 and is scored at 4 inches and 5 inches. Be sure to watch the video below to see how this treat packet comes together.
How to Video
Isn’t this packet super fun? Let me know if you have questions about it or any other stamping project. I’m happy to help.
Thanks so much for visiting my blog today!
Kim Quade, Stampin’ Up! demonstrator in Mesa, Arizona
Project Supply List
Click on any of the graphics below to shop for the products to make this treat packet.
Welcome to Team Stamp It’s September Blog Hop! Thanks so much for joining us. This month, we feature cards and projects designed for Halloween. Be sure to visit all of the blogs on the hop to gain a host of inspiration for your Halloween crafting. Leave a comment on each. You have a chance to win the Birthday Sparkle Kit.
My card features Stampin’ Up!’s Everyday Arches Dies, the Spooky Sweet 12 x 12 Designer Series Paper, and the die cut from the Fright Night Dies. Isn’t it super cute?
Measurements and Details
Here are some details to help you get started:
Petunia Pop cardstock base measuring 8 1/2 x 5 1/2, scored and folded at 4 1/4
Basic Black cardstock panel measuring 5 1/4 x 4
Spooky Sweet 12 x 12 Designer Series Paper measuring 5 x 3 3/4
Basic Black and Basic White cardstock for the Everyday Arches die cuts
Basic Black cardstock for the “Boo” sentiment. I recommend using Adhesive Sheets on the cardstock before die cutting.
Petunia Pop 1/4-inch Iridescent Ribbon
White Baker’s Twine
Neutral Matte Dots (black)
Googly Eyes!
I hope you love this project.
Remember to visit all of the participating stampers. Leave a comment and have a chance to win a Birthday Sparkle Kit.
Congrats to last month’s winner: Vicki Sewell.
Thanks so much for visiting my blog today! Need more inspiration? Subscribe to my free, email newsletter. I send three to four newsletters each month that include a card making tutorial, a paper crafting video, and updates to Stampin’ Up! news and specials. Click here.
Participating Blogs
Click on the links below to visit the other blogs on the hop.
Supply List
Click on any of the graphics below to shop for the products to create this card at home:
Halloween lovers take note! Today, I’m sharing a fun Halloween card using a fun fold — the gate fold with a belly band. In addition, I use a fun element called a “wobble.” Be sure to watch the video below to see how this card comes together and how the wobble works.
Basic Black cardstock base measuring 8 1/2 x 5 1/2 scored on each of the long ends at 2 1/8
Two pieces of Spooky Sweet 12 x 12 Designer Series Paper measuring 5 1/4 x 1 7/8
Stylish Shape circle die cut from Spooky Sweet DSP
Haunted House die cut from Basic Black card stock (backed with Daffodil Delight card stock)
Bats, spiders, and spider webs die cut from Basic Black card stock (it helps to use adhesive sheets on the back of the card stock).
Belly Band created from Basic Black Two-Tone card stock measuring 9 1/2 x 1 1/4
Basic White panel measuring 5 1/4 x 4 for the inside
Sentiment stamped with Pumpkin Pie ink
This is what the card looks like when it’s open:
How to Video
From my craft room in Mesa, Arizona, I offer step-by-step instructions for creating this Halloween gate fold card.
Thanks so much for visiting my blog today. I hope you enjoyed this card. Please let me know if you have questions about this creation or other Stampin’ Up! paper projects.
Kim Quade, Stampin’ Up! demonstrator in Mesa, Arizona
Project Supply List
Click on any of the graphics below to shop for the products to create this card at home.
Welcome to the October Stampers Dozen Blog Hop! Thanks so much for joining us! Be sure to visit all of the participating stampers. See the list of links near the bottom of this post.
This month, we feature handmade cards and projects created with the color combination of Black, Gorgeous Grape, and Pumpkin Pie.
See this post for another card that uses this Halloween-themed paper.
I paired this patterned paper with Stampin’ Up!’s Choose Happy Stamp Set. This set contains a variety of words and images geared toward all four seasons.
Choose Happy Halloween Card
Here are some details to help you get started:
Gorgeous Grape Card Stock base measuring 8/12 x 5 1/2, scored and folded at 4 1/4
Basic White Card Stock panel measuring 5 1/4 x 4
Eight pieces of Halloween Spells 12 x 12 Designer Series Paper measuring 1 1/4 x 1 1/4
Basic Black Card Stock measuring 2 1/2 x 2 1/2
Basic White Card Stock measuring 2 3/8 x 2 3/8
Create word block and pumpkin image with stamps from the Choose Happy Stamp Set
Stamp pumpkin and sentiment with Memento Black ink. Color pumpkin with Pumpkin Pie and Granny Apple Green Stampin’ Blends.
Adhesive-Backed Sparkle Gems
This is a super fun layout. Try it with other Designer Series Paper and stamp sets.
Here’s a Thanksgiving card using Stampin’ Up!’s Changing Leaves Bundle and the Splendid Autumn 6 x 6 Designer Series Paper
How to Video
In this Facebook live replay (10/15/2024) from my craft room in Mesa, Arizona, I offer step-by-step directions for creating this card.
Thanks so much for visiting my blog today! I hope you love this project and “sketch.” Please let me know if I can help you in your paper crafting journey.
Kim
List of Participating Stampers
Be sure to visit all of the blogs on the hop. Click on any of the links below to gain inspiration for your personal paper crafting.
Project Supply List
Click on any of the photos below to shop for the supplies to create this cute card at home.
When I hold my monthly in person stamping classes in my home in Mesa, Arizona, I love to give each stamper a fun treat packet.
This month, I created these cute little Boo! treat packets as my gift to them. I used the Alphabet A’ La Mode Dies. The dies let you spell any sentiment you want. And, once upon a time, Stampin’ Up! sold the clear boxes that measure about 3 1/4 x 3 1/4. I found some extras in my stash and decided to create something fun for Halloween. And, I filled them with Reese’s Peanut Butter ghosts!
These DIY treat boxes are perfect for those special trick or treaters, kids, nieces, nephews, and grandkids, too!
If you don’t have access to these clear boxes, the current Scalloped Gift Card Boxes would work, as well.
Alphabet A’ La Mode for Halloween Treat Box
Here are a few details and measurements to help you get started:
Alphabet A’ La Mode Dies with Granny Apply Green, Pumpkin Pie, and Gorgeous Grape card stock. Tip: Apply Adhesive Sheets to the back of the card stock before die cutting. I die cut all the pieces and then mixed and matched the letters.
Basic Black card stock die cut with circle from the Stylish Shapes Dies.
Black & Very Vanilla 3/8″ Large Check Ribbon colored with Stampin’ Blends. I used both Gorgeous Grape and Pumpkin Pie.
Gems: The Gorgeous Grape gems from the Glossy Dots Assortment work, as do the Granny Apple Green gems from the Iridescent Adhesive-Backed Discs.
I hope you enjoy these cute little Halloween treat boxes. I know my stampers appreciated them this month.
Do you love this Halloween Spells Designer Series Paper? See another post here to view a Halloween card fun fold.
Thanks so much for visiting my blog today. Please let me know if you have questions about this or any other stamping projects.
Need more inspiration? Subscribe to my free email newsletter. I send three to four newsletters each month that include a free paper crafting video, a card making tutorial, and updates to Stampin’ Up!, news, specials, and events. Click here to subscribe.
Kim
Project Supply List
Click on any of the pictures below to shop for the paper crafting products to create this Alphabet A’ La Mode for Halloween project at home.
Sign up for my newsletter and get a free tutorial!
Get Updates!
Join our mailing list to receive the latest updates from Kim!
You have Successfully Subscribed!
Current Catalogs
Follow Me
Categories
Disclaimer
The content in this blog is the sole responsibility of Kim Quade as a Stampin’ Up!® Independent Demonstrator. The use of and content of classes, services or products offered is not endorsed by Stampin’ Up!